Multi Camera Control - Controlling multiple cameras from a smartphone via Wi-Fi
With Imaging Edge Mobile, you can use a smartphone to control multiple cameras. There are two ways to connect: using just a smartphone and cameras (group owner method), or using an access point (access point method).
Supported cameras: DSC-RX0, DSC-RX0M2
- Multi camera control combined with RX0 and RX0M2, or combined with Action Cam, is not available.
Access Point Method: Connecting for Multi Camera Control
The smartphone and all cameras are connected to and communicate through an access point Wi-Fi. Up to 50 cameras can be controlled.
- When using DSC-RX0, camera system software (firmware) ver.2.00 or later is required.
- To control six or more cameras with DSC-RX0M2, Imaging Edge Mobile 7.2 or later is required.
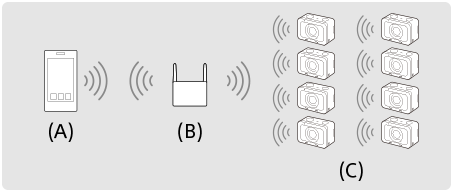
- (A) : Smartphone
- (B) : Access point
- (C) : Cameras (clients)
See each Help Guide for how to connect. <DSC-RX0> <DSC-RX0M2>
After connecting and launching Imaging Edge Mobile, select ![]() in the top right corner,
then [Settings], and turn on [Connect w/ camera via access point].
in the top right corner,
then [Settings], and turn on [Connect w/ camera via access point].
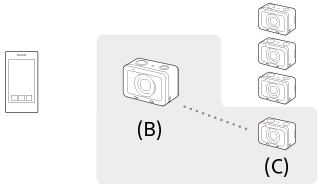
Group Owner Method: Connecting for Multi Camera Control
One of the cameras is set as the “group owner” and connected to the smartphone via Wi-Fi. The other cameras are set as “clients” and connect to the group owner via Wi-Fi. You can control up to five cameras.
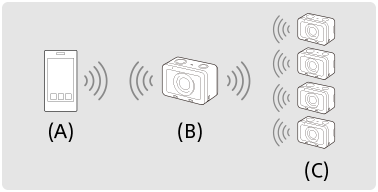
- (A) : Smartphone
- (B) : Group owner
- (C) : Clients
Multiple connections
-
On the camera that you want to connect as the group owner, select MENU >
 (Network) > [Ctrl w/ Smartphone] and set as follows.
- [Ctrl w/ Smartphone] : [On]
- [
 Connection Type] : [Multi (Group Owner)]
-
Connect the smartphone and the group owner as follows.
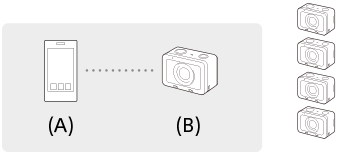
- (A) : Smartphone
- (B) : Group owner
-
2.1. On the group owner, select [Ctrl w/ Smartphone] > [
Connection Info.].The QR Code and SSID for multiple connections will be displayed.
-
2.2. Connect by scanning the QR Code on the monitor of the group owner with Imaging Edge Mobile.
Once the camera is connected as the group owner,
 is displayed in white on the shooting screen of the camera.
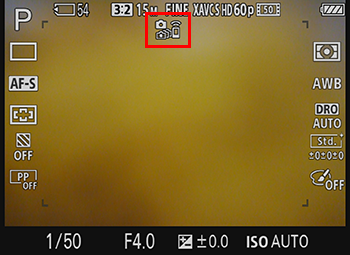
-
On a camera that you want to connect as a client, select MENU >
(Network) > [Ctrl w/ Smartphone] and set as follows.- [Ctrl w/ Smartphone] : [On]
- [Connection Type] : [Multi (Client)]
If the camera has been connected as a client before, the camera will connect to the previous group owner automatically.
If you are connecting the camera as a client for the first time, or if the camera cannot be connected to the previous group owner, you need to set the access point. Perform the following procedure. -
Connect the group owner and the client as follows (only when connecting for the first time).
- (B) : Group owner
- (C) : Clients
-
4.1. On the client, select [Access Point (Client)] > [WPS Push].
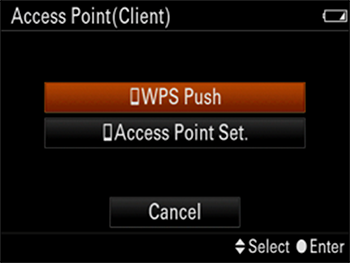
If the screen above does not appear, display it by selecting MENU >
(Network) > [Ctrl w/ Smartphone] > [Access Point (Client)] > [OK].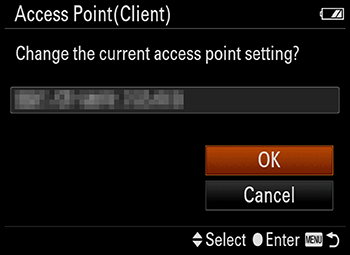
-
4.2. On the group owner, select MENU >
(Network) >
[Ctrl w/ Smartphone] > [WPS Push].While the MENU screen is displayed, the smartphone and the group owner or client will be disconnected temporarily. The connection will be reestablished automatically when you return to the shooting screen.
-
4.3. When the SSID of the group owner is displayed on the monitor of the client, select [OK] on the client.
Once the camera is connected as a client,
 is displayed in white on the shooting screen of the camera.
-
If the message [Continue to add client camera?] appears on the monitor of the group owner, select either of the following.
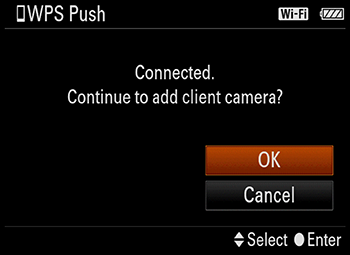
- If you want to add more clients, select [OK] and repeat Steps 3 to 4.3.
- When you have finished connecting all the clients, select [Cancel] to return the group owner to the shooting screen.
To establish multiple connections after the first time
- If you set the same camera as the group owner, you can establish connections with the same settings as the last time.
To check the group owner
- On a client, select MENU > (Network) > [Ctrl w/ Smartphone] > [Access Point (Client)].
If you have changed the group owner, or if you have performed [SSID/PW Reset] or [Edit Device Name]
- Reestablish the connections between the smartphone and the group owner, and between the group owner and the clients.
Note
- Wi-Fi connections are not available under water.
- Live view images may not be displayed smoothly on the screen of the smartphone depending on the surrounding radio wave condition or smartphone performance.
- When [Ctrl w/ Smartphone] is set to [On], the camera’s battery is drained more quickly. Set it to [Off] when you are not using the [Ctrl w/ Smartphone] function.
- While MENU is in operation, the Wi-Fi function is temporarily deactivated. If you exit MENU within a certain period of time, the connection will be reestablished automatically.