ILCE-9 / ILCE-7RM3 / ILCE-7RM3A / ILCE-7M3
Customization guide
Practice
This page introduces examples of customization, along with shooting scenarios. Use them as a reference according to your preferences and shooting style.
1. How to separate autofocusing from the shutter release (AF On)

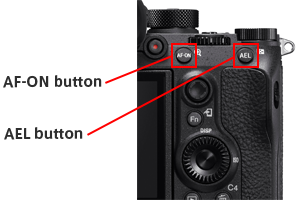
Operate the shutter button with your index finger, and the AF-ON button with your thumb.
You can control autofocusing and the shutter release independently, instead of activating the autofocus function by pressing the shutter button halfway down. Generally, this method is called "back-button AF," since the autofocus function is activated using a button on the back side of the camera. This method is helpful in the following situations.
- When you want to focus at a specific shooting distance predicting the position of the subject
- When you don’t want to hold the shutter button halfway down for a long period of time
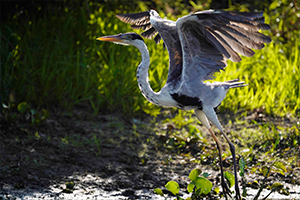
- When you want to prioritize the shutter release timing, such as when shooting a bird taking off
- When you want to control the AF function and the AE function separately
If the subject is moving, set [Focus Mode] to [AF-C]. While the AF-ON button is pressed and held, the camera keeps focusing on the subject continuously. You can release the shutter exactly at your desired timing.
If the subject is static, set [Focus Mode] to [AF-S]. Once you press the AF-ON button, the focus is locked unless you press it again. You can capture the best shot of the subject with the focus locked.
| Advance preparation | MENU →  1 → [AF w/ shutter] → [Off] 1 → [AF w/ shutter] → [Off] |
|---|---|
| MENU → 1 →[Pre-AF] → [Off] |
|
| [Focus Mode]: For moving subjects, set to [AF-C]. For static subjects, set to [AF-S]. | |
| If you want to assign the [AF On] function to a button other than the AF-ON button, select MENU → 2 → [Custom Key] → desired button → [AF On]. |
|
| Shooting | For a moving subject, press and hold the AF-ON button. For a static subject, press the AF-ON button once. |
2. How to shoot a subject to which the Eye AF function can be applied (a subject that is detectable as a face)
The Eye AF function works for both portrait photography and sports photography, as long as a face occupies a certain part of the image. Although this function is assigned to the center button of the control wheel as a default, you can reassign the function to the desired button, such as the focus hold button on the lens, the AF-ON button, or the AEL button.
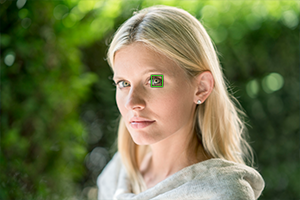
The Eye AF function is most effective in portrait shooting. Since the shutter release is controlled by your right hand, you can perform the shutter release and focusing separately with your right and left hands by assigning the Eye AF function to the focus hold button.
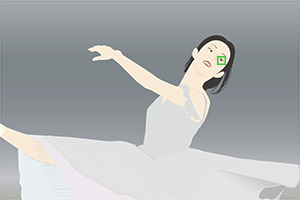
The Eye AF function also works when the subject is moving. If you set [Focus Mode] to [AF-C], the camera will track the eyes while the subject moves. As long as the eyes are detected, a green frame is displayed around the eyes while you press and hold the button to which the Eye AF function is assigned.
| Advance preparation | MENU → 2 → [Custom Key] → [Focus Hold Button] →[Eye AF] |
|---|---|
| [Focus Area]: [Wide] | |
| Shooting | When the Eye AF function is available, use Eye AF. Otherwise, use a wide focusing area, which is more versatile for general shooting. |
3. How to switch between multiple focus-area settings instantly ([Reg Cust Shoot Set])
The [Reg Cust Shoot Set] (Register Custom Shooting Setting) function is recommended for switching instantly between focus-area settings according to the state of the subject. It is useful under continuously changing shooting conditions, such as sports photography. There are three buttons — the AF-ON button, the AEL button, and the focus hold button on the lens — that can be operated without changing your holding position. You can improve the overall operability of the camera by assigning functions appropriately to these buttons according to the shooting situation.
3-1. Example of primarily using [Expand Flexible Spot], combined with a wide focus area for more versatile use
- [Focus Area]: [Expand Flexible Spot]
- AF-ON button: Assign [Lock-on AF * :Expand Flexible Spot].
- AEL button: Assign [Wide].
* If the ILCE-9 system software is Version 5.00 or higher, [Lock-on AF] is referred to as [Tracking].
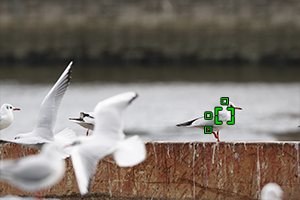
A
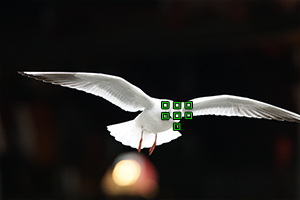
B
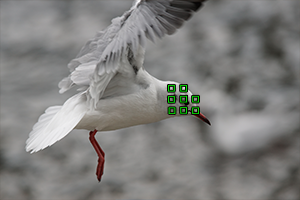
C
This is an example of combining [Expand Flexible Spot] with [Wide]. When you aim at a certain bird in the flock, use [Expand Flexible Spot] (A). When the target bird is moving, use [Lock-on AF:Expand Flexible Spot] with the AF-ON button (B). You can switch the focus area to [Wide] instantly by pressing the AEL button even if flying birds come into the frame suddenly (C).
| Advance preparation | MENU → 2 → [Custom Key] → [AF-ON Button] → [Recall Custom hold 1] → Set [Focus Mode] to [Continuous AF], and [Focus Area] to [Lock-on AF:Expand Flexible Spot] → [Register]. |
|---|---|
| MENU → 2 → [Custom Key] → [AEL Button] → [Recall Custom hold 2] → Set [Focus Area] to [Wide] → [Register]. |
|
| MENU → 1 → [AF w/ shutter] → [On] The [AF On] function is not used in this shooting method. |
|
| [Focus Mode]: [AF-C] | |
| [Focus Area]: [Expand Flexible Spot] | |
| Shooting | The camera uses [Expand Flexible Spot] if no button is pressed. The camera uses [Lock-on AF:Expand Flexible Spot] if the AF-ON button is pressed and held. The camera uses [Wide] if the AEL button is pressed and held.
|
3-2. Example of combining [Eye AF] with [Expand Flexible Spot]
- [Focus Area]: [Expand Flexible Spot]
- AF-ON button: Assign [Eye AF].
- AEL button: Assign [Lock-on AF * :Expand Flexible Spot].
* If the ILCE-9 system software is Version 5.00 or higher, [Lock-on AF] is referred to as [Tracking].
A
B
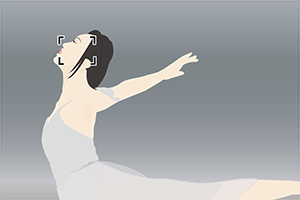
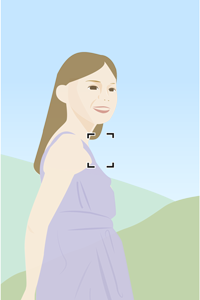
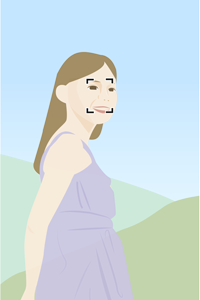
This is an example of combining [Eye AF] with [Expand Flexible Spot]. When the [Eye AF] function is available, use [Eye AF] with the AF-ON button (A). When the [Eye AF] function is not available because the subject is turned sideways, etc., use [Expand Flexible Spot] or [Lock-on AF:Expand Flexible Spot] according to the state of the subject (B).
| Advance preparation | MENU → 2 → [Custom Key] → [AF-ON Button] → [Eye AF] |
|---|---|
| MENU → 2 → [Custom Key] → [AEL Button] → [Recall Custom hold 1] → Set [Focus Area] to [Lock-on AF:Expand Flexible Spot]. → [Register] |
|
| MENU → 1 → [AF w/ shutter] → [On] The [AF On] function is not used in this shooting method. |
|
| [Focus Mode]: [AF-C] | |
| [Focus Area]: [Expand Flexible Spot] | |
| Shooting | When the [Eye AF] function is available, activate [Eye AF] using the AF-ON button regardless of the movement of the subject. When the [Eye AF] function is not available, use [Expand Flexible Spot] for static subjects, and use [Lock-on AF:Expand Flexible Spot] by pressing the AEL button for moving subjects. |
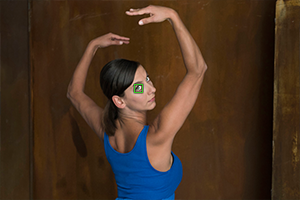
4. How to focus on a frequently used specific position ([AF Area Regist.])
In sports photography or portrait photography, when you shoot images with the same composition frequently, you can move the focusing frame to a specified position instantly by pressing a single button ([AF Area Regist.]). If you often focus on the center of the image, [Focus Standard] is recommended.
In portrait shooting, set the focusing position to the upper part of the monitor so that you can start shooting quickly.
| Advance preparation | 1. MENU → 1 → [AF Area Regist.] → [On] 2. Set [Focus Area] to the desired position, and then hold down the Fn button. 3. MENU → 2 → [Custom Key] → Select the desired key for assignment. → [Regist. AF Area hold], [Regist AF Area tggle], or [Reg. AF Area+AF On]. |
|---|---|
| Shooting | Shoot the image while pressing down the assigned key (or after you press the key). The registered focusing area will flash. |
| Advance preparation | MENU → 2 → [Multi-Slc Center Btn] → [Focus Standard] |
|---|---|
| Shooting | Press the center of the multi-selector. When [Wide] is selected, the camera focuses on the center of the monitor and the focus is locked. When [Flexible Spot] is selected, the focusing frame returns to the center. |
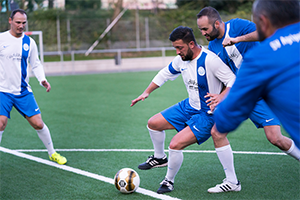
5. How to shoot a subject moving only laterally (or vertically)
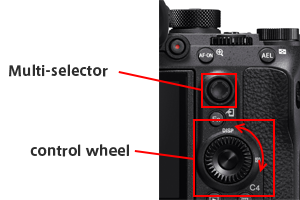
Generally, the multi-selector is used to move the flexible spot in order to focus on the subject. But if the subject is moving only in the lateral direction (or vertical direction), you can move the flexible spot precisely in just the lateral direction (or vertical direction) by turning the control wheel instead of using the multi-selector.
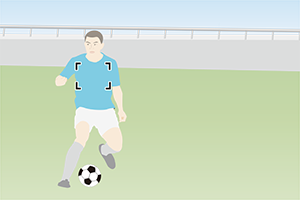

You can move the spot quickly along with the player by turning the control wheel.
| Advance preparation | MENU → 2 → [Custom Key] → [Control Wheel] → [Move AF Point:L/R (or U/D)] |
|---|---|
| [Focus Area]: [Flexible Spot] or [Expand Flexible Spot] | |
| Shooting | Turn the control wheel to move the flexible spot in the lateral direction (or vertical direction). |
6. How to change the shutter speed temporarily ([Reg Cust Shoot Set])
This method is convenient when you want to change the shutter speed temporarily, such as to shoot an electrical scoreboard* as a note in sports photography. This method is also helpful for changing settings other than the shutter speed temporarily. Assign the setting to a key that you can press and hold while shooting images.
*The characters on the scoreboard will be partially broken if you capture it at a high shutter speed.
| Advance preparation | MENU → 2 → [Custom Key] → desired key for recalling → [Recall Custom hold 1-3] → Set the shooting mode to [Shutter Priority] or [Manual Exposure], and the shutter speed to about 1/60 seconds. → [Register] |
|---|---|
| Shutter speed: A high speed such as 1/1600 second | |
| Shooting | Shoot sports scenes at a high shutter speed such as 1/1600 second. Press and hold the assigned key to switch the shutter speed to 1/60 second only when shooting the electrical scoreboard. |
7. How to set the focus area when you switch the camera’s orientation between vertical and horizontal frequently ([Swt. V/H AF Area])
You can choose whether to switch [Focus Area] and the position of the focusing frame according to the orientation of the camera (horizontal/vertical). If you want to switch the camera’s orientation frequently, [AF Point Only] is recommended. [AF Point Only] is useful when the subject is approaching the camera and you are holding the camera vertically. It allows you to switch the focusing frame position quickly according to the scene.
| Advance preparation | MENU → 1 → [Swt. V/H AF Area] → [AF Point Only] Determine the position of the focusing frame while the camera is horizontal. 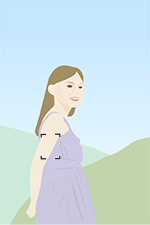 When the orientation of the camera is vertical, the focusing frame deviates from the subject.  Adjust the position of the focusing frame. |
|---|---|
| Shooting |
You can move the focusing frame to a preset position according to the orientation of the camera (horizontal/vertical). |
8. How to shoot telephoto images by changing the angle of view (APS-C/Super 35mm)
The ILCE-9 / ILCE-7RM3 / ILCE-7RM3A / ILCE-7M3 is equipped with a full-frame image sensor. However, if you intentionally shoot images in the APS-C-equivalent size, the angle of view will become narrower. This makes the recorded image look as if it were shot with a telephoto lens without actually changing the lens. Although the pixel count and file size become smaller, you can shoot RAW images or select a focus area, unlike with the digital zoom.
You can set this function from 1 in MENU. However, it is recommended that you assign the function to a custom key such as the C4 button if you will be using it frequently.
| Advance preparation | MENU → 2 → [Custom Key] → Select the desired key for assignment. → [APS-C S35/Full Frm Sel.] |
|---|---|
| Shooting | You can switch between the 35-mm full-frame image size and the APS-C-equivalent size by pressing the assigned key. |
| Advance preparation | MENU → 2 → [Custom Key] → Select the desired key for assignment. → [APS-C/Super 35mm] |
|---|---|
| Shooting | Press the assigned key, and then [On].
|
9. How to turn the brightness level/overexposure indication on or off (Zebra)
The camera displays a zebra pattern over part of the image if the brightness level meets the IRE level that you have set. You can turn the zebra display on or off quickly.
*For the ILCE-9, this function can be used if the camera's system software (firmware) is Ver. 5.00 or later.
| Advance preparation | 1. Configure the zebra level beforehand using MENU → 2 → [Zebra Setting] → [Zebra Level]. 2. MENU → 2 → [Custom Key] → Select the desired key for assignment. → [Zebra Display Select] |
|---|---|
| Shooting | You can turn the zebra display on or off by pressing the assigned key.
|
10. How to magnify the image in the manual focus mode when using a lens from another manufacturer, etc.
When using an A-mount lens, a manual focus lens, or a lens from another manufacturer, you can magnify the image quickly by assigning [Focus Magnifier] to a custom key.
We recommend assigning it to an easy-to-operate button such as the AF-ON button. If you often move the magnification position away from the center, we recommend assigning the function to the center of the multi-selector or the center of the control wheel.
| Advance preparation | MENU → 2 → [Custom Key] → Select the desired key for assignment. → [Focus Magnifier] |
|---|---|
| Shooting | The focus magnification scale switches every time you press the assigned key. To return the magnification position to the center, press the C4 (Delete) button. |
11. How to turn the peaking display on/off in the manual focus modes
You can turn the peaking display on or off quickly while shooting in the manual focus (MF) or direct manual focus (DMF) mode. We recommend assigning the function to an easy-to-operate button, such as the AF-ON button.
*For the ILCE-9, this function can be used if the camera's system software (firmware) is Ver. 5.00 or later.
| Advance preparation | 1. Configure the peaking level and color beforehand using MENU → 1 → [Peaking Setting]. 2. MENU → 2 → [Custom Key] → Select the desired key for assignment. → [Peaking Display Sel.] |
|---|---|
| Shooting | You can switch the peaking display on/off by pressing the assigned key. |
12. How to protect or rate images
Assign the [Protect] or [Rating] function to a custom key during playback. This lets you sort recorded images quickly. We recommend assigning the function to the C3 button so that you can move to the next image using your right hand, and select the assigned function using your left hand.
*For the ILCE-9, this function can be used if the camera's system software (firmware) is Ver. 5.00 or later.
| Advance preparation | MENU →  → [Custom Key] → [Custom Button 3] → [Protect] or [Rating] → [Custom Key] → [Custom Button 3] → [Protect] or [Rating] |
|---|---|
| During playback | Move to the next image using your right hand, and select [Protect] or [Rating] with the C3 button using your left hand. |
13. How to play back only protected images or rated images
You can jump between images during playback, playing back only protected images or images set with a particular rating. You can select the front dial or the rear dial to perform this function. Use operating parts other than the selected dial (such as the control wheel) to play back all images. In this way, you can choose the playback method that suits your purpose.
*For the ILCE-9, this function can be used if the camera's system software (firmware) is Ver. 5.00 or later.
| Advance preparation | 1.MENU → → [Image Jump Setting] → [Select Dial] → [Front Dial] 2.MENU → → [Image Jump Setting] → [Image Jump Method] → [Protect Only] |
|---|---|
| MENU → → [View Mode] → [Date View] |
|
| During playback | You can play back protected images only using the front dial, and all images using the rear dial. |
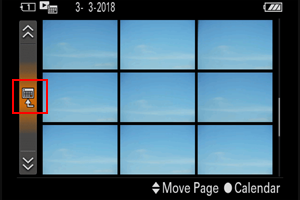
You can also select [View Mode] from the index display instead of setting it from the MENU.
