Global
Support / Contact Us
Support / Contact Us
DSC-RX0M2
Configuring [Focus Mode] settings according to the distance between the camera and the subject allows you to take a picture without having to fine-tune the focus.Here are some examples of [Focus Mode] settings for shooting a self-portrait.
We recommend setting [Focus Mode] to [Single-shot AF] when shooting a self-portrait.
You may also find it helpful to use the [Face/Eye AF Set.] function together with the [Self-portrait/ -timer] function.
Camera Settings
 (Camera Settings1) → [Shoot Mode] →
  [Intelligent Auto]. (Camera Settings1) → [Focus Mode] → [Single-shot AF]. (Camera Settings1) → [Face/Eye AF Set.]* → [Right/Left Eye Select] → desired setting item. (Camera Settings1) → [Face/Eye AF Set.]* → [Face Detect. Frame Disp.] → desired setting item. (Camera Settings1) → [Self-portrait/ -timer] → [On].
Shooting still images
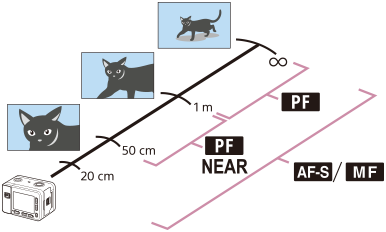
Configuring the [Focus Mode] settings according to the distance between the camera and the subject allows you to capture images at an ideal resolution for that distance.
| Distance between camera and subject | [Focus Mode] | Examples |
|---|---|---|
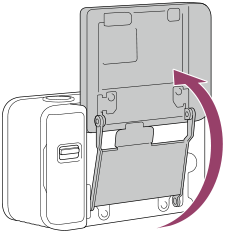
| 20 cm to 50 cm | [Single-shot AF] | 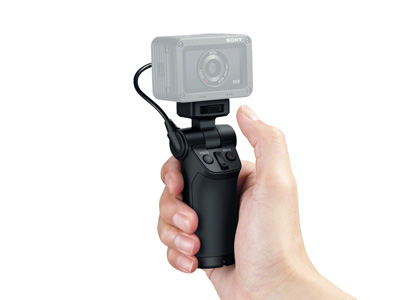 Hand-held shooting VCT-SGR1(sold separately)  Fixed-camera shooting VCT-SGR1(sold separately) |
| 50 cm to 1 m | [Preset Focus] and [Near Mode in PF] → [On] | 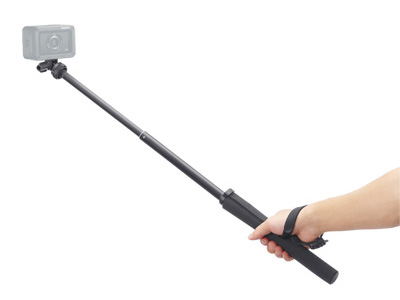 Shooting with a monopod or similar VCT-AMP1(sold separately) |
| 1 m or more | [Preset Focus] and [Near Mode in PF] → [Off] | Fixed-camera shooting with scenery in the background VCT-SGR1(sold separately) |
Camera Settings
* Camera’s system software (firmware) Ver. 2.00 or later
(Camera Settings1) → [Shoot Mode] →  ( Intelligent Auto).
When distance between camera and subject is between 20 cm and 50 cm :
MENU → (Camera Settings1) → [Focus Mode] → [Single-shot AF].
For movies, you can first set the focus before recording, and then later readjust the focus during recording by pressing the SHUTTER/MOVIE button halfway down.*
(Set [AF-S during mov rec] to [On] in advance.)
When distance between camera and subject is between 50 cm and 1 m :
MENU → (Camera Settings1) → [Focus Mode] → [Preset Focus].
MENU → (Camera Settings1) → [NEAR Mode in PF] → [On].
Focuses on subjects between approximately 50 cm and 1 m from the camera.
When distance between camera and subject is 1 m or more :
MENU → (Camera Settings1) → [Focus Mode] → [Preset Focus].
MENU → (Camera Settings1) → [NEAR Mode in PF] → [Off].
Focuses on subjects approximately 1 m or more from the camera.
Shooting movies
Hint
When [Focus Mode] is set to [Single-shot AF] :
When the product detects a face, the gray face detection frame appears. When the product determines that autofocus is enabled, the face detection frame turns white. Press the SHUTTER/MOVIE button halfway down to bring your face into focus. The face detection frame will turn green. Press the SHUTTER/MOVIE button fully down at this point to keep the focus fixed.
You can also enable or disable the face detection frame in the [Face Detect. Frame Disp.] settings.
MENU → (Camera Settings1) → [Face/Eye AF Set.]* → [Face Detect. Frame Disp.] → desired setting item.
 PAGE TOP