ILCE-9M2 Reducing issues from high-frequency flicker
Shooting with functions to reduce issues from high-frequency flicker
By using a function designed to reduce issues from high-frequency flicker, which enables finer adjustment of shutter speed than usual, you may be able to reduce the effect of flickering from artificial light sources such as fluorescent or LED lighting.
This section describes how to check for flickering and then fine-tune the shutter speed (by using a "high-resolution" shutter speed)
The function to reduce high-frequency flicker issues is available when the camera’s system software (firmware) is Ver. 2.00 or later.
Checking for flicker issues
Effects of flickering are easier to check on the camera screen with [Var. Shutter] set to [On] in M (Manual Exposure) or S (Shutter Priority) shooting mode.
Camera settings
- Turn the mode dial to set the mode to M (Manual Exposure) or S (Shutter Priority) mode.
- Use the front or rear dial to select your preferred shutter speed.
- Focus on the subject.
- MENU →
 1 (Camera Settings1) → [Hi Frequency flicker] → [Var. Shutter] → [On].
 - MENU → 1 (Camera Settings1) → [Hi Frequency flicker] → [Var. Shutter Set.].
The [Var. Shutter Set.] screen is displayed.
Example: Check on the monitor for flicker issues (banding) caused by LED lighting.
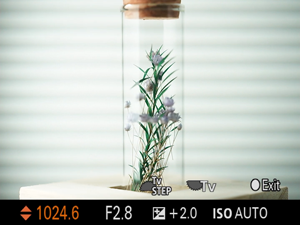
[Var. Shutter Set.] screen
This video demonstrates flicker issues (banding).
Hint
- Even with [Var. Shutter] set to [On], since it may be difficult to check effects of flickering, we recommend shooting and checking in advance.

Setting the shutter speed
After determining that the camera is affected by flickering on the [Var. Shutter Set.] screen, reduce the effects of flickering by using the high-resolution shutter speed function to fine-tune the shutter speed.
Shutter speed fine-tuning
On the [Var. Shutter Set.] screen, you can fine-tune the shutter speed with the front or rear dial or control wheel.
With [Var. Shutter] set to [On], the shutter speed denominator is displayed as a decimal (indicating fine adjustment).
![]() Rear dial (Tv)
Rear dial (Tv)
Turn the rear dial to fine-tune the shutter speed to one of these settings: 250.6→253.3→256.0→258.8 (Actual values may vary.)
![]() Front dial (Tv STEP)
Front dial (Tv STEP)
Turn the front dial to fine-tune the shutter speed to either an integral multiple of the initial value or to 1/[integral multiple]. Example: 125.3 (times 1/2) ← 250.6 → 501.3 (times 2)(Actual values may vary.)
Control wheel
Turn the control wheel to fine-tune the shutter speed just as it is set using the dial assigned to Tv.
Control wheel up/down
Press and hold the control wheel to fine-tune the shutter speed value more quickly.
- Fine-tune the shutter speed.
Continue to fine-tune the shutter speed with the rear dial (Tv) or control wheel, as you reduce or increase the speed until the effects of flickering are less noticeable. - Fine-tune the shutter speed by changing it to an integral multiple of the initial value.
If the effects of flickering are still noticeable despite fine-tuning the shutter speed, try turning the front dial (Tv STEP) to reduce the fine-tuned shutter speed.
After reducing the fine-tuned shutter speed with the front dial (Tv STEP), continue fine-tuning the speed until the effects of flickering are less noticeable.
Example: Flicker issues (banding) caused by LED lighting were reduced by fine-tuning the shutter speed.

The shutter speed does not match the flickering cycle, resulting in banding caused by LED lighting to be visible on the screen.


As the shutter speed is adjusted, the appearance of banding changes.

When the shutter speed matches the flickering cycle, banding caused by LED lighting is no longer visible.
This video shows the appearance when flicker issues (banding) are reduced.
- Shoot.
Press the shutter button to shoot.
* The images on this web page are provided as examples only