ILCE-7RM3 / ILCE-7RM3A

Pixel Shift Multi Shooting

In "Pixel Shift Multi Shooting," the camera shoots four uncompressed RAW images while shifting the image sensor one pixel at a time. You can generate images with a higher resolution than is possible with regular shooting by combining the four RAW images on a computer using the Imaging Edge Desktop*1 application. This is helpful when shooting still subjects.

*1:
Imaging Edge Desktop is an application to support creative work using Sony digital cameras. It allows you to adjust and develop RAW images and shoot images remotely (tethered shooting) from your computer. Imaging Edge Desktop has three functions to make this possible: “Viewer,” “Edit,” and “Remote.”
Imaging Edge Desktop can be downloaded here.

Pixel Shift Multi Shooting is available in “Remote” in the Imaging Edge Desktop application when shooting remotely (tethered) and also on the camera itself.Instructions are provided here for both methods.

Note

Any camera movement or subject blurring as the four Pixel Shift Multi images are captured may prevent the RAW images from being combined correctly, and a faint grid pattern may be visible.
Also, images may not be combined correctly if the light shining on the subject changes due to movement of persons or objects, or if the amount of light emitted is inconsistent between shots when shooting with a flash.
Keep this in mind when setting up any photography equipment, and at the time of shooting.

Shooting Procedure

  1. Setting up photography equipment
  2. Configuring camera settings
  3. Shooting
  4. Combining Pixel Shift Multi images
  5. Adjusting and Developing Images
  1. Setting up photography equipment

Equipment setup notes

  • Place the camera on a tripod or other stable surface to hold it steady.
  • Make sure the camera and subject will remain steady if nearby people or objects move.
  • Make sure the camera or lens weight or other factors will not cause the camera to move as you shoot.
  1. Configuring camera settings

When shooting remotely

  1. Confirm that MENU →  
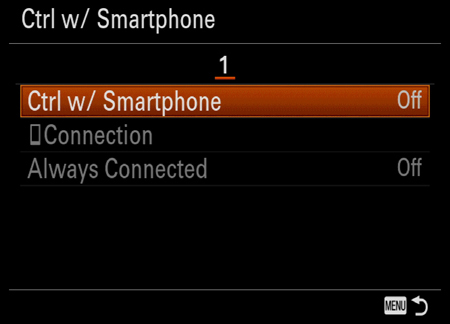
(Network) → [Ctrl w/ Smartphone] → [Ctrl w/ Smartphone] is set to [Off].
  2. Select MENU →  (Setup) → [USB Connection] → [PC Remote].
  3. Use a USB cable to connect the camera to the computer where Imaging Edge Desktop is installed.
  4. After “Remote” in the Imaging Edge Desktop application is started, select a camera to use for Remote Shooting on the device selection window, and then perform the following settings.
  • In the shooting panel, select [Px. Shift Multi Shoot.].*

    * You cannot perform Pixel Shift Multi Shooting in a shooting mode other than P, A, S, or M.

  • Set [4 Photos] using the button for switching the number of shots, and select a capture interval*2 with the button for switching the capture interval.
    *2:
    The RAW images may not be combined correctly if the shooting environment changes when the four images are captured in Pixel Shift Multi Shooting, as caused by camera shake, subject movement or changes in subject brightness.
    We recommend setting capture interval to the minimum setting of 0.5 seconds.
    When using a Mount Adaptor (LA-EA1/LA-EA2/LA-EA3/LA-EA4/LA-EA5), capture interval may be longer.
    The following update is required to set to 0.5 seconds.
    • "Remote" Ver. 1.2.00 or later
    • For ILCE-7RM3, System Software Ver. 1.10 or later
    When using flash, set the capture interval accounting for the time required to charge the flash.

When shooting with the camera itself

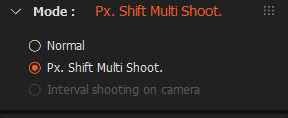
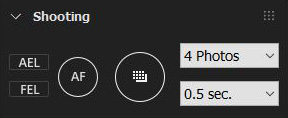
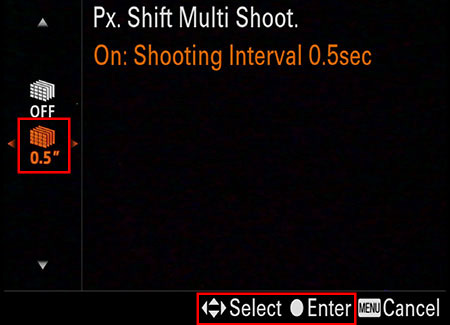
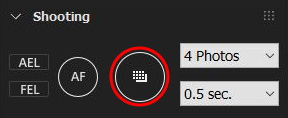
Select MENU →  (Camera Settings 1) → [Px. Shift Multi Shoot.], set the capture interval*3, and shoot.

*3:
The RAW images may not be combined correctly if the shooting environment changes when the four images are captured in Pixel Shift Multi Shooting, as caused by camera shake, subject movement or changes in subject brightness.
We recommend setting capture interval to the minimum setting of 0.5 seconds.
When using a Mount Adaptor (LA-EA1/LA-EA2/LA-EA3/LA-EA4/LA-EA5), capture interval may be longer.
The following update is required to set to 0.5 seconds.
  • For ILCE-7RM3, System Software Ver. 1.10 or later
When using flash, set the capture interval accounting for the time required to charge the flash.
  1. Shooting

Shooting notes

  • Make sure subject brightness in the shooting environment does not change when the four Pixel Shift Multi images are captured.
    Especially when shooting highly reflective subjects such as metal or glass, ensure that subject brightness will not be affected by any nearby movement.
  • Set a suitable exposure time, because some light sources may flicker.

Notes when using flash

  • If the amount of light emitted by the flash is inconsistent between shots, images may not be combined correctly. To stabilize the amount of light emitted, try increasing the flash level or widening the illumination angle.
  • Set the capture interval accounting for the time required to charge the flash.
  • The flash sync speed is 1/13 second. Setting [Exposure step] to [0.5EV] sets the shutter speed to 1/10 second.

When shooting remotely

To shoot, click the shutter button in “Remote” in the Imaging Edge Desktop application.

Hint

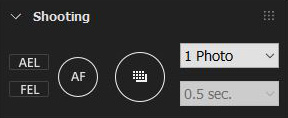
It may be helpful to set the number of shots to [1 Photo] and take a test shot. Use the test image to confirm that the shooting settings (such as flash intensity and angle) are correct.

When shooting with the camera itself

Press the shutter button down fully to take the picture.
Pressing the shutter button on the camera may cause camera shake. We recommend shooting with one of the following.

  • Remote Commander (sold separately)
  • Camera self-timer
  • Remotely from a smartphone
  1. Combining Pixel Shift Multi images

When shooting remotely

After you shoot, “Viewer” in the Imaging Edge Desktop application starts and the captured images are combined to generate a RAW image with the file extension ARQ.

When shooting with the camera itself

  1. Transfer the four RAW images (file extension: ARW) to the computer.
  • Transferring from the camera
    1-1.
    In MENU →  (Setup) → [USB Connection], select [Auto], [Mass Storage], or [MTP].
    1-2.
    Connect the computer to the camera with a USB cable and transfer the four RAW images to the computer.
  • Transferring from storage media

    Insert the storage medium containing the RAW images from Pixel Shift Multi Shooting in the computer and transfer the four RAW images (file extension: ARW) to the computer.

  1. Start “Viewer” in the Imaging Edge Desktop application, select a folder containing the RAW images from the folder window on the left side of the screen, and select a RAW image from Pixel Shift Multi Shooting (labeled  in the Viewer).
  2. Select [Create Px. Shift Multi Shoot. Composite Image] from the [File] menu.
  3. Set [Output method] and [File settings], and then select [Save].
    Select [ARQ Format] for [Save format].
  4. The four RAW images are combined to generate a single RAW image with the file extension ARQ.
  1. Adjusting and Developing Images

By switching to “Edit” in the Imaging Edge Desktop application, you can develop and save RAW files as JPEG or TIFF files.

Hint

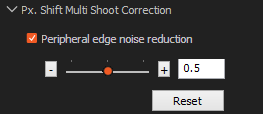
You can reduce noise that appears at the edges of images in Pixel Shift Multi Shooting. This noise is caused by vibration or other factors. Use the slider to adjust the amount of correction. This panel is displayed only when you select an image shot with Pixel Shift Multi Shooting, in ARQ format.

For instructions on the Imaging Edge Desktop applications, see this page.