You can import videos and photos recorded on your camera by connecting your camera to your Mac using Wi-Fi.
Before Use
- To use a Wi-Fi connection, you must first register the access point on your camera. Refer to the Operating Guide supplied with your camera for more information.
- If your camera is connected to your Mac with a USB cable, disconnect it.
Setting up Wireless Auto Import
-
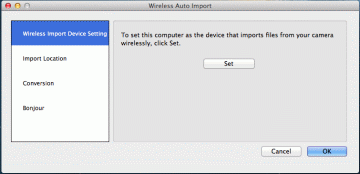
Start Finder and click [Applications], and then double-click [Wireless Auto Import].
The [Wireless Auto Import] settings window is displayed.
-
Click [Wireless Import Device Setting], and then click [Set].
If you are prompted to enter an administrator password, enter it.
-
Connect the camera to your Mac with a USB cable.
The driver will be installed, and your Mac is set as the import destination for videos and photos.
-
Disconnect the camera from your Mac.
Notes
- The [Wireless Auto Import] settings must be configured when you import videos and photos to your Mac for the first time.
- From the second time, if you want to select another Mac as the import destination, you must configure the [Wireless Auto Import] settings again.
Importing videos and photos from your camera to your Mac
-
Start up and log in to your Mac.
-
Select MENU -
 (Send to PC) on the LCD screen of your camera.
When the Wi-Fi connection is established, video and photo import starts automatically, and a progress indicator is displayed at the bottom right of the screen on the Mac.
(Send to PC) on the LCD screen of your camera.
When the Wi-Fi connection is established, video and photo import starts automatically, and a progress indicator is displayed at the bottom right of the screen on the Mac.
When the data import is completed, a message is displayed on the Mac.
Note
- If there is no memory card in your camera, (Send to PC) will not be displayed on the screen in step 2 above.
Parts and controls of the settings window
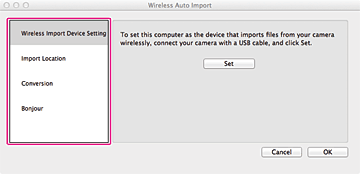
| [Wireless Import Device Setting] | Set your Mac as the device for importing files using Wi-Fi. |
| [Import Location] | Select the destination folder for saving videos and photos that you have imported to your Mac. |
| [Conversion] | Set whether to convert the AVCHD format videos imported to your Mac to MP4 format videos. Even when you convert the AVCHD format videos to MP4, AVCHD format videos will also be saved in the destination folder. |
| [Bonjour] | Reconfigure the Wi-Fi connection between your Mac and camera again. If your Mac does not respond when you select MENU - (Send to PC) on the LCD screen of your camera, cancel the file import and then try again following the steps below.
|
Note
- In the [Conversion] option, videos recorded with MPEG-2 format (STD) cannot be converted to MP4 format regardless of their settings.
On trademarks
- Mac is a trademark of Apple Inc.