Lock-on AF
[Lock-on AF] is a function for tracking a moving subject automatically. There are two ways to set the [Lock-on AF]: pressing the shutter button halfway down and pressing the center button of the control wheel.
[Lock-on AF] by pressing the shutter button halfway down
[Lock-On AF] by pressing the shutter button can be set in three different ways.
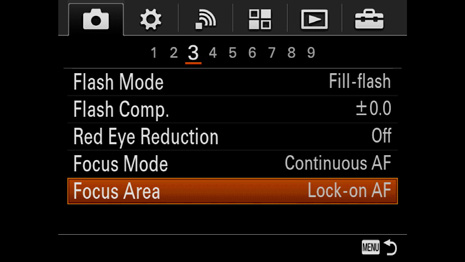
- In the Menu settings: MENU > (Camera Settings) > [Focus Area] > desired setting
- By pressing the Fn (Function) button (if the function has already been allocated to the Fn menu)
- By pressing a custom button (if the function has already been allocated to the button)
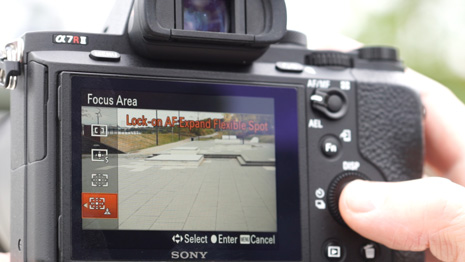
After setting [Lock-on AF], you must select the focus area – [Wide], [Zone], [Center], or [Flexible Spot] – in which the camera will initially look for the subject. [Expand Flexible Spot] is also selectable for ILCE-7RM2. If your subject is a reasonable size within the frame and provides enough contrast to the background, we recommend that you use [Lock-on AF: Wide] because the subject can be anywhere in the frame when the camera start tracking. If it might be difficult for the camera to find the subject, specify the subject by selecting another focus area.
To lock on the subject and start tracking, press and hold the shutter button halfway down. The camera will track the subject once it is locked, even if the subject goes outside the selected focus area. You can track your subject in easy steps, by pressing the shutter button halfway down, tracking the subject, and then releasing the shutter. If you want to cancel, stop pressing the shutter button. Even after releasing the shutter, the camera continues tracking while you are pressing the shutter button halfway down until you remove your finger.
- Using [Lock-on AF] by pressing the shutter button halfway down is available only in AF-C (Continuous AF) mode.
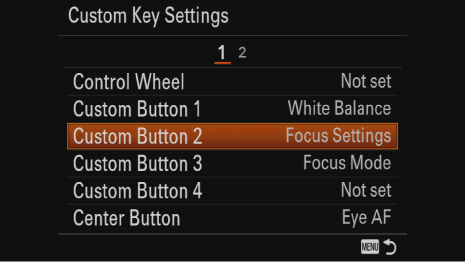
- If you assign the [Focus Settings] to a custom button, you can access the focus settings by pressing the custom button, which is very quick to operate.
- [Lock-on AF] may not work when an A-mount lens is attached using a Mount Adaptor LA-EA1/LA-EA3.
[Center Lock-on AF] by pressing the center button
[Center Lock-on AF] can be activated in three different ways.
- In the Menu settings: MENU > (Camera Settings) > [Center Lock-on AF] > [On]
- By pressing the Fn (Function) button (if the function has already been allocated to the Fn menu)
- By pressing a custom button (if the function has already been allocated to the button)
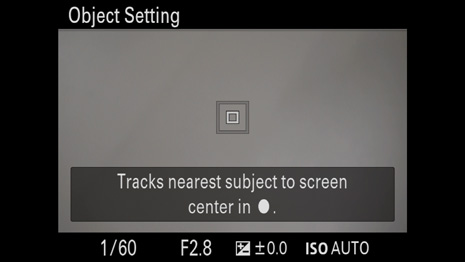
To use [Center Lock-on AF], you must turn it on every time. We recommend assigning it to a custom button or the Fn button for quick access. When you turn on the [Center Lock-on AF], the Object Setting screen appears. Align the frame over the subject, and press the center button in the control wheel to start tracking the subject. You don't have to keep pressing the center button. The camera continues to track the subject even after releasing the shutter. To cancel the function, turn off the function.
The merit of using [Center Lock-on AF] is that it can be used in any autofocus mode. You can easily start tracking the subject even in AF-S (Single-shot AF) mode. All you have to do is lock onto the subject by opening the Object Setting screen and turn on the function.
Fast Hybrid AF
Fast Hybrid AF is an autofocus system that combines traditional contrast detection AF with focal plane phase detection AF. Combining both of these autofocus features is great for added precision and ideal for a quick response when tracking fast-moving subjects. Even in [Continuous Shooting: Hi] mode, the camera can track the subject and focus on it in each shot because of Fast Hybrid AF.
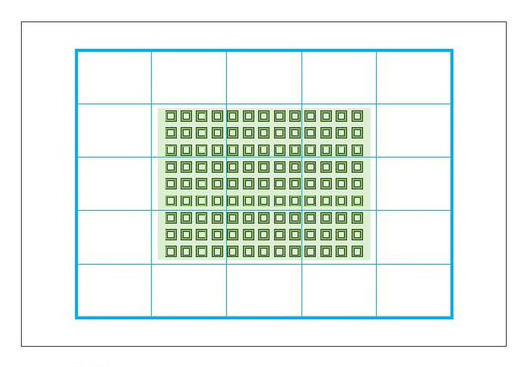
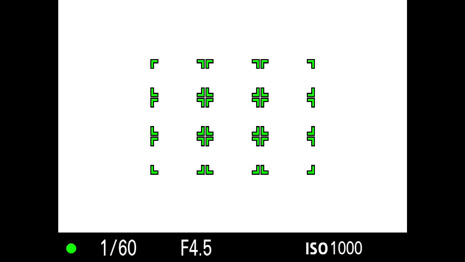
Taking images of moving subjects is the basic challenge of any autofocus system. With the ILCE-7RM2, remarkable progress has been made as it is the first Sony full-frame camera that has integrated a phase detection AF system in the 399 sensors, with a huge coverage of 45%. The coverage of the contrast AF system is around 70%, so it is easy to put the focus on nearly any subject inside the image frame using the various AF area options of the camera.
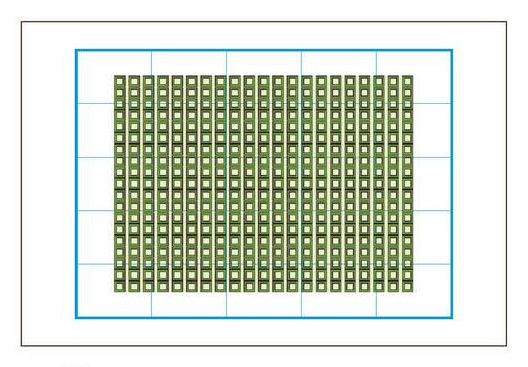
![]() Phase-detection AF (399 points)
Phase-detection AF (399 points)
![]() Contrast-detection AF (25 points)
Contrast-detection AF (25 points)
Details on the 399 phase detection AF sensors and 25-point contrast AF detection of the ILCE-7RM2
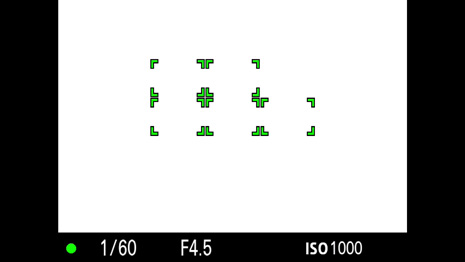
![]() Phase-detection AF (117 points)
Phase-detection AF (117 points)
![]() Contrast-detection AF (25 points)
Contrast-detection AF (25 points)
Details on the 117 phase detection AF sensors and 25-point contrast AF detection of the ILCE-7M2
AF On
Usually, autofocus is activated when you press the shutter button halfway down, and with a full press the shutter of the camera is released. For certain shooting occasions, however, you can de-activate focus metering when pressing the shutter button and assign the autofocus function to a custom button.
Setting method
-
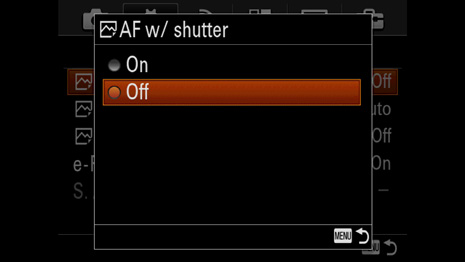
Select [AF with Shutter] from the MENU and separate AF from the action of pressing the shutter button.
MENU > (Custom Settings) > [AF w/ shutter] > [Off]
- Menu item details
- On: Autofocus operates when you press the shutter button halfway down.
- Off: Autofocus does not operate even if you press the shutter button halfway down.

-
Select the desired button and assign the autofocus function.
MENU > (Custom Settings) > [Custom Key Settings] > desired button > [AF On].

-
Press the button to which you have assigned the [AF On] function while autofocus shooting.
Commonly the [AF On] function is assigned to the AF/MF button. Depending on your preferences, you may choose a different button, for example the C3 button, which is easily accessible with your thumb when holding the camera.
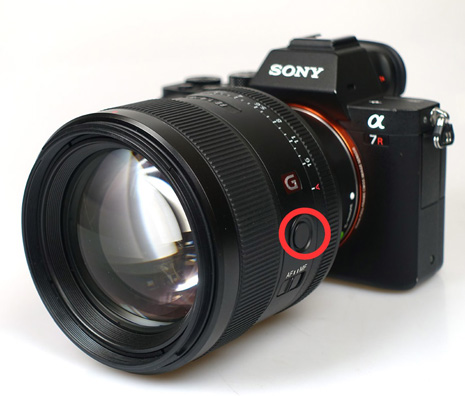
When using a lens equipped with a focus hold button, you can assign the [AF On] function to that button as well. This is comfortable and ensures a stable hold on the camera, especially when you are shooting handheld with a telephoto lens or macro lens.
You can assign the [AF On] function to the following buttons. You can even assign the same feature to multiple buttons.
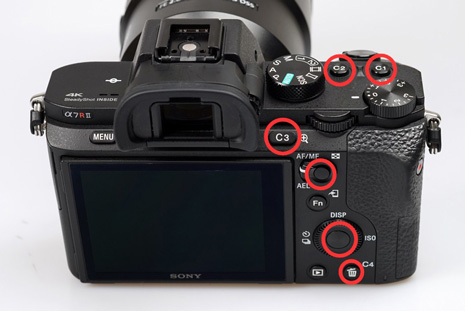
- AF/MF or AEL button
- Custom buttons C1 – C4
- Center button
- Focus hold button on the lens
Face Detection
Face Detection automatically recognizes one or more faces of among your subjects and the camera focuses on the relevant area.
Setting method
Face detection can be activated in three different ways.
-
In the Menu settings: MENU > (Camera Settings) > [Smile/Face Detect.] > [On]

-
By pressing the Fn (Function) button (if the function has already been allocated to the Fn menu)

-
By pressing a custom button (if the function has already been allocated to the button)

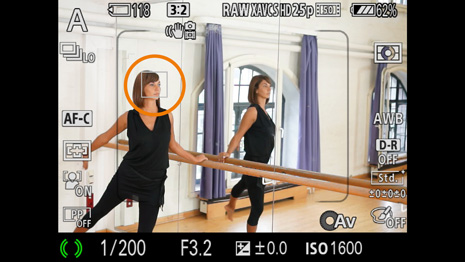
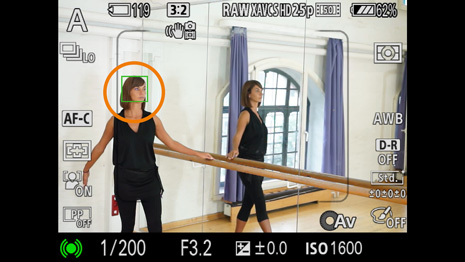
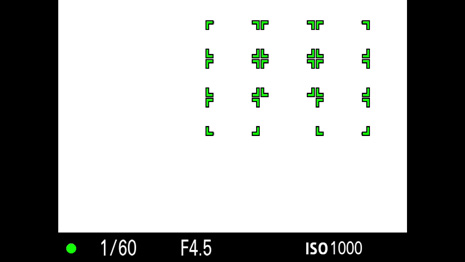
Face Detection frame
When the product detects a face, the grey face detection frame appears. When the product determines that autofocus is enabled, the face detection frame turns white. When you press the shutter button halfway down, the frame turns green.
Additional functions
You can register specific faces so that they will be prioritized over non-registered faces. If there is more than one registered face in the frame, the product automatically selects the first prioritized face.
Smile shutter recognizes when people are smiling and then releases the shutter automatically. You can select Smile Detection Sensitivity from [On: Slight Smile], [On: Normal Smile] and [On: Big Smile].
Eye AF
The camera focuses on the subject's eyes while you keep the button pressed. In order to use this function, you must assign it to a custom button using the [Custom Key Settings] in the MENU.
Setting method
-
Select MENU > (Custom Settings) > [Custom Key Settings] > assign the [Eye AF] function to the desired button.


You can assign it to most of the custom buttons, but we recommended that you use one that is easy to reach with your right thumb while pressing the shutter button. Most photographers use either the AF/MF button, C3 button, or the center button for that purpose.

When using a lens with a focus hold button you can assign the [Eye AF] to that button on the lens, too. This is useful since the focus hold button is easier to reach when holding a large aperture lens without having your thumb leave its firm holding position on the camera grip.
-
Point the camera at a person's face, and press and hold the button to which you have assigned the [Eye AF] function.
-
While pressing the button, press the shutter button.
Focus Area
Focus Area Setting
You can set the focus area using [Focus Area]. Use this function when it is difficult to achieve the proper focus in autofocus mode. The setting applies to both still images and movies.
Setting method
[Focus Area] can be set in three different ways.
- In the Menu settings: MENU > (Camera Settings) > [Focus Area] > desired setting
- By pressing the Fn (Function) button (if the function has already been allocated to the Fn menu)
- By pressing a custom button (if the function has already been allocated to the button)
Wide
Focuses automatically on a subject in all ranges of the image.
Zone
Select a zone on the monitor on which to focus. A zone consists of nine focus areas, and the product automatically selects a focus area on which to focus. This works like [Wide] within a limited AF area, which can be moved around within the image area.
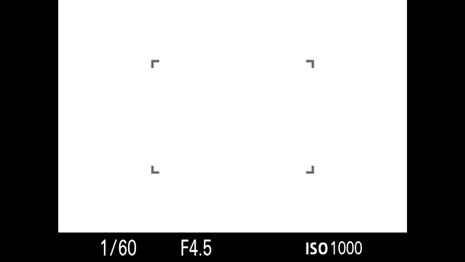

Center
Focuses automatically on a subject in the center of the image. When used together with the AF lock function, you can compose the image you want.

The size of the AF detection field is the same as when using [Flexible Spot] placed in the center with the spot size set to [L].
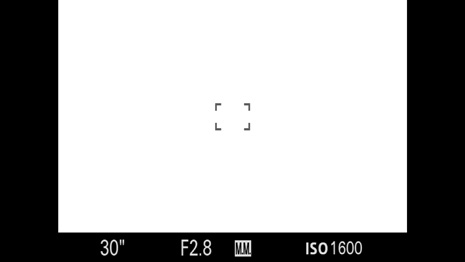
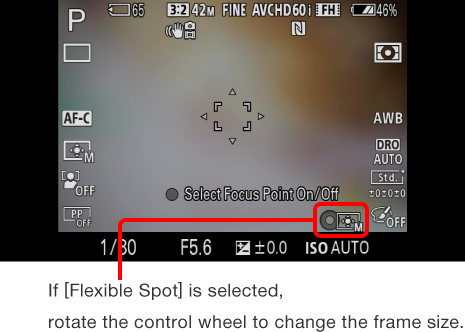
Flexible Spot
[Flexible Spot] allows you to move the focusing frame to the desired point on the screen and focus on an extremely small subject in a narrow area.
On the [Flexible Spot] shooting screen, you can change the size of the focusing frame by rotating the control wheel.


Expanded Flexible Spot (ILCE-7RM2 only)
Another option for the focus area setting is [Expanded Flexible Spot].
It basically works in the same way as [Flexible Spot] with the size [S]. But it has a safety net – so to speak – to avoid loss of focus due to a focus point that is too small.
If the camera fails to focus on the single selected point, it uses the focus points around the flexible spot as the second priority area to achieve focus.

Notes on Focus Area setting
- You can select the size for [Flexible Spot] from [S], [M], and [L]. You can select [S] to shoot a point on which you want to focus exactly. However, this may cause difficulties in focusing on the subject when the [S] spot cannot find any contrast inside the small spot area. In this case, the use of a larger spot or [Expanded Flexible Spot] may improve this issue.
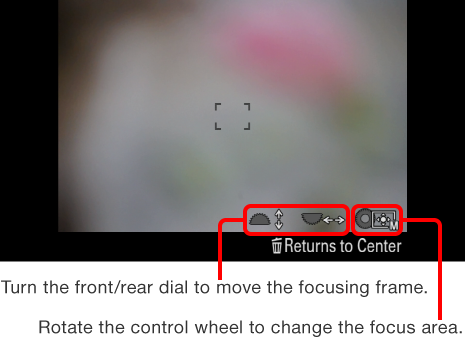
- You can move the [Flexible Spot] or [Zone] area quickly using the [Focus Settings] function. Turn the control wheel to select the focus area, then turn the front/rear dial or press the top/bottom/left/right side of the control wheel.
- The AF area setting is not available when using [Digital Zoom] or [Clear Image Zoom].
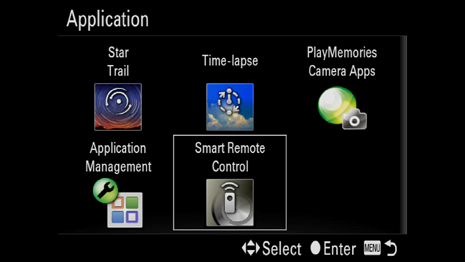
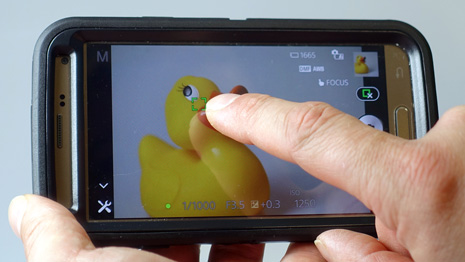
Using touch-AF on mobile device – PlayMemories Camera Apps
It is possible to move the flexible spot using touch control when using the PlayMemories Camera Apps Smart Remote Control and a mobile device.
- The Smart Remote Control of PlayMemories Camera Apps has to be installed on your camera. The pre-installed Smart Remote Embedded does not support the function to move the flexible spot using the touchscreen of your mobile device.
- PlayMemories Mobile has to be installed on your mobile device.
Focus Settings
When [Focus Area] is set to [Zone] or [Flexible Spot] (including [Expand Flexible Spot] in the case of the ILCE-7RM2), the basic setting method is to select the desired area with [Focus Area], press the center button to confirm the selected area, and then press the control wheel or turn the front/rear dial to move the focusing frame to the desired position.
However, [Focus Settings] lets you move the focusing frame directly using the control wheel or front/rear dial after you press the assigned button. It is a quick way to control the focus area settings. We recommend that you keep [Focus Settings] assigned to a custom button. It is assigned to the C2 (Custom 2) button in the default settings.
Setting method
-
Select the desired button and assign the [Focus Settings] function.
MENU > (Custom Settings) > [Custom Key Settings] > desired button > [Focus Settings]
-
Press the assigned button to use [Focus Settings].
-
Rotate the control wheel to select the focus area.
-
If [Zone] or [Flexible Spot] is selected, press the top/bottom/left/right side of the control wheel or turn the front/rear dial to move the focusing frame.
- [Focus Settings] can be assigned to any button. If you use the front/rear dial to move the focusing frame, assign the function to a button near the shutter button. If you use the control wheel, assign it to a button near the control wheel. Doing so will allow you to operate the function more quickly.
Focus Settings vs. Focus Area
Let’s say you allocated [Focus Area] to C1 and [Focus Settings] to C2, and compare these functions in a situation where you change the focus area and its position.
If you use [Focus Area], you have to press C1, select a focus area, press the center button to confirm the focus area, and then move the focusing frame. This takes four steps.
On the other hand, if you use [Focus Settings], you have to press C2, rotate the control wheel to select a focus area, and then move the focusing frame. This only takes three steps; you don't need to press the center button.
As you can see, in a way, the [Focus Area] function is contained within [Focus Settings]. So, if you need to choose only one function to allocate to a custom button, we recommend [Focus Settings] rather than [Focus Area].
The [Focus Standard] setting is recommended when taking successive photos of the same scene.
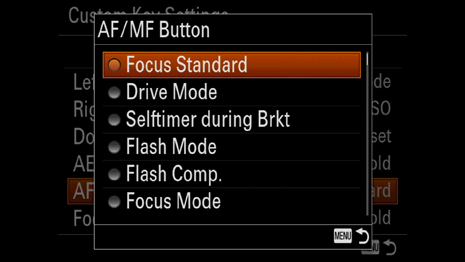
Focus Standard
[Focus Standard] is a function that can only be used after it is assigned to a certain button using the customization function. If the focus area is set to [Zone] or [Flexible Spot] (including [Expand Flexible Spot] in the case of the ILCE-7RM2), you can move the focusing frame with fewer operations.
[Focus Standard] is provided with a June 2017 camera system software (firmware) update. The updated version is 4.00 for both the ILCE-7RM2/7M2.
Setting method
-
Select the desired button and assign the [Focus Standard] function.
MENU > (Custom Settings) > [Custom Key Settings] > desired button > [Focus Standard]
-
Press the assigned button to use [Focus Standard].
-
If [Zone] or [Flexible Spot] is selected, press the top/bottom/left/right side of the control wheel to move the focusing frame.
-
Take the photo. After you take the photo, you can still move the focusing frame by pressing the control wheel.
- To cancel, press the button to which you assigned [Focus Standard] again.
- While the [Focus Standard] function is active, the custom functions assigned to the control wheel and C4 button are disabled.
- When the focus area is set to [Wide] or [Center], Center Lock-on AF will activate if [Center Lock-on AF] is turned on, and the autofocus will activate while the button is pressed if [Center Lock-on AF] is turned off.
Focus Standard vs. Focus Settings
[Focus Standard] is a good solution when tracking a moving subject manually. You only need to press the assigned button once; you do not have to press it again after each shot. If you assign it to a button near the control wheel such as the center button, you can move the focusing frame as soon as you press the assigned button.
[Focus Settings], on the other hand, allows for operations using the front/rear dial. It also lets you quickly change the focus area setting (e.g. from [Wide] to [Flexible Spot]).
The two functions differ in terms of operability. Select one according to your preferences and shooting style.
Priority Set in AF-C (ILCE-7RM2 only)
You can set whether to release the shutter even if the subject is not in focus in the AF-C (Continuous AF) mode.
Setting method
MENU > (Custom Settings) > [Priority Set in AF-C] > desired setting
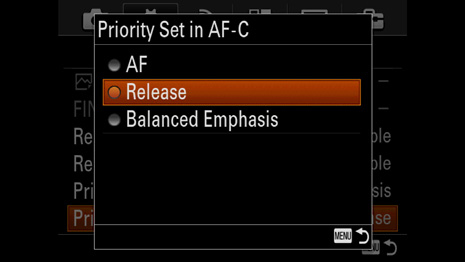
Select the setting based on your personal preferences. If you select [AF], you don't have to delete unintended out-of-focus pictures afterwards. If you select [Release], you won't miss a moment you want to capture and you can decide whether or not to save the picture afterwards.
These settings are also available in the AF-S (Single-shot AF) mode. When shooting motion less subjects using the AF-S mode, we recommend that you select [AF], since it is suitable for a situation in which you can reproduce the shot more easily compared to shooting active scenes.
AF Tracking Sensitivity (ILCE-7RM2 only)
When the ILCE-7RM2 camera is set to Movie mode, the AF Tracking Sensitivity setting is available, which can be adjusted from the camera's main menu. You can choose the ideal AF Track Sensitivity setting when shooting movies in order to respond better to different situations, such as when shooting a fast-moving subject or when shooting a scene in which there are many objects that can distract the AF system.
By setting the AF Tracking Sensitivity, you can set how rapidly the camera acts while tracking the movement of subjects.
Setting method
MENU > (Camera Settings) > [AF Track Sens] > desired setting
- Menu item details
- High: This mode is useful when recording movies when the subject is moving quickly.
- Normal: This mode is useful when you want to keep the focus on a certain subject when there are obstacles in front of the subject or in crowded places.
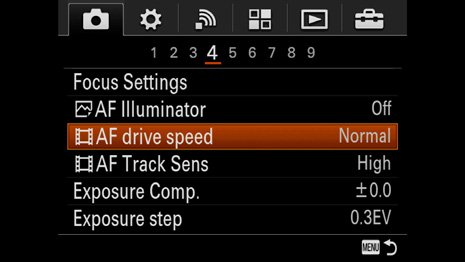
AF Drive Speed (ILCE-7RM2 only)
When the ILCE-7RM2 camera is set to Movie mode, the AF Drive Speed setting is available. It can be adjusted from the camera's main menu. With this function, you can switch the speed of focusing when using autofocus in Movie mode.
Setting method
MENU > (Camera Settings) > [AF drive speed] > desired setting
- Menu item details
- Fast: Sets the AF Drive Speed to fast. This mode is suitable for shooting active scenes, such as sports.
- Normal: Sets the AF Drive Speed to normal, This is the recommended setting for most applications.
- Slow: Sets the AF Drive Speed to slow. With this mode, the focus switches smoothly when the subject to be focused is changed. This mode is useful for shooting impressive images. If the AF drive is too fast, it can be visually distracting, so setting it to slow ensures a smooth focus transition.
Effect of the AF Drive Speed setting
The clip shows the difference between the [Fast], [Normal] and [Slow] setting for the AF Drive Speed. The camera will take approximately twice as long to pull focus when you change the setting from [Fast] to [Normal].
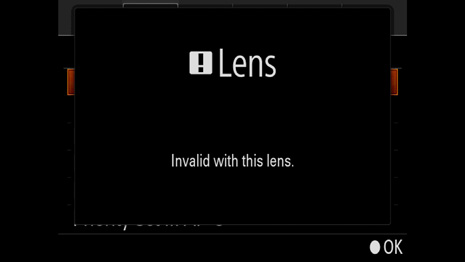
Applicable Lens for AF Tracking Sensitivity and AF Drive Speed (ILCE-7RM2 only)
When you try to set the AF Tracking Sensitivity or AF Drive Speed, the following camera message may be displayed and the settings may not be available although the camera is set to Movie mode. This is because the lens must be able to support the phase detection AF system for these features.
For applicable lens information, access the following [Lens Compatibility] website and then select your camera and lens.
- If there is no description for Focal plane phase detection AF or Fast Hybrid AF, the lens supports the functions.
- If there is a note saying that Focal plane phase detection AF or Fast Hybrid AF does not work, the lens does not support the functions and you cannot use them.
- If you find a note saying that the camera/lens system software needs to be updated to use Focal plane phase detection AF or Fast Hybrid AF, update the software.
Using A-mount Lenses
In order to attach a Sony A-mount lens to the ILCE-7RM2/7M2, a Mount Adaptor is required. Available functions regarding autofocus vary depending on the Mount Adaptor.
Mount Adaptor LA-EA1/LA-EA3
Both contrast AF and focal plane phase detection AF are available. The default setting is phase detection AF, but the focus detection system can be changed to contrast AF by selecting MENU > (Custom Settings) > [AF System] > [Contrast AF].
If using the ILCE-7M2, a system software update (ver.2.00 or later) is required to use phase detection AF. The menu setting can be found after performing the update.
- With phase detection AF, [Zone], [Expand Flexible Spot] (ILCE-7RM2 only), [Lock-on AF], and [Eye AF] are not available. A warning message for the lens appears.
- In the contrast AF, [Continuous AF] (AF-C) is not available. A warning message for the lens appears.
- When [AF System] is set to [Phase Detection AF], even if [Priority Set in AF-S] is set to [Balanced Emphasis], the camera will temporarily switch to [AF].
Mount Adaptor LA-EA2/LA-EA4
Only phase detection AF, which is controlled by the dedicated AF sensor inside the Mount Adaptor, is available, so the Mount Adaptor’s AF system will be used. The available focus areas are [Wide] (15 focus area), [Center], [Flexible Spot] (15 spot area), and [Lock-On AF].
- [Eye AF] is not available.
- Even if [Priority Set in AF-S] is set to [Balanced Emphasis], the camera will temporarily switch to [AF].
- Even if [Priority Set in AF-C] is set to [Balanced Emphasis], the camera will temporarily switch to [Release].