How to use
Operation flow

Creators' App

Imaging Edge Mobile
Imaging Edge Mobile Plus
Imaging Edge Mobile Plus
Transfer video
Transfer video to smartphone

Movie Edit add-on
Import video
Select video and import to this application
Edit video
- Frame
"Zoom" "Inclination" "Track" - Trim
- Change speed
Export video
Select resolution of video to be exported
Share videos via SNS, etc.
Smartphone Operation Screen
Video import screen
You can check videos imported by Creators' App, Imaging Edge Mobile or Imaging Edge Mobile Plus.
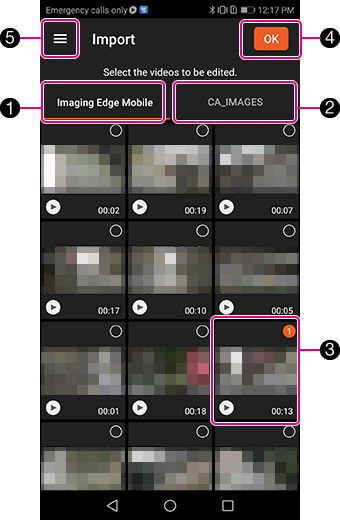
- 1 [Imaging Edge Mobile] button
- Videos imported by Imaging Edge Mobile are stored in the Imaging Edge Mobile folder. Click this button to display the videos stored in that folder.
- 2 [CA_IMAGES] button
- Videos imported by Creators' App or Imaging Edge Mobile Plus are stored in the CA_IMAGES folder. Click this button to display the videos stored in that folder.
- 3 Video thumbnail
- You can select the video to be imported to Movie Edit add-on. A checkmark is displayed in the checkbox of the selected video.
When you tap the button, playback starts.
 - 4 [OK] button
- Imports the selected videos to Movie Edit add-on.
After importing, the "Preview window" is displayed. - 5 Settings menu button
- Displays the settings menu.
Hint
- When the video is imported to a smartphone using Creators' App / Imaging Edge Mobile / Imaging Edge Mobile Plus, the inclination (gyro) information is imported together with the video.
Select the video on the video import screen and import it to Movie Edit add-on so that image stabilization is performed automatically.
Note
- You can select up to fifty video clips at a time.
- You can also import the selected videos all at once as long as their total recording time is within sixty minutes.
- When videos are shot indoors, in the shade, or in other low light environments, you may not be able to get the full effects.
In that case, you can improve the effects if you shoot the video using a shutter speed of 1/100th seconds or higher in the M (Manual Exposure) mode.
For the types of videos that can be edited, refer to the section "Video formats that can be edited."
Preview window
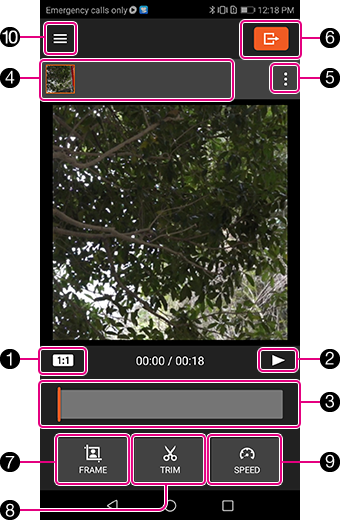
- 1 Set aspect ratio button
- You can change the aspect ratio of the video.
1:1, 4:5, 5:4, 16:9, 9:16 - 2 Play button
- Starts video playback and pauses playback.
- 3 Playback progress bar
- The bar indicates the position of the currently played video.
- 4 Edited video list area
- Displays the videos that are imported to this application and edited.
- 5 Video menu button
- When you tap this button, the video menu is displayed.
[Add], [Remove], [Copy] - 6 Export button
- When you tap this button, the "Export video" window is displayed.
- 7 [Frame] button
- When you tap this button, the "Frame video" window is displayed.
- 8 [Trim] button
- When you tap this button, the "Trim video" window is displayed.
- 9 [Speed] button
- When you tap this button, the "Speed setting" window is displayed.
- 10 Menu button
- When you tap this button, the menu panel is displayed.
[Create New], [Settings], [Reset Edits]
Frame video window
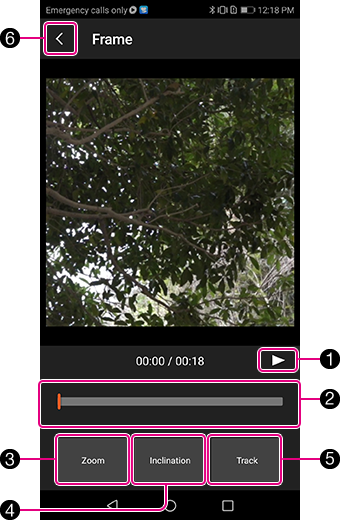
- 1 Play button
- Starts video playback and pauses playback.
- 2 Playback progress bar
- The bar indicates the position of the currently played video.
- 3 [Zoom] button
- Use your finger to perform the zoom operation on the window displayed after tapping the button.
You can zoom in and out and change your viewpoint. - 4 [Inclination] button
- You can adjust the inclination of the video on the window displayed after tapping the button.
- 5 [Track] button
- You can select the subject that you want to track on the window displayed after tapping the button. When you tap the [Start] button, tracking of the selected subject will continue.
- 6 Return button
- When you tap this button, returns to the "Preview window."
Trim video window
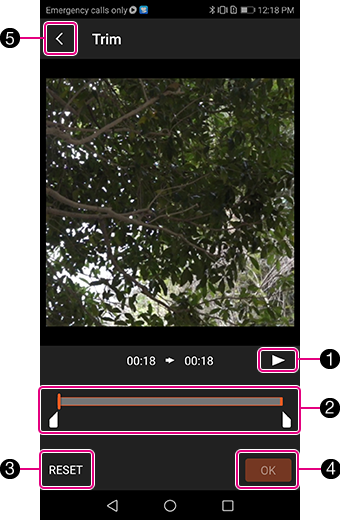
- 1 Play button
- Starts video playback and pauses playback.
- 2 Trimming bar/Trimming start point and end point
- You can set the trimming start point and end point.
- 3 [Reset] button
- Resets the settings.
- 4 [OK] button
- Determines the trimming range that you have set.
- 5 Return button
- When you tap this button, returns to the "Preview window."
Speed setting window
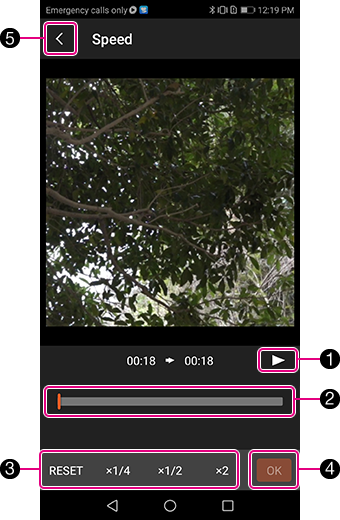
- 1 Play button
- Starts video playback and pauses playback.
- 2 Playback progress bar
- The bar indicates the position of the currently played video.
- 3 Change speed button area
- When you tap any one of the [x1/4], [x1/2], or [x2] settings, the speed edit bar is displayed with the start and end points and you can set each speed value and the start and end points.
- 4 [OK] button
- Sets the settings you just made.
- 5 Return button
- When you tap this button, returns to the "Preview window."
Export video
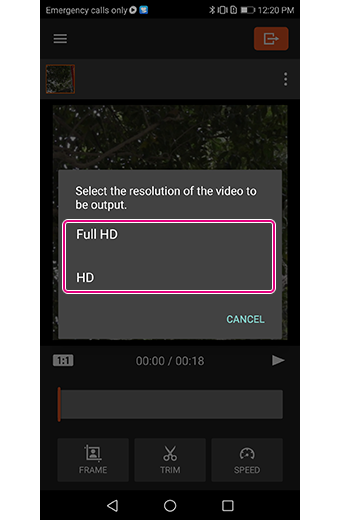
When you have finished performing all editing tasks, return to the "Preview window" and tap the Export button.
When you specify the resolution of the video on the "Export video" window, video exporting will start.
* The resolution of the video to be exported can be the following two types, regardless of the resolution of the video when it was imported.
- Full HD (1920 x 1080), HD (1280 x 720)
Video formats that can be edited
| File Format | Record Setting |
|---|---|
| XAVCS HD | 60p (50p) 50M |
| 60p (50p) 25M | |
| 30p (25p) 50M | |
| 30p (25p) 16M | |
| 24p 50M | |
| XAVCS 4K | 30p (25p) 100M |
| 30p (25p) 60M | |
| 24p 100M | |
| 24p 60M | |
| proxy movies 1280x720 |
60p (50p) 9M |
| 30p (25p) 9M | |
| 24p 9M |