ILCE-7RM4/7RM4A
Pixel Shift Multi Shooting
In "Pixel Shift Multi Shooting," the camera shoots four or 16 uncompressed RAW images while shifting the image sensor one pixel or 0.5 pixel at a time. You can generate images with a higher resolution than is possible with regular shooting by combining the captured RAW images on a computer using the Imaging Edge Desktop*1 application. This is helpful when shooting still subjects.
- *1:
- Imaging Edge Desktop is an application to support creative work using Sony digital cameras. It allows you to adjust and develop RAW images and shoot images remotely (tethered shooting) from your computer. Imaging Edge Desktop has three functions to make this possible: “Viewer,” “Edit,” and “Remote.”
Imaging Edge Desktop can be downloaded here.
If you have already installed the application, update it to the latest version.
Pixel Shift Multi Shooting is available in “Remote” in the Imaging Edge Desktop application when shooting remotely (tethered) and also on the camera itself.
Recommended system requirements
When 16 RAW images are combined in one image, the size of generated RAW image with the file extension ARQ is going to be approximately 2 GB.
The operation and process for combining images on a computer may take time in some cases. Therefore, we recommend using the following system requirements.
- Windows
CPU: 8th Generation Intel Core i7 Processors 2.2 GHz or higher
Memory: 16 GB or higher
Storage: Built-in SSD
- Mac
CPU: 8th Generation Intel Core i7 Processors 2.2 GHz or higher
Memory: 16 GB or higher
Storage: Built-in SSD
Time required for completing the processes for combining and developing images is approximately 2 minutes. (Based on the test conditions defined by Sony)
It may take a longer time to complete the processes for combining and developing images depending on the operating environment and performance of your computer.
Note
Any camera movement or subject blurring as the Pixel Shift Multi images are captured may prevent the RAW images from being combined correctly, and a faint grid pattern may be visible.
Also, images may not be combined correctly if the light shining on the subject changes due to movement of persons or objects, or if the amount of light emitted is inconsistent between shots when shooting with a flash.
Keep this in mind when setting up any photography equipment, and at the time of shooting.
Shooting Procedure
- Setting up photography equipment
- Configuring camera settings
- Shooting
- Combining Pixel Shift Multi images
- Adjusting and Developing Images
- Setting up photography equipment
Equipment setup notes
- Place the camera on a tripod or other stable surface to hold it steady.
- Make sure the camera and subject will remain steady if nearby people or objects move.
- Make sure the camera or lens weight or other factors will not cause the camera to move as you shoot.
- Configuring camera settings
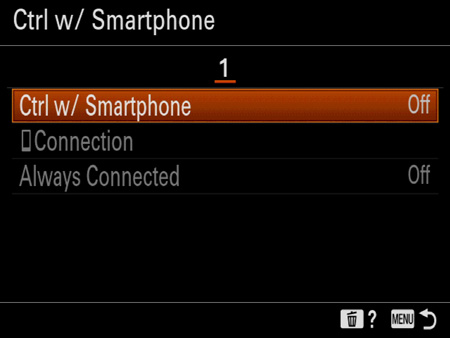
- Confirm that MENU →
 (Network) → [Ctrl w/ Smartphone] → [Ctrl w/ Smartphone] is set to [Off].
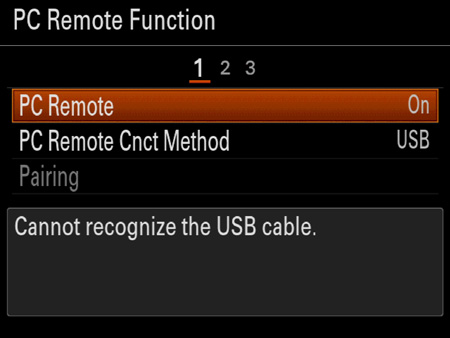
- Select the connection method between the camera and computer.
MENU → Network → [PC Remote Function] → [PC Remote] → select [On].
MENU → Network → [PC Remote Function] → [PC Remote Cnct Method] → select the desired setting.
Click here for details on the setting of [PC Remote Cnct Method].
The following procedure is used for setting [PC Remote Cnct Method] to [USB].
Hint
PC Remote shooting using a Wi-Fi connection may take a long time to transfer the recorded images. It is recommended that you set [Still Img. Save Dest.] under [PC Remote Function] to [Camera Only], or use a USB connection instead.
- Use a USB cable to connect the camera to the computer where Imaging Edge Desktop is installed.
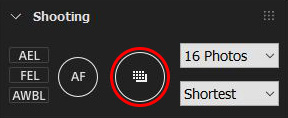
- After “Remote” in the Imaging Edge Desktop application is started, select a camera to use for Remote Shooting on the device selection window, and then perform the following settings.
When shooting with the camera itself
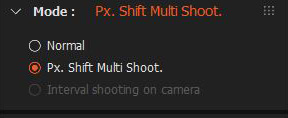
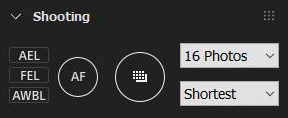
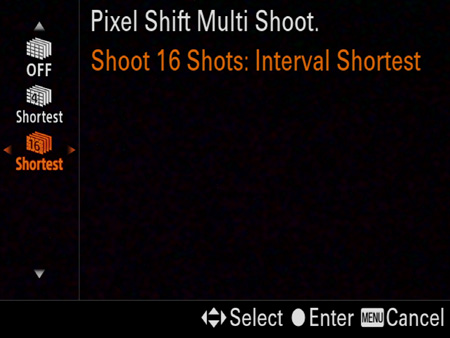
Select MENU →  (Camera Settings 1) → [Pixel Shift Multi Shoot.], set the number of shots and capture interval*3, and shoot.
- *3:
- If camera shaking and subject blurring occurs, the RAW images recorded with [Pixel Shift Multi Shoot.] may not be combined properly.
We recommend setting capture interval to the minimum setting ([Interval Shortest]).
When using flash, set the capture interval accounting for the time required to charge the flash.
When using a Mount Adaptor (LA-EA1/LA-EA2/LA-EA3/LA-EA4/LA-EA5), capture interval may be longer.
Shooting notes
- Make sure subject brightness in the shooting environment does not change when the Pixel Shift Multi images are captured.
Especially when shooting highly reflective subjects such as metal or glass, ensure that subject brightness will not be affected by any nearby movement.
- Set a suitable exposure time, because some light sources may flicker.
- We recommend shooting images ISO3200 or lower in order to achieve a high image quality.
Notes when using flash
- If the amount of light emitted by the flash is inconsistent between shots, images may not be combined correctly. To stabilize the amount of light emitted, try increasing the flash level or widening the illumination angle.
- Set the capture interval accounting for the time required to charge the flash.
- The flash-syncing speed is 1/8 second.
- When shooting in the "Pixel Shift Multi Shooting," mode, you cannot use the optical wireless flash.
To shoot, click the shutter button in “Remote” in the Imaging Edge Desktop application.
Hint
It may be helpful to set the number of shots to [1 Photo] and take a test shot. Use the test image to confirm that the shooting settings (such as flash intensity and angle) are correct.
When shooting with the camera itself
Press the shutter button down fully to take the picture.
Pressing the shutter button on the camera may cause camera shake. We recommend shooting with one of the following.
- Remote Commander (sold separately)
- Camera self-timer
- Remotely from a smartphone
- Combining Pixel Shift Multi images
After you shoot, “Viewer” in the Imaging Edge Desktop application starts and the captured images are combined to generate a RAW image with the file extension ARQ.
Hint
- You can also combine four images at a time in the order in which they were shot from 16 Pixel Shift Multi Shooting images to generate a single image and to generate a total of four RAW images. When you execute [Process Composite RAW Shooting] → [Create Px. Shift Multi Shoot. Composite Image (Create 4 Images from 16 Images)] from the [File] menu after selecting an image from 16 Pixel Shift Multi Shooting images displayed using “Viewer” in the Imaging Edge Desktop application, four images at a time are combined in the order in which they were shot and a total of four RAW images with the file extension ARQ are generated. Try this function when you are unable to combine the RAW images correctly because of camera shake or subject blurring in the captured Pixel Shift Multi Shooting images included among the16 images, or when high resolution is not required.
- If you have set [Still Img. Save Dest.] under [PC Remote Function] to [Camera Only], import the recorded four or sixteen RAW images to the computer and then combine them using “Viewer” in the Imaging Edge Desktop application.
When shooting with the camera itself
- Transfer the captured RAW images (file extension: ARW) to the computer.
- Start “Viewer” in the Imaging Edge Desktop application, select a folder containing the RAW images from the folder window on the left side of the screen, and select a RAW image from Pixel Shift Multi Shooting (labeled
 in the Viewer).
- Select [Process Composite RAW Shooting] → [Create Px. Shift Multi Shoot. Composite Image (Create 1 Image)] or [Create Px. Shift Multi Shoot. Composite Image (Create 4 Images from 16 Images)]* from the [File] menu.
* Four images at a time are combined in the order in which they were shot from 16 Pixel Shift Multi Shooting images to generate a single image and a total of four RAW images are generated. Try this function when you are unable to combine the RAW images correctly because of camera shake or subject blurring in the captured Pixel Shift Multi Shooting images included among the16 images, or when high resolution is not required.
- Set [Output method] and [File settings], and then select [Save].
Select [ARQ Format] for [Save format].
- The four RAW images are combined to generate a single RAW image with the file extension ARQ.
- Adjusting and Developing Images
By switching to “Edit” in the Imaging Edge Desktop application, you can develop and save RAW files as JPEG or TIFF files.
Hint
- The adjustment speed can become faster if you close the screen of “Viewer” in the Imaging Edge Desktop application while the images are adjusted using “Edit” in the Imaging Edge Desktop application depending on the operating conditions of your computer.
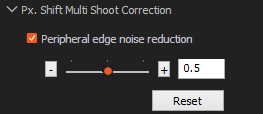
- You can reduce noise that appears at the edges of images in Pixel Shift Multi Shooting. This noise is caused by vibration or other factors. Use the slider to adjust the amount of correction. This panel is displayed only when you select an image shot with Pixel Shift Multi Shooting, in ARQ format.
For instructions on the Imaging Edge Desktop applications, see this page.


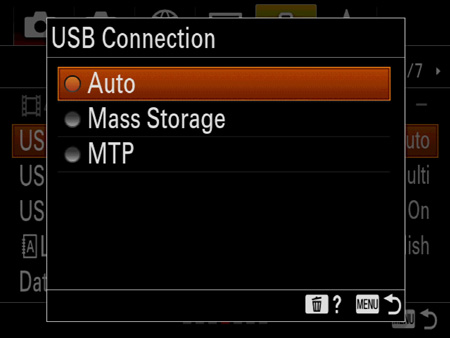
 (Setup) → [USB Connection], select [Auto], [Mass Storage], or [MTP].
 PAGE TOP