|
 |
 |
|
The following procedures are available for backing up image data.
- Backing up image data to a computer
| · |
If you are using Windows(R) , read this |
| · |
If you are using Mac OS, read this |
- To back up image data to a memory card, read this
|
| Note |
| · |
We recommend backing up the image data to a computer because the order of images and the file names of image data may change when the image data is backed up to a memory card and then the backed up image data is saved again to the internal memory after the firmware update. |
| · |
If files of formats that cannot be displayed in the digital photo frame are saved to the internal memory with a computer, the image data cannot be backed up to a memory card. We recommend using a computer for the backup. |
| · |
When backing up image data to a computer, optional USB cable (B-TYPE) is necessary. |
|
|
|
| Backing up image data to a computer |
Remove all memory cards inserted in the memory card slots of the digital photo frame.
When you are using 
| Note |
The following explanation assumes you are using Windows Vista(R) .Also, the computer screens shown in the explanation may differ depending on your operating system setup. |
|
|
|
 |
|
When you are using 
| Note |
| The computer screens shown in the following explanation may differ depending on your operating system setup. |
|
|
- Turn on the power of the digital photo frame.
Check that the images saved to the internal memory are displayed on the LCD.
| Note |
| If the demo mode screen appears after the power of the photo frame is turned on, you do not need to back up any image data because there is no image data saved to the internal memory of the digital photo frame. |
- Connect your digital photo frame and computer with a USB cable.
Check that the following is displayed on the LCD of the digital photo frame.

Also, check that the DPF icon for the DPF-A72 is displayed on the desktop of your computer.

(The name of the icon may be "Unlabeled," "Untitled," "NO NAME," or some other name.)
| · |
For details on how to connect a USB cable, see the "Connecting a computer" chapter in the operating instructions of the digital photo frame. |
| · |
When a USB cable is connected, some windows may open automatically on your computer and an application may start automatically. If this happens, close all of the windows and quit the application. |
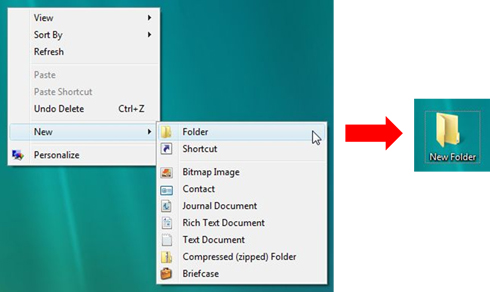
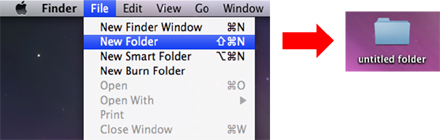
- Create a new folder on the desktop of your computer. Click "New Folder" from the File menu at the top of the computer screen.
An "untitled folder" is created on the desktop of your computer.
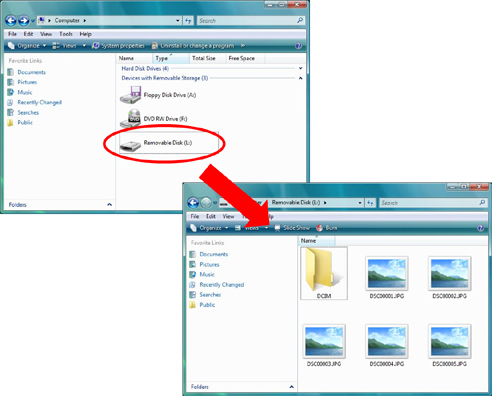
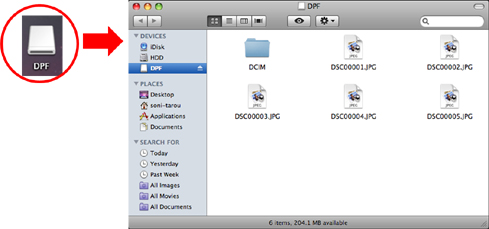
- Double-click the DPF icon for the DPF-A72 on the desktop of your computer to open the window.
The folders and files saved in the internal memory of the digital photo frame appear.
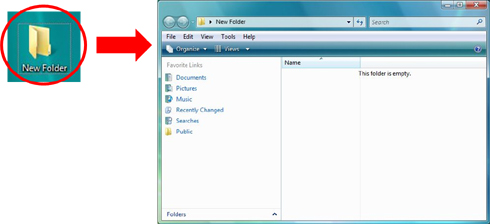
- Open the "untitled folder."
Double-click the "untitled folder" icon on the desktop of your computer to open the window.

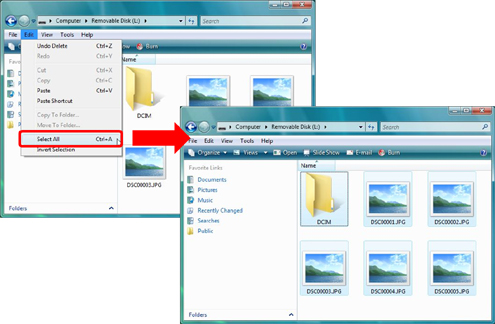
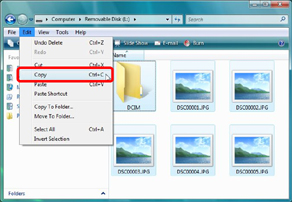
- Click the DPF window for the DPF-A72 that was opened in Step 4, and click "Select All" from the Edit menu at the top of the computer screen.
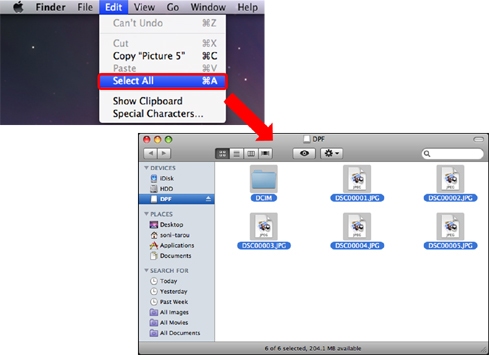
All the folders and files in the internal memory are selected.
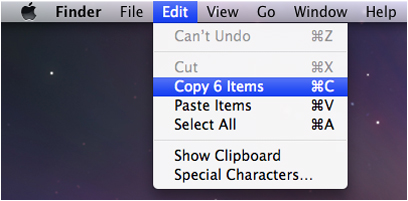
- Click "Copy 6 Items" from the Edit menu at the top of the computer screen.
| Note |
| The number of items in "Copy 6 Items" differs depending on the number of selected folders and files. In this example, the total number of selected folders and files is 6. |
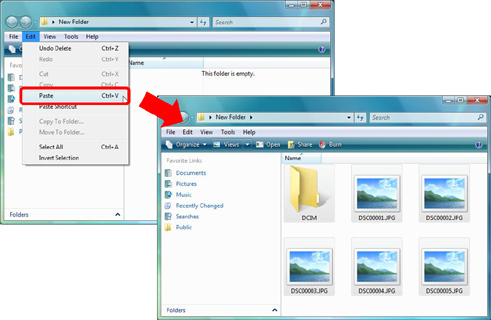
- Click the "untitled folder" window that was opened in Step 5, and click "Paste Items" from the Edit menu at the top of the computer screen.
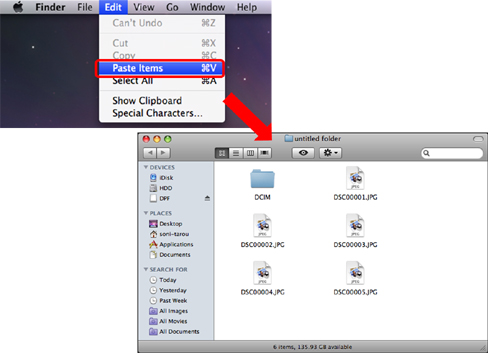
The image data of the internal memory is copied to the computer.
- Disconnect the USB cable after copying is finished.
Before you disconnect the USB cable from your computer, perform the following removal operation.
(The same applies to turning off the digital photo frame while your computer is being used.)
| Note |
| If the removal operation is not performed correctly, the image data stored in the digital photo frame may be corrupted. |
Drag the icon of the USB disk drive (removable disk) to "Trash," and then disconnect the USB cable. Before you disconnect the USB cable, check that the access lamp on the digital photo frame is off.
Sometimes the file transfer may still be ongoing even though it may look as if it has finished on the computer screen. If you disconnect the USB cable or remove the storage media during file transfer, the data stored in the storage media may be corrupted.
The backup is now finished.
|
|
|
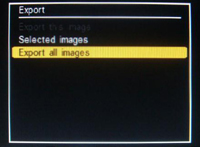
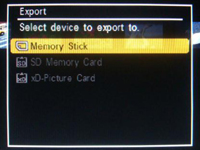
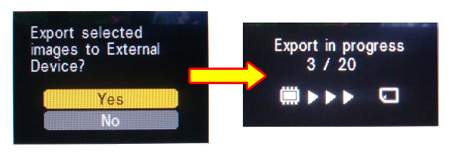
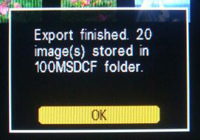
| Backing up image data to a memory card |
Provide a memory card that has just been initialized (formatted). For the initialization (format) procedure, see the operating instructions of your digital camera.
| Note |
| · |
Do not use the memory card for the firmware update. If the memory card contains a mixture of the firmware update file and backed up image data, the firmware update may not be performed correctly. |
| · |
Use a memory card that has a larger capacity than the used capacity of the internal memory as the memory card for backup. If the capacity of the memory card is smaller than the used capacity of the internal memory, you will not be able to back up all of the images. For the procedure for checking the used capacity of the internal memory, see <here>. |
|
|
|
|
|
 |
|