Connecting the camera
Connecting the camera
For details on making connections, also refer to “Setup guide.”
Camera settings
When using ILCE-1 or ILCE-9M3
- MENU →
 (Network) → [Wired LAN] → [Wired LAN Connect] → [On]
 - MENU → (Network) → [Cnct./Remote Sht.] → [Remote Shoot Function] → [Remote Shooting] → [On]
When using the ILCE-9M2
- Select MENU → (Network) → [PC Remote Function] → [PC Remote] → [On]
- Select MENU → (Network) → [PC Remote Function] → [PC Remote Cnct Method] → [Wired LAN]
When using the ILCE-9
- Select MENU → (Network) → [PC Remote(Wired LAN)] → [On]
Camera connections
Depending on your usage environment, connect the camera to the computer with a LAN cable using “Single connection” or “Multiple connection.”
Starting the application (Device Selection Window)
Starting Remote Camera Tool
Double click on the Remote Camera Tool icon. The "Device selection window" will appear.
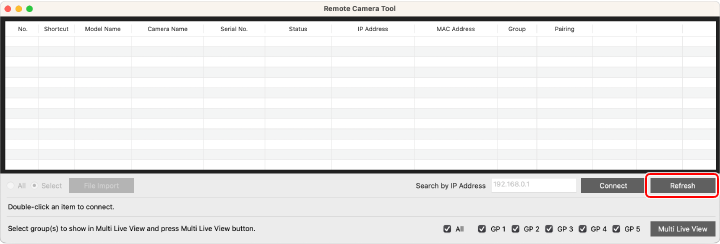
Device Selection Window
Click the [Refresh] button. A list of the camera(s) connected to the PC will appear.
To connect the camera to Remote Camera Tool you will need to either establish a connection using access authentication or perform pairing. For details, refer to “How to connect using access authentication” or “How to pair.”
Double-click an already connected camera to display the Camera control window in “Single Live View,” from which you can perform various operations.
Alternatively, click the [Multi Live View] button to display multiple cameras at the same time in the Camera control window in “Multi Live View,” from which you can perform various operations.
-
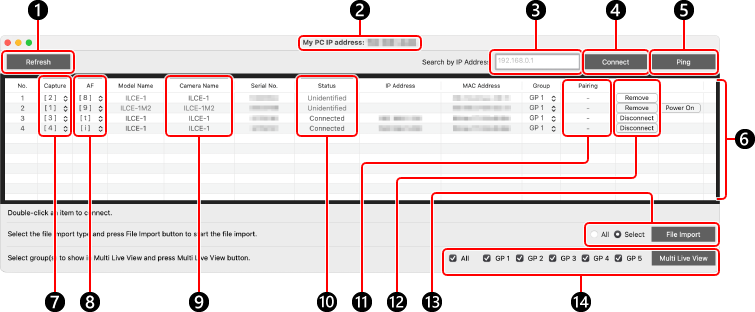
1 IP address dialog box
This is used when the camera cannot be displayed by clicking the [Refresh] button, or to connect by entering the IP address directly.
-
2 [Connect] button
To connect by entering the IP address directly, input the camera’s IP address in 1, then click the [Connect] button (2).
-
3 [Refresh] button
Allows you to search among the connected cameras.
-
4 Shortcuts
You can assign shortcuts to the cameras you wish to connect to.
-
5 Camera Name
You can change the device names under the [Camera Name] column on this window.
Note, however, that the name you changed on this window is effective only for Remote Camera Tool. The name of the camera displayed on the [Edit Device Name] menu will not change.
-
6 Camera status
Connected: The camera is connected.
Disconnected: The camera is disconnected.
Unidentified: Camera not found (for cameras that were previously connected) -
7 Pairing
Done:Pairing is complete. Double-click to connect.
Not yet:Pairing is incomplete. Double-click to open the pairing screen (refer to “How to pair” below for further instructions).
- (dash):Displayed when a camera with the [Connect without Pairing] setting is set to [Enable], or when a camera with the “Access Authen.” setting is set to [On]. When connecting without pairing is enabled, you can double-click to connect. -
8[Disconneted] button, [Remove] button
Select a camera with the Status “Connected” and click the [Disconnected] button to disconnect the selected camera.
Select a camera with the Status “Unidentified” and click the [Remove] button to remove the selected camera from the list.- To remove all the cameras with the Status “Unidentified” from the list, select [Tools] → [Remove Unidentified Camera].
-
9 A list of connected camera(s) will appear.
The cameras appear in Multi Live View in the order displayed.
Click an item name to re-sort the list in ascending or descending order. -
10 Multi Live View start button
Select the group(s) to display in Multi Live View and click the [Multi Live View] button.
Clicking the [Multi Live View] button starts Multi Live View.
Multi Live View lets you display up to 20 cameras. Multi Live View does not start if the number of cameras in the selected group(s) is 0 or 21 or more. -
11 File transfer
For details, refer to “File transfer.”
Using the Network Configuration File
You can display in a device selection window only cameras with the IP addresses given in advance in a file by using Network Configuration File. This means you can eliminate the trouble of manually inputting IP addresses.
From the menu bar, select [File] → [Network Configuration File Setting].
Follow the instructions on the screen to specify the file containing items such as IP addresses.
Listing example (setting values as listed after the “#” character)
192.168.100.2,1,1 #IP=192.168.100.2, shortcut=1, Group=1
For detailed usage instructions, refer to “Network Configuration File User's Manual.”
How to connect using access authentication (ILCE-1 and ILCE-9M3 only)
On cameras that support the access authentication function, communication data can be encrypted over an SSH connection, allowing you to transfer data more securely.
 : When you configure camera settings, a message about access authentication appears on the camera. Select [Access Authen. Info].
- If no message about access authentication is displayed, either perform the following setting on the camera or use pairing to connect.
- MENU → (Network) → [Network Option] → [Access Authen. Settings] → [Access Authen.] → [On]
- MENU → (Network) → [Network Option] → [Access Authen. Info]
- To connect using pairing, refer to “How to pair.”
 : Launch Remote Camera Tool on the computer, and in the Device Selection Window double-click the camera you wish to connect.
 - : Refer to the access authentication information displayed on the camera, enter the user name and password on the computer, and click [OK].
- Once the input credentials have been saved, you will subsequently be able to connect without entering a user name and password.

Note
- When entering usernames, passwords, and fingerprints, make sure that no one is around to avoid the information on the screen being seen by others and to prevent unauthorized use.
- If you unmask your password when entering it, there is a risk that it will be revealed to a third party. Make sure that no one is aroundbefore unmasking.
- : Confirm that the fingerprint displayed on the computer matches the one displayed on the camera, then click [OK].
Deleting access authentication info
You can delete access authentication info (user name and password) stored on the computer by selecting [File] → [Delete Stored Access Authen. Info] in the Device Selection Window.
How to pair
To enhance security, pair the camera with the computer before use. Pairing is only required on the first connection.
Pairing is not necessary if you connect using access authentication.
- : Double-click a camera with “Not yet” displayed under Pairing in the Device Selection Window.
The screen below will be displayed.

- : Configure the following setting on the camera to display the pairing standby screen.
When using ILCE-1 or ILCE-9M3 : MENU →
(Network) → [Cnct./Remote Sht.] → [Remote Shoot Function] → [Pairing] When using the ILCE-9M2 : MENU →
(Network) → [PC Remote Function] → [Pairing]When using the ILCE-9 : MENU →
(Network) → [PC Remote(Wired LAN)] → [Pairing] - : Select [Pairing].

- : On the camera’s pairing screen, select [OK].
- : Turn the power switch of the camera to OFF.
Once you have turned the power switch to OFF, the pairing information will be saved on the camera. Wait for 10 seconds or longer before turning the switch to ON.
Deleting the pairing information
Pairing information is stored on both the computer (Remote Camera Tool) and on the camera. You can delete all pairing information from Remote Camera Tool by selecting [Tools] → [Delete All Pairing Information] in the Device Selection Window.
- Pairing information cannot be deleted individually.
- To delete the pairing information for the camera, perform the following settings to reset the network settings.
When using ILCE-1 or ILCE-9M3 : MENU →
(Network) → [Network Option] → [Reset Network Set.]When using ILCE-9M2 or ILCE-9 : MENU →
(Network) → [Reset Network Set.]
Setup guide
For details on the connection, also refer to the following: