 |
 |
 |
|
| Update procedure (Explanations on program update) |
|
| Note |
Perform the update (Step 5- in the following explanation) while the digital photo frame and AC adapter are placed on a stable surface to ensure the power does not turn off as a result of, for example, the AC adapter becoming disconnected during the update. in the following explanation) while the digital photo frame and AC adapter are placed on a stable surface to ensure the power does not turn off as a result of, for example, the AC adapter becoming disconnected during the update.
The turning off of the power of the digital photo frame during the update may cause a malfunction. |
|
- Download the update file.
Click the following file (A72_V146.zip) to start the download.
Save the downloaded file to the desktop of your computer (recommended).
| Note |
| This update file is specifically for the DPF-A72. It cannot be used for other Sony digital photo frame products. |
- Extract the downloaded update file.
■ When your computer is running Windows Vista(R)/Windows(R) 7
- Right-click the saved file (A72_V146.zip).
- Click 'Extract All.'
- Click 'Extract' in the Extract Compressed (Zipped) Folders window that appears.
The A72_V146 folder is displayed in the open state on the desktop of your computer.
■ When your computer is running Windows(R) XP
- Right-click the saved file (A72_V146.zip).
- Click 'Extract All.'
- Click 'Next' in the 'Welcome to Compressed (zipped) Folders Extraction Wizard' that appears.
- Click 'Next.'
- Click 'Finish.'
The A72_V146 folder is displayed in the open state on the desktop of your computer.
■ When your computer is running Windows(R) 2000
- Use an extraction tool to extract the saved file (A72_V146.zip) to the desktop of your computer. The A72_V146 folder is created when the file is extracted.
■ When your computer is running Mac OS
- Double-click the saved file (A72_V146.zip).
The A72_V146 folder is created on the desktop of your computer.
The extracted A72_V146 folder contains the following update file.
The extension (*.VUP or *.vup) may not be displayed depending on your operating system setup.
| Note |
| Extraction may be performed when the file is downloaded depending on your operating system setup. Also, extraction may not be possible with the above procedure depending on your operating system setup. In such a case, use an extraction tool. |
- Provide storage media.
In this explanation, we describe using a Memory Stick/Memory Stick Duo to perform the update.
When using an SD Memory Card or xD-Picture Card, replace the Memory Stick/Memory Stick Duo with the corresponding card in the explanation.
Provide a Memory Stick/Memory Stick Duo that has just been initialized (formatted). For the initialization (format) procedure, see the operating instructions of your digital camera.
| Note |
- Use a Memory Stick/Memory Stick Duo that has been initialized (formatted) with your digital camera, or a Memory Stick that has been initialized (formatted) with the special software Memory Stick Formatter.
- Use an SD Memory Card or xD-Picture Card that has been initialized (formatted) with your digital camera.
- Using storage media that has been initialized (formatted) with a computer is not recommended because it may not be recognized by the DPF-A72 depending on the format in which it was initialized (formatted).
If you have to use storage media that has been initialized (formatted) with a computer, copy JPEG image files and check that they can be viewed in DPF-A72 beforehand.
|
| Note |
| Make sure you use the Memory Stick / Memory Stick Duo that has just been initialized (formatted). |
- Copy the update file to the storage media.
Depending on your setup, use one of the following procedures to copy the update file to the Memory Stick / Memory Stick Duo .
■When your computer has a Memory Stick slot
- Insert the initialized (formatted) Memory Stick / Memory Stick Duo into the Memory Stick slot of your computer.
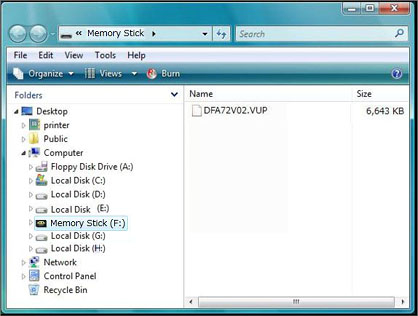
- Open the A72_V146 folder on the desktop of your computer, and copy the update file in the folder to the Memory Stick / Memory Stick Duo .
Without creating a folder, drag&drop to copy the update file as is to the topmost layer (layer directly under the Memory Stick / Memory Stick Duo ).
[Example of copying to the topmost layer of storage media (layer directly under the storage media) in Windows Vista(R)]
* The screen differs depending on your setup.
■ When your computer does not have a Memory Stick slot
- Insert the initialized (formatted) Memory Stick / Memory Stick Duo into the Memory Stick slot of your digital camera.
- Connect your digital camera and computer with a USB cable.
| Note |
| Optional USB cable (B-TYPE) is necessary. |
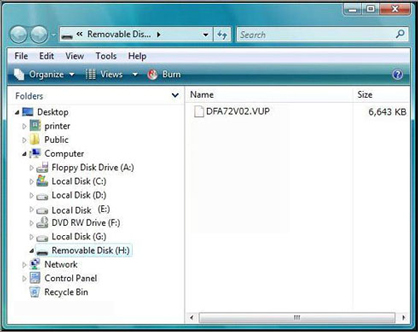
- Open the A72_V146 folder on the desktop of your computer, and copy the update file in the folder to the Memory Stick / Memory Stick Duo of your digital camera (shown as Removable Disk on your computer).
Without creating a folder, drag&drop to copy the update file as is to the topmost layer (layer directly under the Memory Stick / Memory Stick Duo ).
[Example of copying to the topmost layer of storage media (layer directly under the storage media) in Windows Vista(R)]
* The screen differs depending on your setup.
| Note |
| For the procedure to connect your digital camera and computer and the procedure to copy to the Memory Stick / Memory Stick Duo , see the operating instructions of your digital camera. |
- Perform the firmware update.
| Note |
Perform Steps  to with the buttons on the digital picture frame. The operation cannot be performed with the remote control. to with the buttons on the digital picture frame. The operation cannot be performed with the remote control.
|
- Make sure that the power of the digital photo frame is off (the «
 (POWER)» button of the digital photo frame is lit red). (POWER)» button of the digital photo frame is lit red).
- Insert the Memory Stick / Memory Stick Duo to which you copied the update file into the Memory Stick slot of your digital photo frame.
- Press the «(POWER)» button to turn on the power of the digital photo frame while pressing the «VIEW MODE» button.
Keep the «VIEW MODE» button pressed until the following screen appears.

| Note |
| If the LCD does not display the screen above after at least 1 minute or the screen is not displayed clearly, disconnect the AC adapter from the digital photo frame, and then reconnect it. Next, make sure that the «(POWER)» button lights green, press the «(POWER)» button to turn off the power, and then perform '5. Perform the firmware update ' again. If the screen above is still not displayed, consult your nearest Customer Service Center . |
- [Press the «
 (ENTER)» button. (ENTER)» button.
Make sure that the following message is displayed on the LCD after a few minutes.

| Note |
| If the LCD does not display the screen above after at least 1 minute or the screen is not displayed clearly, disconnect the AC adapter from the digital photo frame, and then reconnect it. Next, make sure that the «(POWER)» button lights green, press the «(POWER)» button to turn off the power, and then perform '5. Perform the firmware update' again. If the screen above is still not displayed, consult your nearest Customer Service Center. |
- Press the « (ENTER)» button.
The LCD screen changes to the following screen, and the firmware update is performed.
It takes about 1 minute 30 seconds to write the firmware.

| Note |
During the update, make sure that the digital photo frame and AC adapter are placed on a stable surface to ensure the power does not turn off as a result of, for example, the AC adapter becoming disconnected during the update.
Also, make sure the Memory Stick / Memory Stick Duo is firmly inserted so that it does not come out during the update.
The turning off of the power of the digital photo frame or the coming out of the Memory Stick / Memory Stick Duo may cause a malfunction. |
| Note |
| ·If the 'No update file found' error occurs |
| Cause: |
There is no file in the Memory Stick / Memory Stick Duo . |
| Solution: |
Use your computer to check the file that was copied to the Memory Stick / Memory Stick Duo and the copy location, and then perform ' 5. Perform the firmware update. ' again from the beginning.
|
·If the 'Update failed. See [Explanations on program update].' error occurs |
| Cause: |
The Memory Stick / Memory Stick Duo came out part way through the update. |
| Solution: |
Click [Explanations on program update] to display the information.
|
|
- When the completed message appears on the LCD, press the «(POWER)» button to turn off the power of the digital photo frame.

- Remove the Memory Stick / Memory Stick Duo from the digital photo frame.
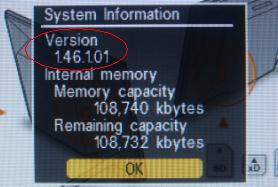
- Check the firmware version after the update.
- Press the «(POWER)» button to turn on the digital photo frame.
- Press the «MENU» button.
- Use the «
 » buttons to select the Settings tab. » buttons to select the Settings tab.
- Use the «
 » buttons to select 'System Information,' and press the « (ENTER)» button. » buttons to select 'System Information,' and press the « (ENTER)» button.
- Make sure that the firmware version is ' 1.46.x.xx .'
- After you have checked the firmware version, press the « (ENTER)» button.
- Press the «MENU» button.
- Turn off the power of the digital photo frame.
Turn off the power of the digital photo frame.
The update file in the Memory Stick / Memory Stick Duo is not needed after the update.
|
|
|
| Note |
In the event that the image data stored in internal memory is lost or damaged after the firmware update, use the following procedure 'Procedure for Restoring Image Data to Internal Memory' to save the image data to internal memory again.
|
|
 |
|
|
|