Creating a Disc
With "PlayMemories Home", you can create 4 types of discs: a DVD-Video disc, an AVCHD format disc, a Blu-ray disc and a data disc.
Select a disc according to the saved photos/videos or playback device being used.
- Saving videos to a disc in standard definition (STD) image quality (DVD-Video disc)
- Creating an AVCHD (HD) disk with HD quality
- Saving videos to a disc in high-definition (HD) image quality (Blu-ray disc)
[Hint]
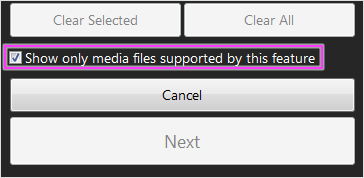
- When creating each disk, if you check the checkbox below, only the corresponding files applicable to the disk creation will be displayed.
[Note]
- When using the create disk function for the first time, a Handycam, Cyber-shot or α (Alpha) camera needs to be connected to a computer.
- The DVD-Video menu is displayed only when your "Handycam", "Cyber-shot" or "α" is compatible with the disc.
It is necessary to install a specific Add-on software (free) for the first time by connecting to the network. Follow the on-screen instructions.
- Disable the power-saving mode to avoid your PC going into sleep mode during the creation of the disc.
- You cannot add additional content to the disc after creating the disc.
Additional content cannot be added to DVD-RW, DVD+RW, BD-RE or CD-RW either. You can write to the disc again after erasing all the written data.
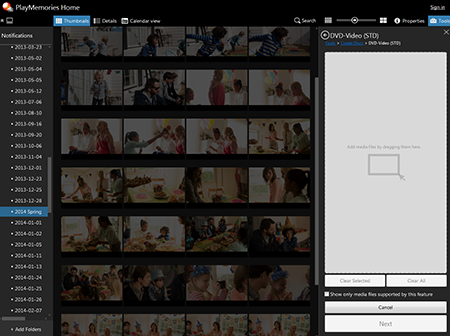
Saving videos to a disc in standard definition (STD) image quality (DVD-Video disc)
With "PlayMemories Home", you can create a DVD disc in standard definition (STD) image quality from a video in the AVCHD or MPEG2 (SD) format.
[Notes]
- It will take some time to create a disc depending on the video format or PC environment.
1. Insert a new DVD disc into the DVD drive of your PC.
2. Click [ Tools] - [Create Discs] - [DVD-Video (STD)].
3. Select videos to write to the disc from the thumbnails, then drag and drop them into the area on the right, and click [Next].
4. Follow the on-screen instructions.
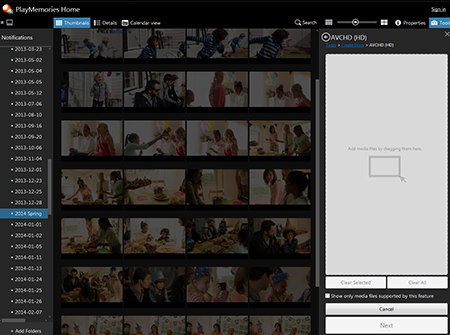
Creating an AVCHD (HD) disk with HD quality
Using PlayMemories Home, AVCHD, MP4 (AVC) and XAVC S format videos can be written to a DVD as a AVCHD disk.
[Notes]
Creating an AVCHD (HD) disk from an AVCHD video: Videos recorded with a recording mode of [HD PS] (28Mbps) and [HD FX] (24Mbps) cannot be created as a AVCHD disk as is. Using PlayMemories Home, such videos will be converted to a [HD FH] bit rate and recorded as an AVCHD disk.
For MP4 (AVC) and XAVC S videos: Videos will be converted to an AVCHD disk with 1920x1080/60i.
As the video is converted, it will take more time than usual to create the disk. The recording time of the video that can be stored on a single disk will vary according to the device.
1. Insert a new DVD disc into the DVD drive of your PC.
2. Click [Tools] - [Create Discs] - [AVCHD (HD)].
3. Select videos to write to the disc from the thumbnails, then drag and drop them into the area on the right, and click [Next].
4. Follow the on-screen instructions.
Saving videos to a disc in high-definition (HD) image quality (Blu-ray disc)
[Notes]
- You can use the Blu-ray disc of BD-R or BD-RE.
1. Insert a new Blu-ray disc into the Blu-ray disc drive of your PC.
2. Click [Tools] - [Create Discs] - [Blu-ray Disc (HD)].
3. Select videos to write to the disc from the thumbnails, then drag and drop them into the area on the right, and click [Next].
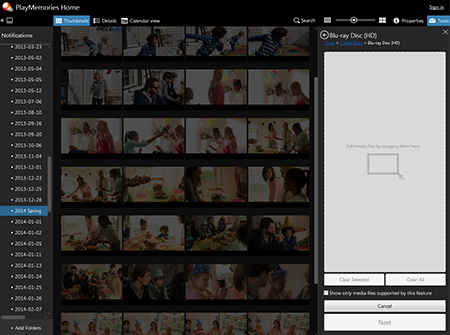
4. Follow the on-screen instructions.
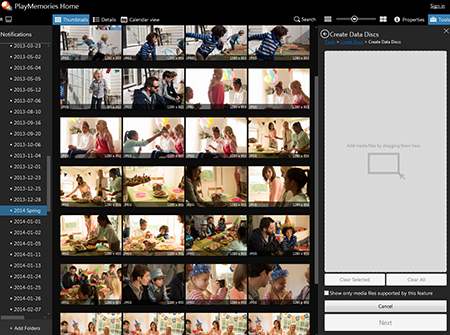
Saving photos to a disc (data disc)
With "PlayMemories Home", you can easily save photos stored on your PC onto CDs and DVDs. Also, a list of the photos in the HTML format etc., are automatically created on the data disc.
The created disc is playable only on a PC.
[Notes]
- Usable disc types are DVD-R, DVD+R, DVD+R DL, DVD-RW, DVD+RW, CD-R, and CD-RW.
- You cannot save videos on a data disc.
1. Insert a new CD or DVD disc into the DVD drive of your PC.
2. Click [Tools] - [Create Discs] - [Create Data Discs].
3. Select the photos to write to the disc from the thumbnails, then drag and drop them into the area on the right, and click [Next].