Focusing on a person’s face or eyes (Shooting still images)
The following procedure is used for capturing images by focusing on a face or eye of a person.
There are two shooting methods. Use either method in accordance with the shooting conditions. You can also set whether to detect the left or right eye.
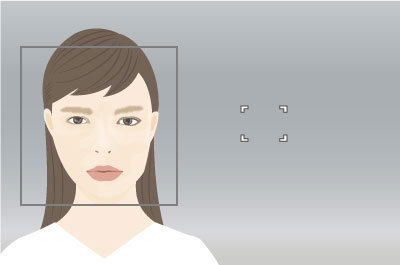
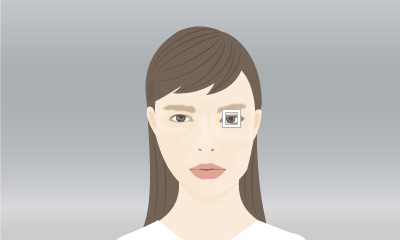
- Press the shutter button halfway down.
- When the camera detects a face or eye inside or around the designated [
 Focus Area], it focuses on the face or eye with higher priority.
 - If the camera does not detect any face or eye inside or around the designated [Focus Area], it will focus on another detectable subject.
- When shooting, press the shutter button halfway down to focus before pressing it all the way down.
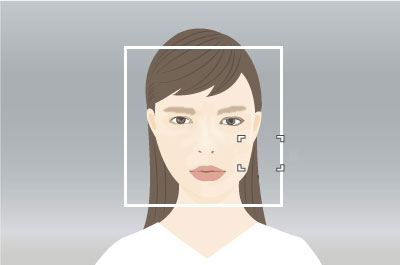
- When the camera detects a face or eye inside or around the designated [
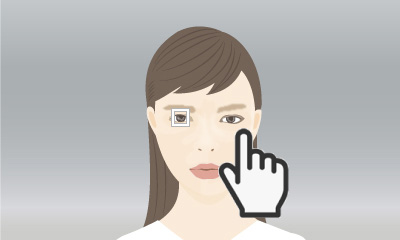
- Press the button to which you have assigned [Eye AF].
- The camera focuses exclusively on faces or eyes anywhere on the screen, regardless of the setting for [Focus Area].
- The camera will not automatically focus on another subject if no face or eye is detected anywhere on the screen.
- When shooting, keep holding down the custom key when you press the shutter button.
- The camera focuses exclusively on faces or eyes anywhere on the screen, regardless of the setting for [
Press the shutter button halfway down.
Setting the camera
-
[
Face/Eye Prior. in AF]MENU →
 (Focus) → [Face/Eye AF] → [Face/Eye Prior. in AF] → [On].
 -
[
Face/Eye Subject]MENU →
(Focus) → [Face/Eye AF] → [Face/Eye Subject] → [Human]. -
[
Focus Mode]MENU →
(Focus) → [AF/MF] → [Focus Mode] → the desired setting from the  [Single-shot AF],
  [Automatic AF],
  [Continuous AF], or
  [DMF].
 -
[
Focus Area]MENU →
(Focus) → [Focus Area] → [Focus Area] → the desired setting.
Guide to using the camera
Face and eye detection frames
To display the face and eye detection frames when a face or an eye is detected, set [Face/Eye Frame Disp.] to [On].
- MENU → (Focus) → [Face/Eye AF] → [Face/Eye Frame Disp.] → [On].
* Even when [Face/Eye Frame Disp.] is set to [Off], if [Right/Left Eye Select] is not set to [Auto] or if you execute [Switch Right/Left Eye] using the custom key, the eye detection frame appears.
Detection frames are color-coded, as described below.
- Gray: Face or eye detected, but not available for autofocus (because the focus area and face do not overlap)
- White: Autofocus available (when you have set the priority order in [Face Memory], subjects include faces that you have ranked highest in priority)
- Reddish-purple: Faces ranked second or lower in priority in [Face Memory]
- Green: Face or eye in focus (when shutter button is pressed halfway down)
Setting [Focus Area]
* In this section, the procedure for setting the focus area is explained in the condition where [Face/Eye Frame Disp.] is set to [On].
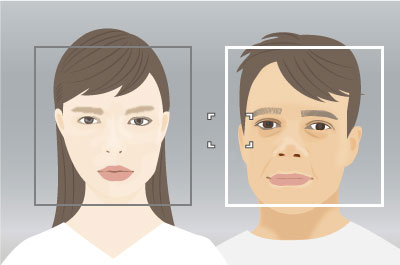
When face detection frames and focus areas overlap, you can focus on either the face or eye. This way, you can switch to the best focus area depending on the shooting scene. For example, when a [Spot] of [Focus Area] overlaps a face detection frame as shown below, the face detection frame changes from gray to white, and you can focus on either the face or eye.
* When [Right/Left Eye Select] is not set to [Auto] or you execute [Switch Right/Left Eye] using the custom key, the eye detection frame appears.
Face and eye not in focus
Can focus on face or eye
- [Wide]:
- Useful for subjects that are moving around, or when the position of faces is unpredictable.
- [Zone], [Center Fix], [Spot], [Expand Spot]:
- Set when you will decide in advance how to compose shots, or when you will focus on a certain person among multiple subjects.
Selecting people to focus on their face or eyes
* In this section, the procedure for setting the focus area is explained in the condition where [Face/Eye Frame Disp.] is set to [On].
Selecting faces with the focus area
Faces to focus on can be selected when the focus area is over the face detection frame.
* When [Right/Left Eye Select] is not set to [Auto] or you execute [Switch Right/Left Eye] using the custom key, the eye detection frame appears.
Selecting faces by touch
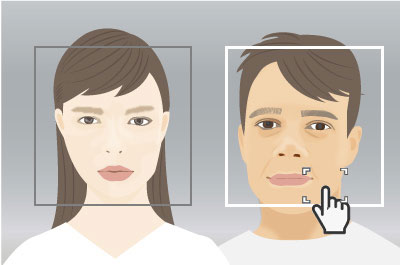
Faces to focus on can be selected when the focus area is moved over the face detection frame by touch. On the monitor, touch the detection frame of the face to select.
* When [Right/Left Eye Select] is not set to [Auto] or you execute [Switch Right/Left Eye] using the custom key, the eye detection frame appears.
Selecting faces by registering them
Faces that you register in advance are given priority when the camera focuses.
MENU → (Focus) → [Face/Eye AF] → [Face Memory] → [New Registration] to register faces.
- MENU → (Focus) → [Face/Eye AF] → [Regist. Faces Priority] → [On] to give priority to focusing on the faces that you have registered in advance.
- When you have registered multiple faces, you can change the priority order of faces by selecting MENU → (Focus) → [Face/Eye AF] → [Face Memory] → [Order Exchanging].
Switching the eye to detect
You can set which eye to detect (left or right) in advance by selecting MENU → (Focus) → [Face/Eye AF] → [Right/Left Eye Select], but you can also switch eyes as follows.
Switching with a custom key assigned to [Switch Right/Left Eye]
* [Switch Right/Left Eye] operations are possible when you are not pressing the shutter button halfway down.
If you have set [Right/Left Eye Select] to [Right Eye] or [Left Eye], the eye to be detected can be switched between left and right each time you press the custom key assigned to [Switch Right/Left Eye].
If you have set [Right/Left Eye Select] to [Auto], the eye to be detected can be temporarily switched between left and right by pressing the custom key assigned to [Switch Right/Left Eye].
Note
If you have set [Right/Left Eye Select] to [Auto], any of the following actions will cancel the temporary right/left selection and the camera will revert to automatic eye detection.
- Pressing the center of the control wheel
- Pressing the center of the multi-selector
- Stopping pressing the shutter button halfway down (only during still image shooting)
- Stopping pressing the custom key to which [AF On] or [Eye AF] is assigned (only during still image shooting)
- Pressing the MENU button
Switching by touch
If you have set [Touch Func. in Shooting] to [Touch Tracking], the eye to be detected can be switched between left and right by touching the periphery of an eye on the monitor.
Touch the periphery of an eye that you want detected on the monitor.
The eye to be detected switches.
Switching by touch is possible when you are not pressing the shutter button halfway.
To cancel touch operations, press the center of the control wheel or touch the ![]() icon in the upper right of the monitor.
icon in the upper right of the monitor.
Press the button to which you have assigned [Eye AF].
Setting the camera
-
[Custom Key/Dial Set.]
After selecting MENU →
 (Setup) → [Operation Customize] → [
 Custom Key/Dial Set.], select a button to which the function is assigned and then select [Eye AF].
 -
[
Face/Eye Subject]MENU →
(Focus) → [Face/Eye AF] → [Face/Eye Subject] → [Human]. -
[
Focus Mode]MENU →
(Focus) → [AF/MF] → [Focus Mode] → the desired setting from the [Single-shot AF], [Automatic AF], [Continuous AF], or [DMF].
Guide to using the camera
Eye detection frames

A green autofocus frame is displayed once an eye is detected after you press the custom key assigned to [Eye AF]. If the eyes cannot be detected, the face detection frame may be displayed instead. In this case, you can try to make the eye detection frame appear by zooming in on the face.
Focusing based on subject movement
Adjust the [Focus Mode] setting to suit subject movement.
[Single-shot AF]
Locks the focus once the subject is in focus after you hold down the custom key assigned to [Eye AF]. Recommended for stationary subjects.
[Automatic AF]
Automatically switches between [Single-shot AF] and [Continuous AF] in response to subject movement.
[Continuous AF]
Enables continuous focusing by holding down the custom key assigned to [Eye AF]. Recommended for moving subjects.
[DMF]
Locks the focus once the subject is in focus after you hold down the custom key assigned to [Eye AF]. Recommended for stationary subjects.
Selecting faces by registering them
Faces that you register in advance are given priority when the camera focuses.
MENU → (Focus) → [Face/Eye AF] → [Face Memory] → [New Registration] to register faces.
- MENU → (Focus) → [Face/Eye AF] → [Regist. Faces Priority] → [On] to give priority to focusing on the faces that you have registered in advance.
- When you have registered multiple faces, you can change the priority order of faces by selecting MENU → (Focus) → [Face/Eye AF] → [Face Memory] → [Order Exchanging].
Switching the eye to detect
You can set which eye to detect (left or right) in advance by selecting MENU → (Focus) → [Face/Eye AF] → [Right/Left Eye Select], but you can also switch eyes as follows.
Switching with a custom key assigned to [Switch Right/Left Eye]
* [Switch Right/Left Eye] operations are possible when you are not pressing the custom key assigned to [Eye AF].
If you have set [Right/Left Eye Select] to [Right Eye] or [Left Eye], the eye to be detected can be switched between left and right each time you press the custom key assigned to [Switch Right/Left Eye].
If you have set [Right/Left Eye Select] to [Auto], the eye to be detected can be temporarily switched between left and right by pressing the custom key assigned to [Switch Right/Left Eye].
Note
If you have set [Right/Left Eye Select] to [Auto], any of the following actions will cancel the temporary right/left selection and the camera will revert to automatic eye detection.
- Pressing the center of the control wheel
- Pressing the center of the multi-selector
- Stopping pressing the shutter button halfway down (only during still image shooting)
- Stopping pressing the custom key to which [AF On] or [Eye AF] is assigned (only during still image shooting)
- Pressing the MENU button