Adding and using Shot Marks
You can add a Shot Mark while shooting or playing a movie.
If you add a Shot Mark to a movie, you can use it as a mark for selecting, transferring, or editing the movie.
Also, you can create still images from movie frames with Shot Marks added.
Adding a Shot Mark to a movie being shot
This section describes the operation method to add Shot Mark1/Shot Mark2 with the following operation to a movie being shot.
- Operation method to add Shot Mark1
Either touch the (Add Shot Mark 1) icon, or press the custom key to which [Add Shot Mark1] is assigned.
 - Operation method to add Shot Mark2
Press the shutter button fully down.
Setting the camera
-
Still/Movie/S&Q switch
Select
 movie shooting mode using the Still/Movie/S&Q switch.
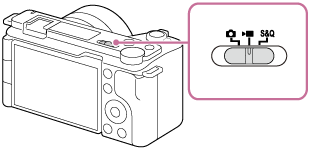
-
[Touch Operation]
MENU →
 (Setup) → [Touch Operation] → [Touch Operation] → [On].
 -
[Shooting Screen]
MENU →
(Setup) → [Touch Operation] → [Shooting Screen] → select menu item and then perform the following settings.- [Shooting Screen]: [On]
- [Swipe Right]: [Icon Display: L&R]
- [Swipe Left]: [Icon Display: Right] or [Icon Display: L&R]
-
[
Custom Key/Dial Set.]Select MENU →
(Setup) → [Operation Customize] → [Custom Key/Dial Set.] → button to assign function to → [Add Shot Mark1]. -
 with Shutter Button
Select MENU →
(Setup) → [ with Shutter Button] → [Add Shot Mark2].
Guide to using the camera
Adding Shot Mark1 to a movie being shot
Check that the touch function icons are displayed on the left and right sides, or on the right side of the screen.
If the touch function icons are not displayed, swipe right or left on the screen.
When you start shooting a movie, the lower-right touch function icon changes to the (Add Shot Mark 1) icon.
If you touch the (Shot Mark1 addition) icon in a scene to which you want to add Shot Mark1 while shooting a movie, you can add Shot Mark1 to the movie.
Also, you can add Shot Mark 1 while shooting a movie by pressing the custom key to which [Add Shot Mark1] is assigned.
Adding Shot Mark2 to a movie being shot
In a scene where you want to add Shot Mark 2 while shooting a movie, you can add Shot Mark 2 by pressing the shutter button fully down.
Checking the position with the Shot Mark
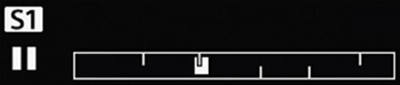
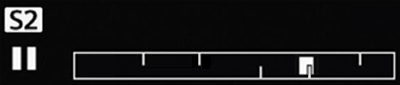
If you play a movie to which a Shot Mark has been added, the positions of the Shot Marks are displayed on the playback bar.
The position to which Shot Mark1 has been added will be displayed at the top of the playback bar, while the position to which Shot Mark2 has been added will be displayed at the bottom of the playback bar.

Playback bar display example: position with Shot Mark1 / Shot Mark2
If you pause while playing a movie, the 
 (Jump to the positions of Shot Marks) icon will be displayed on the right side of the monitor.
To confirm the position with a Shot Mark added, please touch the (Jump to the positions of Shot marks) icon.
If you touch the icon, you will jump to the position to which the Shot Mark has been added.
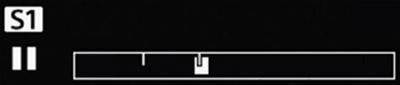
Playback bar display example: When jumping to the position with Shot Mark1
Adding/deleting a Shot Mark to a movie being played
This section describes the operation method to add or delete Shot Mark1/Shot Mark2 with the following operation to a movie being played.
- Operation method to add/delete Shot Mark1
Touch the (Add/Delete Shot Mark1) icon on the monitor. - Operation method to add/delete Shot Mark2
Press the custom key to which [Add/Delete Shot Mark2] is assigned.
Setting the camera
-
[Touch Operation]
MENU →
(Setup) → [Touch Operation] → [Touch Operation] → [On]. -
[Playback Screen]
MENU →
(Setup) → [Touch Operation] → [Playback Screen] → [On]. -
[
 Custom Key Setting]
Select MENU →
(Setup) → [Operation Customize] → [Custom Key Setting] → button to assign function to → [Add/Delete Shot Mark2].
Guide to using the camera
Adding Shot Mark1 to a movie being played
The (Add/Delete Shot Mark1) icon will be displayed on the right side of the monitor while a movie is being played or paused.
If you touch the (Add/Delete Shot Mark1) icon in a scene to which you want to add Shot Mark1, you can add Shot Mark1 to the movie.
The position to which Shot Mark1 has been added will be displayed at the top of the playback bar.
Playback bar display example: Movie playback paused to add Shot Mark1
Adding Shot Mark2 to a movie being played
In a scene where you want to add Shot Mark 2 during movie playback or while playback is paused, you can add Shot Mark 2 to the movie by pressing the custom key to which [Add/Delete Shot Mark2] is assigned.
The position to which Shot Mark2 has been added will be displayed at the bottom of the playback bar.
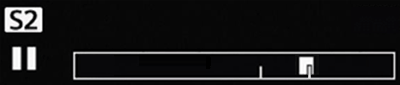
Playback bar display example: Movie playback paused to add Shot Mark2
Deleting a Shot Mark
To delete a Shot Mark, please perform the following operations.
- Pause the playback of the movie.
- If you touch (Jump to the positions of Shot Marks) displayed on the right side of the monitor, you will jump to the position to which a Shot Mark has been added, so jump until the position with the Shot Mark you want to delete.
Playback bar display example: Jumping to the position with Shot Mark1 that you want to delete
Playback bar display example: Jumping to the position with Shot Mark2 that you want to delete
- To delete Shot Mark1, touch the (Add/Delete Shot Mark1) icon on the monitor and then delete Shot Mark1.
To delete Shot Mark 2, press the custom key to which [Add/Delete Shot Mark2] is assigned.
Automatically creating still images from Shot Marks after finishing shooting
If you add Shot Marks using custom keys or the like when shooting a movie, you can automatically create still images from movie frames with Shot Marks added after finishing shooting.
Setting the camera
-
Still/Movie/S&Q switch
Select
movie shooting mode using the Still/Movie/S&Q switch. -
 AutoCreateStillImage
 Select MENU →
 (Shooting) → [Shooting Option] → [AutoCreateStillImage] → [On].
Related camera help guide
Guide to using the camera
File format of still images created
After finishing shooting, still images are created automatically from all movie frames with Shot Marks added.
Visit the following link for instructions on adding Shot Marks.
You can select either the JPEG or HEIF format for the still images to be created, and you can switch the format by selecting MENU →  (Shooting) → [Image Quality/Rec] → [JPEG/HEIF Switch].
Also, the size of the still images created will be the same as that of the movie being recorded, depending on the [File Format] setting of the movie.
Deleting a Shot Mark
You can delete Shot Marks automatically after using the [AutoCreateStillImage] function to automatically create still images while shooting a movie. To delete Shot Marks, configure the following setting beforehand.
- Select MENU → (Shooting) → [Shooting Option] → [ after still img crt] → [Auto Delete].
Creating still images from Shot Marks in playback mode
In playback mode, you can create still images from movie frames with Shot Marks added.
Here we describe how to assign [Create Still Image] to a custom key to allow you to call the function easily.
Setting the camera
-
[
Custom Key Setting] Select MENU →
(Setup) → [Operation Customize] → [Custom Key Setting] → button to assign function to → [Create Still Image].- You can also call the function from the menu. Select MENU →
 (Playback) → [Edit] → [Create Still Image].
- You can also call the function from the menu. Select MENU →
Related camera help guide
Guide to using the camera
File format of still images created
In playback mode with a movie selected or while a movie is playing, pressing the custom key to which [Create Still Image] is assigned causes still images to be created from all movie frames with Shot Marks added.
You can select either the JPEG or HEIF format for the still images to be created, and you can switch the format by selecting MENU → (Playback) → [Edit] → [ JPEG/HEIF Switch].
Also, the size of the still images created will be the same as that of the movie being recorded, depending on the [File Format] setting of the movie.
Deleting a Shot Mark
You can delete Shot Marks automatically after using the [Create Still Image] function to create still images while playing a movie. To delete Shot Marks, configure the following setting beforehand.
- Select MENU → (Playback) → [Edit] → [ after still img crt] → [Auto Delete].