Setting item hints
This page provides hints for menu items listed on the Basic recommended settings page. Convenient functions for shooting are also described.
[Priority Set in AF-C]
Try [Balanced Emphasis], which provides a good balance between the existing [AF] and [Release] settings. This function is useful for maintaining accurate focus while catching a crucial moment when shooting a moving object.
- [AF]:
- The shutter cannot be released before the subject is in focus. Use this setting to prioritize focus over the speed of continuous shooting.
(The continuous shooting speed may become slower and/or the shooting interval may become uneven, depending on the scene.) - [Release]:
- This setting allows you to shoot at any time, but at the risk of shooting multiple images that are out of focus. It is useful for maintaining the speed of continuous shooting.
- [Balanced Emphasis]:
- The subject is more likely to be in focus than when using [Release]. The continuous shooting speed will be slightly slower than when using [Release]. As the camera determines the shooting method immediately before the release timing, this setting is recommended for shooting moving objects. Use [Release] when timing has greater priority.
Hint
- Comparison between [Balanced Emphasis] and [Release]
- The advantage of [Release] is that it maintains the continuous shooting interval even if the subject moves a lot. It is useful for shooting a series of continuous pictures or making a movie.
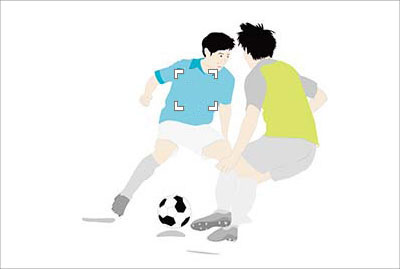
Take photographing a player kicking the ball in soccer as an example. [AF] may miss the moment of the kick, while [Release] will capture the moment but all the shots may be out of focus. [Balanced Emphasis] will give some usable shots.
[AF Lvl for Crossing]
AF-C Focus Mode has five levels of focus tracking.
- [1(Locked on)] to [2]: Low tracking sensitivity (prioritizes stability)
- Focus position is stable and stays locked on to the selected subject.
- [4] to [5(Responsive)]: High tracking sensitivity (prioritizes responsiveness)
- The camera focuses quickly on nearby subjects instead of tracking a single subject.
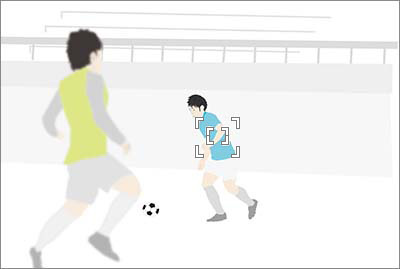
As a rough guide, this setting should be [2] when tracking a specific player in a sport like American football where players are close together, or [3(Standard)] if someone is passing in front of the subject.
In soccer, the players are generally farther apart so [4] is the most suitable setting as it prioritizes responsiveness over lock-on. When set to [4], the focus will not shift if another player’s arm passes in front of the subject, but the focus will move to another player if their whole body blocks the original subject.
[AF Trk for Spd Chng]
You can select the sensitivity of AF tracking relative to changes in the moving speed of the subject.
- [Stable]:
- When it is difficult to keep focused on a subject whose moving speed changes gradually because the surrounding environment is dark or the subject is small, etc., set to the [Stable] side that enables suppression of focus fluctuations.
- [Responsive]:
- Set to the [Responsive] side if you want to keep the focus on a subject whose moving speed changes abruptly.
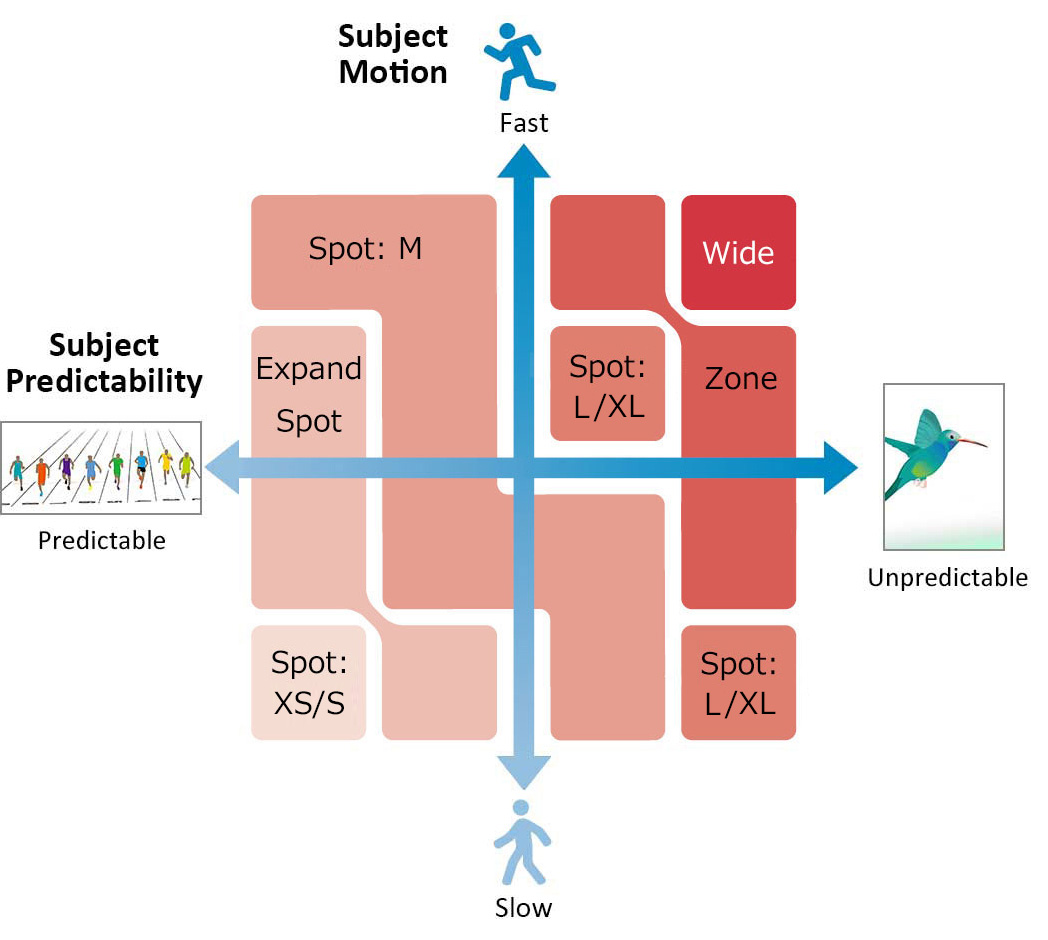
[ Focus Area]
Select Focus Area based on the subject size on screen
Use the size of the subject on screen as a rough guide to decide the size of the focus area, such as [Spot].
For [Spot], the subject should be large enough to cover the whole Focus Area (as a guideline). Having the subject at this size avoids the focus drifting to the background.
For [Expand Spot], the focus area including the expanded area should just about overlap with the subject (as a guideline).
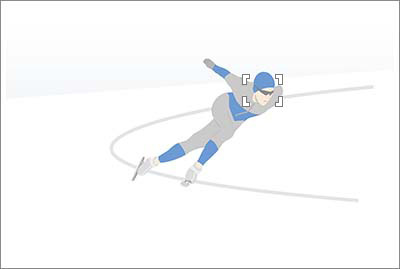
The optimal Focus Area size for the same skating scene depends on the subject size on screen.
[Spot: M] is recommended for focusing on the subject’s face. If set to [Zone], other features such as line markings on the skate rink will be inside the area and the camera might focus on these instead of on the skater.
To target a fast-moving subject at this size using a long focal length, try a wider setting such as [Zone].
Examples of using [Custom]
Allows you to set the shape and size of the focusing area according to the shooting scene. You can adjust the focusing range according to the scene, making it easier to focus on the subject and less likely to focus on the background.
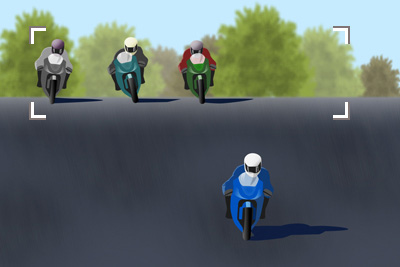
To shoot subjects appearing in a horizontal row from a blind spot in a motorcycle race, you can use [Custom] to shorten the height and extend the width of the focusing area to adjust it to the range where the subjects will appear.
You can set the focusing area according to the range of movement of the subject in order to focus on a jumping subject in a snowboard jumping scene.

Keeping the focus on the nearest subject within the frame indicating the focusing area set by [Custom]
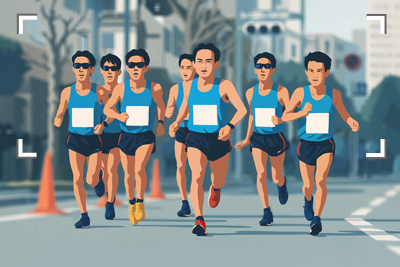
By setting [AF Lvl for Crossing] to [5(Responsive)], you can quickly focus on the closest subject in the focus area frame.
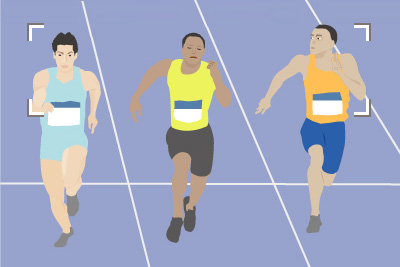
You can keep the focus on the lead runner in track-and-field events where the positions change suddenly, such as sprint races, long-distance races, and marathons on public roads. To position the face of the runner in the AF frame, use [Custom] to set the size of the focus area so that it covers the range from the waist to the head.

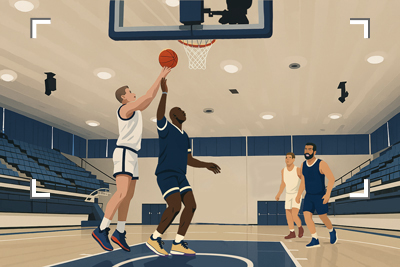
You can keep the focus on the frontmost player even in situations where the players’ positions change rapidly, as in the case of a camera mounted below the basket at a basketball game.
Select Focus Area based on subject movement
If a subject is moving slowly or predictably, a small-area setting like [Expand Spot] or [Spot: S] will focus accurately on the target position. If a subject is moving at high speed or unpredictably, a wider focus area setting such as [Wide], [Zone], or [Spot: L] maintains focus while allowing the composition to be adjusted.
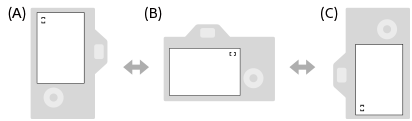
[Switch V/H AF Area]
Choose whether to adjust the position of the focusing frame (AF point) and Focus Area settings to the camera orientation (horizontal/vertical). The default setting is [Off], but [AF Point Only] is recommended if changing the camera orientation frequently, such as reorienting the camera vertically when the subject comes closer.
An example when [Off] is selected

(A) Vertical: [Spot] (Upper left corner)
(B) Horizontal: [Spot] (Lower left corner)
(C) Vertical: [Spot] (Lower right corner)
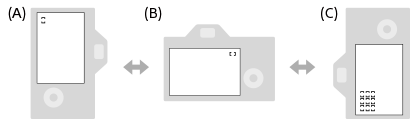
An example when [AF Point Only] is selected
(A) Vertical: [Spot] (Upper left corner)
(B) Horizontal: [Spot] (Upper right corner)
(C) Vertical: [Spot] (Lower left corner)
An example when [AF Point + AF Area] is selected
(A) Vertical: [Spot] (Upper left corner)
(B) Horizontal: [Spot] (Upper right corner)
(C) Vertical: [Zone] (Lower left corner)
- Three camera orientations are detected: horizontal, vertical with the side of the shutter button facing up, and vertical with the side of the shutter button facing down.
Convenient functions for shooting
[AF Area Registration]
The AF Area Registration function enables you to register the focus area with AF On to a custom key ([Reg. AF Area+AF On]) in order to switch to it immediately. For example, if you usually set [Spot: M], but the subject leaves the focusing frame or comes closer, you can press the customized key to activate autofocus using the registered focus area.