Switching the level of defocus in the background
When shooting a selfie, [Background Defocus] is helpful if you want to shoot both yourself and the background sharply in focus or defocus the background.
After you assign [Background Defocus] to a custom key, the level of defocus in the background will switch between [Defocus] and [Clear] each time you press the key.
The following are shooting instructions for recording a movie and switching the level of defocus in the background by using the [Background Defocus] function, with the camera focusing automatically on you.
Related camera help guide
Setting the camera
-
Custom Key
Select MENU →
 (Camera Settings2) → [
 Custom Key] → Assign the [Background Defocus] function to the desired key.
* In the default settings, [Background Defocus] is assigned to the C1 button.
-
[Face/Eye AF Set.]
MENU →
 (Camera Settings1) → [Face/Eye AF Set.] → [Face/Eye Prty in AF] → [On].
MENU →
(Camera Settings1) → [Face/Eye AF Set.] → [Subject Detection] → [Human]. -
[Shoot Mode]
MODE (Mode) button → Select
 ( Intelligent Auto) or (Movie), and then press the center of the control wheel.
If you have selected (Movie), select [Exposure Mode] → desired setting. -
[Focus Mode]
MENU →
(Camera Settings1) → [Focus Mode] → [AF-C]. -
[Focus Area]
MENU →
(Camera Settings1) → [Focus Area] → desired setting.
Related camera help guide
- Assigning frequently used functions to buttons (custom key)
- Focusing on eyes (Face/Eye AF Set.)
- Movie: Exposure Mode
- Focus Mode
- Focus Area
Hint
You can set whether or not the camera measures brightness based on detected faces.
Related camera help guide
You can set effects that retouch the subject’s skin to make it appear smoother when a face is detected.
Related camera help guide
Guide to using the camera
The following are shooting instructions for when [Shoot Mode] is set to ![]() (
(![]() Intelligent Auto) and [Focus Area] is set to [Wide].
Intelligent Auto) and [Focus Area] is set to [Wide].
Shooting instructions
-
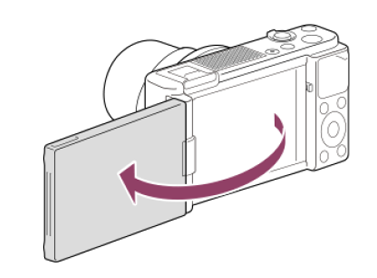
Preparing the camera
Open the monitor transversely, face it forward, and then point the lens at yourself.
-
Checking the focus
When a face or eye is detected and autofocus is enabled, a white detection frame appears around the face or eye.

The eye is detected and autofocus is enabled.
-
Changing the level of defocus in the background
The level of defocus in the background (Defocus/Clear) changes each time you press the Custom Key to which you have assigned [Background Defocus].
In the [Background Defocus] mode, the aperture value is locked. The icons
 (Defocus) and
  (Clear) appear in the lower part of the monitor instead of the aperture value.
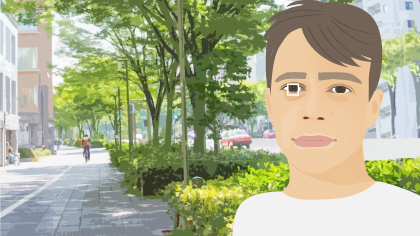
[Background Defocus] mode:
(Clear)Hint
To check the current aperture value, press the DISP (Display Setting) button multiple times until Graphic Display is set. The aperture value will appear on the monitor.
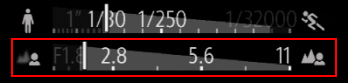
- When (Defocus) is indicated, the aperture value is locked at wide open (F1.8 (W) to F2.8 (T)), and when (Clear) is indicated, the aperture value is locked at F5.6.
Related camera help guide
- When
-
Shooting Movies
Press the MOVIE button to start recording.
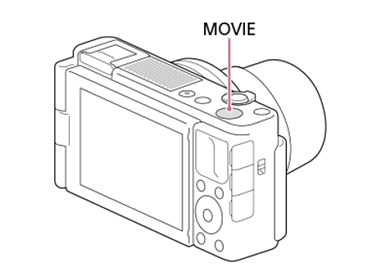
While recording a movie, the level of defocus in the background (Defocus/Clear) changes each time you press the Custom Key to which you have assigned [Background Defocus].
- Press the MOVIE button again to stop recording.
- The camera returns to the ordinary mode and the aperture returns to the former value when you press the MODE (Mode) button.
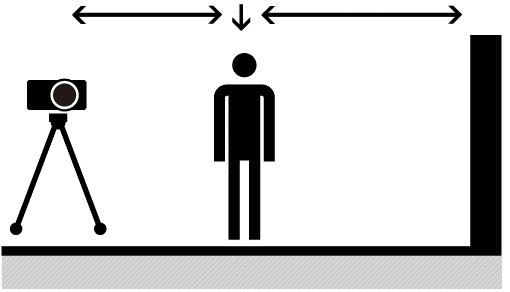
Factors Affecting Defocus
To control the level of defocus, four factors are important: "aperture (f-number)," "focal length," "focusing distance," and "distance to the background."
You can create your desired level of defocus by combining these factors effectively.
- F-number: Make this smaller to increase the level of defocus.
- Focal length: Make this longer to increase the level of defocus.
- Focusing distance: Make this shorter to increase the level of defocus.
- Distance to the background: Make this farther to increase the level of defocus.
Closer Focal point Farther away
Camera
Background
*The menu screen images on this web page have been simplified for display purposes, and do not exactly reflect the actual screen display of the camera.