Time-lapse shooting
You can record movies by condensing changes over a period of time of up to several dozen minutes. Unlike quick-motion movie recording, you can set a shooting interval longer than 1 second. This enables you to record movies with a larger time compression ratio.
Sound will not be recorded.
When creating longer time-lapse movies, use the [Interval Shoot Func.].
Related camera help guide
Setting the camera
Set the Still/Movie/S&Q dial to S&Q (slow-motion/quick-motion).
-
[

 Shoot Mode]
When the [
Shoot Mode] screen appears, select time-lapse by pressing the top/bottom of the control wheel.
Perform the following operations if the [
Shoot Mode] selection screen is not displayed.- MENU →
 (Shooting) → [Shooting Mode] → [Shoot Mode].
- MENU →
-
[
 File Format]
MENU →
(Shooting) → [Image Quality/Rec] → [File Format] → desired setting. -
[
Time-lapse Settings]MENU →
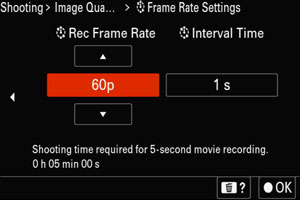
(Shooting) → [Image Quality/Rec] → [Time-lapse Settings] → select the menu item and then perform the following settings.- Set the recording frame rate and shooting interval time with [Frame Rate Settings].
- [Rec Frame Rate]: Sets the recording frame rate for a time-lapse movie. (60p/50p/30p/25p/24p)
[30p]/[25p] cannot be selected when [File Format] is set to [XAVC HS 4K]. - [Interval Time]: Sets the shooting interval for a time-lapse movie. (1 to 60 seconds)
For the first 10 seconds, the interval can be set in units of 1 second. For the 10th to 60th second, the interval can be set in units of 10 seconds. When the file format is set to 4K, you cannot select a value of 6 seconds or longer. The interval time is the interval from the start of exposure to the start of the next exposure, regardless of shutter speed.
- [
- [Record Setting]: Selects the bit rate, color sampling, and bit depth of the movie.
- [Video Light Setting]: When a video light (sold separately) is attached, you can turn the video light on before each frame for the time-lapse movie is recorded. Sets how many seconds before the light turns on. (Off/2 Sec/5 Sec/10 Sec)
- Set the recording frame rate and shooting interval time with [
Related camera help guide
Guide to using the camera
Setting the recording frame rate and shooting interval time
You can set the recording frame rate for a time-lapse movie by using [Frame Rate Settings].
You can set the recording frame rate for a time-lapse movie by using [Rec Frame Rate]. For example, 60 frames are displayed per 1 second of a movie in 60p and 24 frames are displayed per 1 second of a movie in 24p. The frame rate determines the smoothness of motion in movies. Therefore, 60p provides smoother motion in movies than 24p.
You can set the shooting interval from 1 second to 60 seconds by using [Interval Time]. We recommend that you set the shooting interval shorter if the movements of the subject you will shoot are fast and longer if the movements are slow.
Example of setting the shooting interval
Changes in the movements of a person or the appearance of a street: 1 second to 3 seconds
Changes in nature such as scenery or floating clouds: 5 seconds to 10 seconds
For example, if you have set [Rec Frame Rate] to 24p and [Interval Time] to 3 seconds, still images will automatically be shot repeatedly at 3-second intervals and 24 of those still images will be used per second in the time-lapse movie.
The shooting time necessary when recording a 5-second time-lapse movie by using this setting is approximately 6 minutes because it is necessary to have 120 still images (24 images ´ 5-second movie).
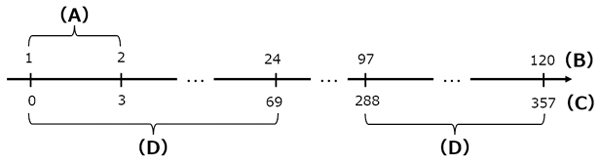
(A) Interval time: 3 seconds (shooting interval)
(B) Number of shots for interval shooting
(C) Shooting time (Seconds)
(D) Recording frame rate: 24p (number of frames necessary per 1 second of a 24p movie)
Time-lapse shooting
Press the MOVIE (movie) button to start shooing.
When you start shooting, the time up to the next shot and the time of the time-lapse movie already recorded will be displayed on the shooting screen.
Press the MOVIE button to end shooting.
Related camera help guide
*The menu screen images on this web page have been simplified for display purposes, and do not exactly reflect the actual screen display of the camera.