Multi Camera Control - Operation for iPhone / iPad
This page describes the settings and operation for Multi Camera Control with iPhone/iPad.
- 1. Preparation before connecting
- 2. Connection - Sending the smartphone and camera information
- 3. Connection - Setting cameras to the Multi Camera Control
- 4. Operation for Multi Camera Control
- The screen design and detailed operations may be different depending on your camera and mobile device.
- Some of the captured screens use Android devices, however, the messages are the same and you can perform operations in the same way.
-
Preparation before connecting
1.1. Install the latest version of Imaging Edge Mobile from the <download> site.
1.2. Write down the Wi-Fi information (Network name and Wi-Fi password) of the smartphone.
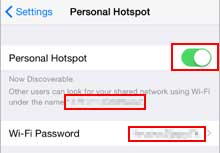
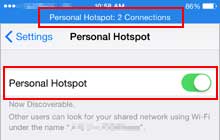
- To show the Wi-Fi information, select [Settings] (> [Cellular]) > [Personal Hotspot] on your smartphone.
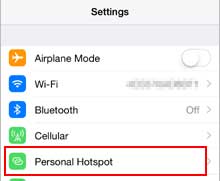
Then turn on [Personal Hotspot]. Write down the displayed Wi-Fi information (Network name (SSID) and Wi-Fi password) of your smartphone.
1.3. Find the Wi-Fi information (SSID and Password) of all the cameras.
- This step is not necessary if you use a QR code to enter the camera information in step 2.2 or if the camera has already been connected to the same smartphone in single connection before.
- Wi-Fi information is found on the Startup Guide sheet supplied with the camera. If you lost the manual, you can find them by connecting the camera and the computer with the USB cable, turning on the camera, then open [Computer] > [PMHOME] > [INFO] > [WIFI_INF.TXT] on the computer.

-
Connection - Sending the smartphone and camera information
2.1. Make sure that
 (Wi-Fi icon) is displayed on the camera.
- If it is not displayed, turn on Wi-Fi on the first camera according to the procedures below.
For FDR-X1000V / HDR-AS200V :
Press the PREV and NEXT buttons at the same time, press PREV or NEXT to select ON (not MULTI), then press the ENTER button. Go back to recording modes such as MOVIE or PHOTO by pressing PREV/NEXT/ENTER buttons.For FDR-X3000 / HDR-AS50 / HDR-AS300 :
Press the UP/DOWN buttons at the same time, press the UP/DOWN buttons to select [ : ON] (not MULTI), then press the ENTER button. Go back to the recording modes by pressing the NENU button.2.2. Enter the camera information on Imaging Edge Mobile.
If this is the first time connecting the camera to a smartphone, follow either of the procedures below. For cameras that have already connected to the same smartphone, just start Imaging Edge Mobile.
When connecting by scanning a QR code (FDR-X3000/ HDR-AS50/ HDR-AS300) :
On your smartphone, start Imaging Edge Mobile and select [Scan QR Code of the Camera]. When your smartphone is ready to scan, open the camera's battery cover and scan the QR code attached to the back of the cover.
When connecting by entering the password :
On your smartphone, select [Settings] > [Wi-Fi], and select the SSID of the camera. If this is the first time connecting the camera to a smartphone, enter the password found in step 1.3.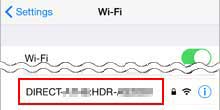
- The Auto power off function may turn off the camera automatically while you are operating. You can change the time or disable this function if necessary.
2.3. Start Imaging Edge Mobile and select Multi Camera Control.
- When the Wi-Fi screen appears on the smartphone, select
 (Setting icon) > [Multi Camera Control Setting]. When the [What is the Multi Camera Control setting?] screen appears, read and select [Next].

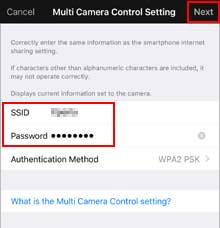
2.4. Enter the smartphone information on Imaging Edge Mobile.
- Enter the smartphone Wi-Fi tethering setting noted in step 1.2. For the second camera or later, selecting [Enter the same info as before.] allows you to enter information easily. When you finish entering, select [Next]. The smartphone information is sent to the first camera, and the setting for the first camera is complete.
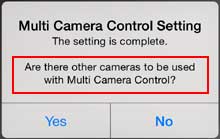
2.5. Repeat for the other cameras.
- When you are asked [Are there other cameras to be used with Multi Camera Control?], select [Yes]. In the next [How to continuously set the same setting to other cameras.] screen, select [OK]. Repeat the same steps from 2.1 to 2.4 for the other cameras.
- When you finish the settings for the last camera, select [No].
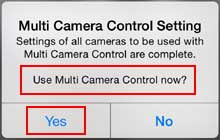
2.6. Start Multi Camera Control.
- When you are asked [Use Multi Camera Control now?], select [Yes]. When the [To use Multi Camera Control] screen appears, select [OK].
2.7. Go back to the Home screen to quit Imaging Edge Mobile.
-
Connection - Setting cameras to the Multi Camera Control
3.1. Set all cameras to the Multi Camera Control mode.
For FDR-X1000V / HDR-AS200V :
Press the PREV and NEXT buttons at the same time, press PREV or NEXT to select MULTI, then press the ENTER button. Press PREV or NEXT again to select CRRNT, then press the ENTER button. Repeat this procedure for all the cameras.
For FDR-X3000 / HDR-AS50 / HDR-AS300 :
Press the UP/DOWN buttons at the same time, press the UP/DOWN buttons to select [ :  ], then press the ENTER button. Press the UP/DOWN buttons again to select CURRENT, then press the ENTER button. Repeat this procedure for all the cameras.
3.2. Connect the cameras to the smartphone via Wi-Fi tethering.
- On your smartphone, select [Settings] (> [Cellular]) > [Personal Hotspot] and confirm [Personal Hotspot] is on. Make sure that the connection message appears on the top of the screen.
- Keep this screen displayed until the connection message appears.
- If the message which tells you that Wi-Fi is off, turn it on.
3.3. Start Imaging Edge Mobile.
- If the [Internet sharing of the smartphone is ON.] message appears, select [OK].

3.4. Confirm that images of all the cameras are displayed on the smartphone.

-
Operation for Multi Camera Control
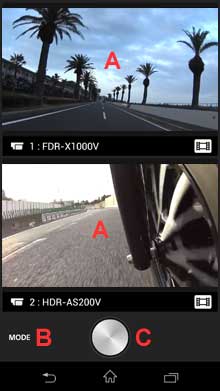
4.1. Operating all cameras at the same time
A: Images of the connected cameras. To operate the cameras individually (step 4.2), tap on the image of the camera you want to operate.
B: To change the recording mode for all cameras
C: To start/stop recording or to release shutter for all cameras
4.2. Operating a single camera individually
A: To go back to multiple mode (step 4.1)
B: To change the settings for the selected camera
C: To change the recording mode for the selected camera
D: To start/stop recording or to release the shutter of the selected camera