Multi Camera Control - Operation
-
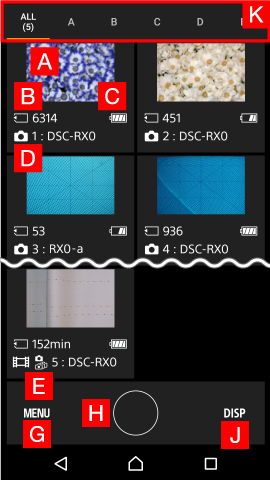
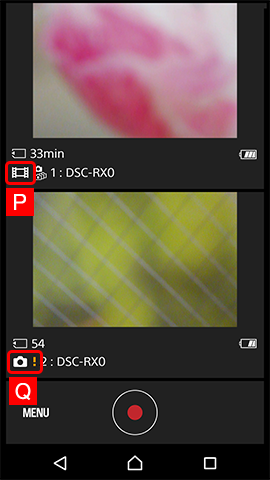
Names and functions of buttons and icons
Multi-screen mode
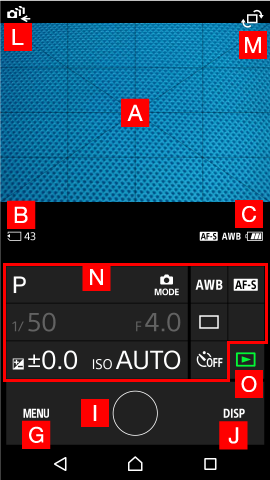
Single-screen mode
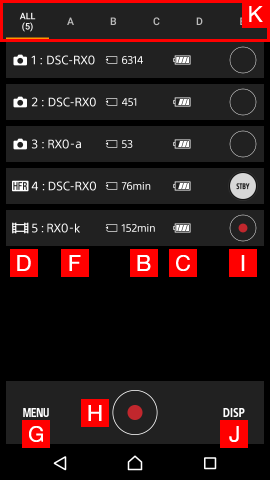
List mode
- Live view
- Remaining capacity of the recording medium
- Remaining battery charge
- Shooting mode
- Group owner (displayed only when connected by the group owner method)
- Camera name (can be changed by selecting MENU >
 (Network) > [Edit Device Name])
 - Menu button (to change settings for all cameras at once)
- Shutter button (to shoot with all cameras at once)
- Shutter button (to shoot with one camera)
- Display button (to change display mode)
- Groups (displayed only when connected by the access point method)
- Back to multi-screen mode or list mode
- Rotate
- Setting area
- In-smartphone image display button (images sent from the camera to the smartphone are displayed)
Tap the live view to switch to the single-screen mode.

To adjust the position of the live view, touch the live view for a slightly longer interval to select, and then drag and drop it.

-
Configure all cameras
In multi-screen mode or list mode, tap the MENU button. You can change the items displayed on the screen. Tap each item to change the settings.
-
Shooting with all cameras at once
Use multi-screen mode or list mode.
If the shooting mode of all the cameras is the same (still image , still image (continuous)
  , movie
  , or super-slow-motion movie (HFR)
  ), you can release the shutters of all the cameras at once.
Shutter button
 When all the cameras are set to shoot still images
 When all the cameras are set to shoot still images (continuous)
 When all the cameras are set to shoot movies, or some are set to shoot movies (refer to 4 below)
 When all the cameras are set to HFR
 Shooting cannot be performed with all the cameras at once because the shooting modes are mixed.
 -
Shooting with cameras in movie mode only
Use multi-screen mode or list mode.
If the shooting modes of the cameras are mixed, but at least one is in the movie mode, only the cameras in the movie mode will start recording when you press the shutter button.
- This camera is in the movie mode, so it records movies.
- This camera is in the still-image mode, so it does not record anything ("!" appears as a warning).
-
Configuring one camera
Use single-screen mode.
To change the settings displayed in the setting area, tap each item.
To change settings not displayed, tap the menu button. -
Shooting with one camera
Use single-screen mode or list mode. In the list mode, tap the shutter button for the individual camera in the list at the right.
-
Grouping
Connected cameras can be divided into and controlled as groups.
This function is available only when connected by the access point method.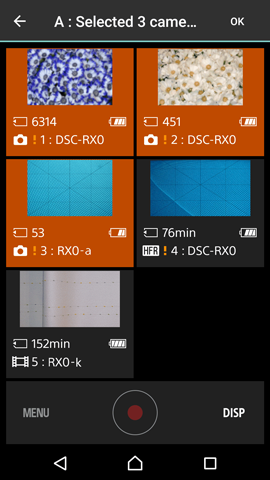
To add cameras to a group (e.g. group A)
- 7.1. Select [A] > [MENU] > [Edit Group A].
- 7.2. Tap cameras to add (or delete).
- 7.3. When you finish, select [OK] to save.
- There is no limit to the number of cameras added to one group.
- One camera can belong to more than one group.