Synchronized Release Settings
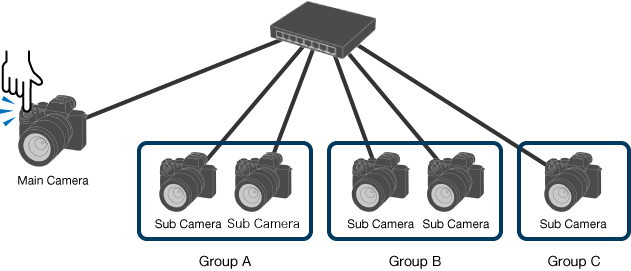
You can connect multiple cameras using LAN cables and shoot images on multiple sub-cameras, linked to the autofocus and shutter timing of the main camera.
- For a list of camera models that support Synchronized Release Settings, refer to “Supported cameras.”
- The description below refers to “the computer,” but it applies to the iPad as well.
Remote Camera Tool is used to configure main camera and sub-camera settings.
Shooting images takes place on multiple cameras connected via a router or hub. Once the synchronized release settings have been configured using Remote Camera Tool, shooting can take place when Remote Camera Tool is not running.
Linked sub-cameras can be assigned to groups on the main camera.
When operating the shutter on the main camera, you can use a custom key at the same time. This allows you to switch between the linked sub-cameras (group) while shooting by pressing the shutter button alone, and pressing the shutter button while holding down the custom key.
- For detailed camera settings, please refer to the Help Guide of the camera you are using.
Connecting the camera
- Set the IP address for all of the cameras and the computer you will be using.
- Only fixed IP addresses on the local network are supported. DHCP is not supported.
- Connect all of the cameras you will be using to the same computer via a router or hub.
For details, refer to “Connecting the camera.”
- If the main camera is connected with the access authentication setting turned [On], use the access authentication function to connect all of the sub-cameras.
- If the main camera is connected with the access authentication setting turned [Off], connect all of the sub-cameras without pairing.
Configuring main camera and sub-camera settings in Remote Camera Tool
- From the Device Selection Window, start all of the cameras you will be using in Multi Live View.
On the iPad, tap (Menu) in the Device Selection Window and select [Synchronized Release Settings].
![Device Selection Window showing information for multiple connected cameras. The [Multi Live View] button at the bottom right of the window is highlighted.](../../share/images/instruction_pct_31.png)
- On the Multi Live View menu, select [Tools] - [Synchronized Release Settings].
- In the Synchronized Release Settings window, specify the main camera and sub-cameras, then click [Apply Settings].
![Synchronized Release settings window. The [Apply Settings] button at the bottom right of the window is highlighted.](../../share/images/instruction_pct_32.png)
- Only one camera can be set as the main camera.
- Up to 19 cameras can be set as sub-cameras, and they can be assigned to groups.
- Click [Start Connection] to put the cameras into connection standby mode.
![Synchronized Release settings window showing information on the main camera and a sub-camera. The [Start Connection] button at the bottom right of the window is highlighted.](../../share/images/instruction_pct_33.png)
- A Connection Status of “Disconnected” indicates that the camera is in connection standby mode.
- If the cameras are able to connect to each other, they connect automatically and the Connection Status changes to “Connected.”
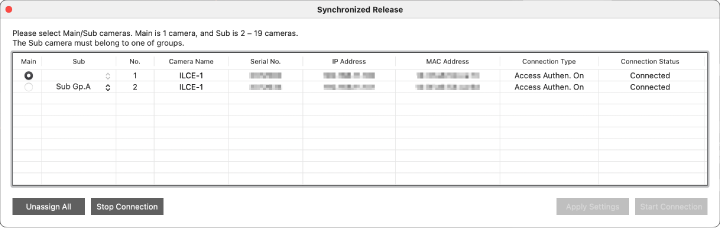
- A Connection Status of “Connected” indicates that the camera is ready to shoot. If a camera is turned off, as soon as it is turned back on it will automatically connect to the other cameras.
- Click [Stop Connection] to cancel connection standby mode on the cameras and change the Connection Status back to “Suspended.” (In this status the cameras are not connected to each other.)
- To cancel the main camera and sub-camera settings, display the shooting standby screen on the camera and select [Unassign All].
If you could not cancel the settings because you selected [Unassign All] when a screen other than shooting standby was displayed, turn the camera off and then on again and retry when the shooting standby screen is displayed.