Multi Live View
Camera control window

-
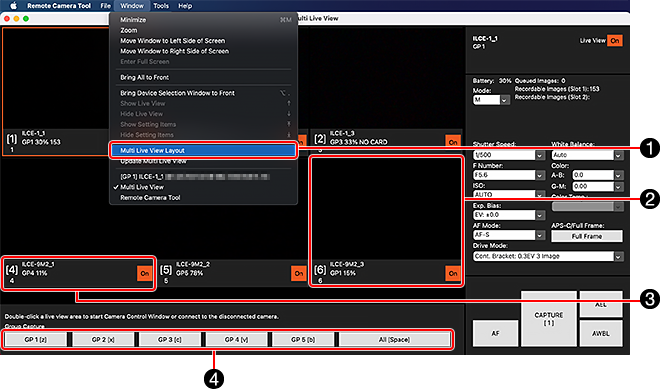
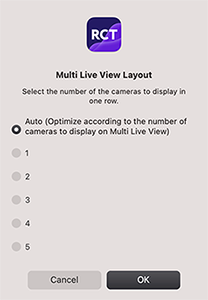
1 Multi Live View Layout
From the menu bar, select [Window] → [Multi Live View Layout].

- The initial value is “Auto.”
- When the setting is “Auto,” the display changes according to the number of cameras.
1 camera: 1 camera per line
2 to 4 cameras: 2 cameras per line
5 to 9 cameras: 3 cameras per line
10 to 16 cameras: 4 cameras per line
17 to 20 cameras: 5 cameras per line
(In all cases, cameras are displayed aligned from top left.)
-
2 Live View area
When a camera is selected, a frame appears and the camera’s control display changes.
When the camera is selected, you can reposition the Live View area by performing the following operations.
- Windows : Keyboard shortcuts [Alt]+[↑]/[↓]/[←]/[→]
- Mac : Dragging and dropping
Double-click to start single view or connect unconnected cameras.
-
3 Camera status display

-
A Camera Name
-
B Assigned shortcut key
-
C No. of Device Selection Window
-
D Group number
-
E Battery charge remaining
- In some cases, the combined charge remaining in two batteries may be displayed.
-
F SD card capacity remaining (SLOT 1)
-
G SD card capacity remaining (SLOT 2)
-
H Information on transfer errors, etc.
-
I Live View off switch
-
-
4 Group Shooting
You can shoot with cameras of the selected group at the same time.
Changes the frame rate in Multi Live View
You can change the frame rate in Multi Live View by placing the downloaded defaultsettings.conf file in the folder shown below.
defaultsettings.conf Click to download a sample file.
Windows:C:\Users\[login ID]\AppData\Roaming\Sony Corporation\Remote Camera Tool\
Mac:/Users/[login ID]/Library/Preferences/Remote Camera Tool/
defaultsettings.conf Example :MultiViewFrameRate=15
The settings take effect when Remote Camera Tool is restarted.