Focusing on human eyes (Shooting movies)
The following procedure is used for capturing images by focusing on a face or eye of a person.
There are three shooting methods. Use the method that is suitable according to the shooting conditions.
You can also set the eye to be recognized to left or right eye.
- This function is recommended when shooting an image while viewing it on the monitor, so that you can focus on the subject easily by touching and selecting the subject on the screen.
- If you want to continue focusing using the set [
 Focus Area], when a part of the subject such as an eye is obstructed and can be no longer be seen even with priority on focusing on the subject's eye.
 - This function is recommended if you want to adjust focus by key operation when it is difficult to perform touch operation, for example, when shooting an image while looking through the viewfinder.
- When you want to temporarily focus on a part of the subject such as an eye on the entire screen regardless of the [Focus Area] setting.
 When you want to temporarily focus on a part of the subject such as an eye using [Subject Recognition AF] after focusing on the subject using (Manual Focus).
When you want to focus on an eye, etc. using touch operation ([Touch Tracking])
Setting the camera
Set the Still/Movie/S&Q dial to  (Movie) to select movie recording mode.
-
[
Subject Recog in AF]MENU →
 (Focus) → [Subject Recognition] → [Subject Recog in AF] → [On]
 -
[
Recognition Target]MENU →
(Focus) → [Subject Recognition] → [Recognition Target] → [Human] -
[
Sbj Recog Frm Disp.]MENU →
(Focus) → [Subject Recognition] → [Sbj Recog Frm Disp.] → [On] -
[
Focus Mode]MENU →
(Focus) → [AF/MF] → [Focus Mode] →  [Continuous AF] or [Manual Focus]
 -
[Touch Operation]
MENU →
 (Setup) → [Touch Operation] → [Touch Operation] → [On].
 -
[Touch Panel/Pad]
MENU →
(Setup) → [Touch Operation] → [Touch Panel/Pad] → the desired setting. -
[Touch Pad Settings]
MENU →
(Setup) → [Touch Operation] → [Touch Pad Settings] → the desired setting. -
[Touch Func. in Shooting]
MENU →
(Setup) → [Touch Operation] → [Touch Func. in Shooting] → [Touch Tracking].Hint
You can change the setting for [Touch Func. in Shooting] by touching
 /
/ /
/ (touch function icon) on the shooting screen.
Guide to using the camera
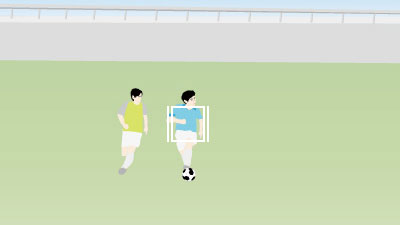
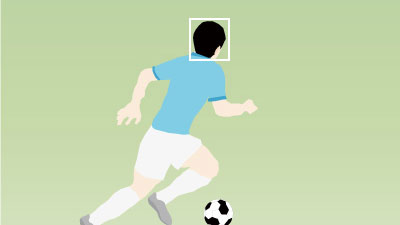
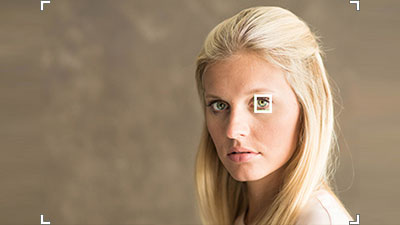
Focusing on an eye by touch operation ([Touch Tracking])
Select an area close to the eye of a subject by touch operation ([Touch Tracking]).
When the camera recognizes the eye of that subject, a subject-recognition frame appears around the eye and the camera can continue focusing.
When a subject-recognition frame appears around an eye
Note
- It is easier to focus on an eye if you touch the eye by setting touch tracking when the eye is out of focus.
- Select a lower value for [AF Subj. Shift Sensitivity] when subject recognition is frequently interrupted so that the focus remains steady.
Operating the tracking and subject recognition function together
If you set the focus in advance on a face or eye using the setting items of [Subject Recognition], the tracking frame will switch to the subject-recognition frame and the subject-recognition frame will appear on the face or eye when the face or eye is recognized while the subject is being tracked using the tracking function.
-
Tracking distant subjects
-
If the body of a subject is recognized when the face not recognized as the subject being tracked is getting closer, the tracking frame will be switched to the subject-recognition frame and the recognition frame will automatically move to the body.

-
If the face or eye of a subject is recognized when the subject being tracked is getting even closer, the subject-recognition frame will automatically move to the face or eye.

-
If the camera cannot recognize an eye because the subject turned away, the subject-recognition frame will automatically switch to the head or body.
Hint
- Setting [Sbj Recog Frm Disp.] to [On] makes it easier to check the detection status of faces or eyes, etc.
- Positioning the entire subject in the angle of view makes the subject easier to recognize.
Note
- It may be difficult to focus on the subject in the following situations.
- In low-light or back-lit conditions.
- When the subject is in the shade.
- When the subject is out of focus.
- When the subject is moving too much, etc.
- It may be difficult to focus on eyes in the following situations even when the camera recognizes eyes.
- When the eyes are closed.
- When the eyes are covered by hair, etc.
- When the person is wearing eyeglasses (sunglasses).
- There are also other situations in which it may not be possible to focus on the subjects.
- When the camera cannot focus on the part you want to prioritize, such as the eyes of the subject, the camera may automatically focus on other recognized parts such as the head or body of the subject.
- Even when a white subject recognition frame is displayed around the subject's face, etc., the camera may automatically focus on the part you want to prioritize, such as the subject's eye.
- The subject may not be recognized when only a part of the subject is within the angle of view.
- When only the hands and feet of a person or animal are visible
- When a part of the subject is hidden and cannot be seen, etc.
- The camera may accidentally recognize other objects as the designated subject under some conditions.
Switching the eye to detect
If you touch around an eye on the monitor, you can switch between focusing on the right eye and left eye.
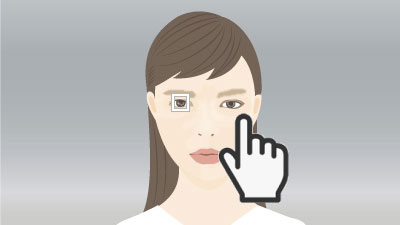
Touching around an eye that you want to recognize on the monitor
Eye to be recognized will be switched
When you want to focus on an eye using the focus area
Setting the camera
Set the Still/Movie/S&Q dial to (Movie) to select movie recording mode.
-
[
Subject Recog in AF]MENU →
(Focus) → [Subject Recognition] → [Subject Recog in AF] → [On] -
[
Recognition Target]MENU →
(Focus) → [Subject Recognition] → [Recognition Target] → [Human] -
[
Sbj Recog Frm Disp.]MENU →
(Focus) → [Subject Recognition] → [Sbj Recog Frm Disp.] → [On] -
[
Focus Mode]MENU →
(Focus) → [AF/MF] → [Focus Mode] → [Continuous AF]. -
[
Focus Area]MENU →
(Focus) → [Focus Area] → [Focus Area] → the desired setting.
Guide to using the camera
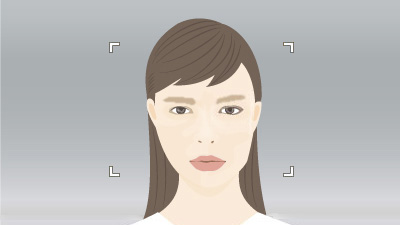
About the subject-recognition frame of an eye, etc.
If you want to display a white or gray subject-recognition frame on an eye, face, head, or body when the camera recognizes a subject, set [Sbj Recog Frm Disp.] to [On].
* Even if [Sbj Recog Frm Disp.] is set to [Off], the subject-recognition frame appears around the eye when the settings of [Right/Left Eye Select] are other than [Auto] or when [Switch Right/Left Eye] is executed by pressing the custom key.
The subject-recognition frame colors indicate the following conditions.
- Gray: Subject is not a target for auto-focusing even when the camera recognizes the face or other part of the subject (because the focus area is not superimposed on a face, etc.)
- White: Auto-focusing is enabled (including the face set as identification target using [Face Memory]).
Hint
- Even if the focus area is not superimposed on a face, the camera can simultaneously recognize the face, eye, and body. On the other hand, when the focus area is superimposed on the body, autofocus is enabled on a face or eye and the white frame appears around the face or eye.
Setting [Focus Area]
* The following procedure is performed under the condition where [Sbj Recog Frm Disp.] is set to [On] and [Right/Left Eye Select] is set to [Auto].
When the subject-recognition frame on a face and the focus area are superimposed, the camera can focus on the face or eye.
For example, when [Focus Area] is set to [Spot], the subject-recognition frame on the face turns from gray to white and you can focus on the face or eye if you superimpose the focus area of [Spot] on the subject-recognition frame on the face as shown below.
* When the settings of [Right/Left Eye Select] are other than [Auto] or when [Switch Right/Left Eye] is executed by pressing the custom key, the subject-recognition frame appears around the eye.
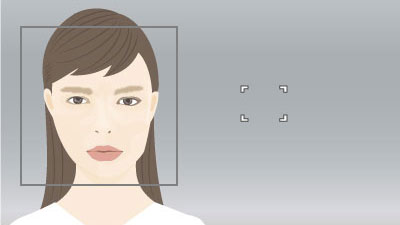
When the subject-recognition frame on a face is not superimposed on the focus area
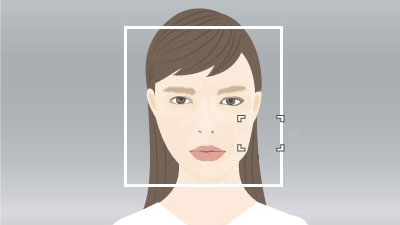
When the subject-recognition frame on a face is superimposed on the focus area and the camera can focus on the face or eye
Since a face or eye in the focus area is in focus, if you want to detect the eye using the widest possible range, set [Focus Area] to [Wide] in advance.
If you want to limit the range in which a face or an eye is detected, set [Focus Area] to [Spot] or [Zone] in advance.
Selecting people to focus on their face or eyes
* The following procedure is performed under the condition where [Right/Left Eye Select] is set to [Auto].
When multiple people are being recognized by the camera, you can use the following procedure to focus on a specific person.
Selecting faces with the focus area
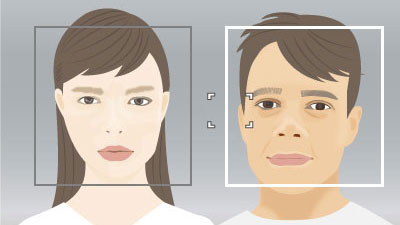
You can select a face to focus on by superimposing the focus area on the subject-recognition frame that appears on the face.
When an eye is detected, the subject-recognition frame will appear on the eye.
* When the settings of [Right/Left Eye Select] are other than [Auto] or when [Switch Right/Left Eye] is executed by pressing the custom key, the subject-recognition frame appears around the eye.
Selecting faces by touch
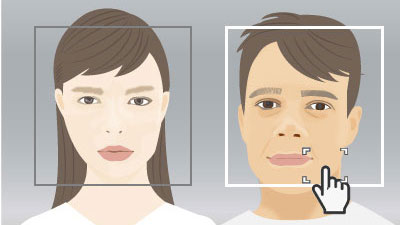
When [Touch Func. in Shooting] is set to [Touch Focus], you can select a face to focus on by superimposing the focus area ([Spot] or [Expand Spot]) on the subject-recognition frame that appears on the face, using touch operation.
Touch the subject-recognition frame displayed on the face that you want to select, on the monitor.
When an eye is detected, the subject-recognition frame will appear on the eye.
* When the settings of [Right/Left Eye Select] are other than [Auto] or when [Switch Right/Left Eye] is executed by pressing the custom key, the subject-recognition frame appears around the eye.
Selecting a face using [Select Face to Track]
Set [Focus Area] to [Wide] or [Center Fix] in advance. If you press the top/bottom/left/right sides of the multi-selector while multiple people are recognized, the [Select Face to Track] screen will appear and an orange bar will be displayed below the selected face. Select a face to focus on using the multi-selector top/bottom/left/right and press the center. The camera will start tracking the selected face.
Hint
Even when [Focus Area] is set to an item other than [Wide] or [Center Fix], you can use a custom key for [Select Face to Track]. Assign [Select Face to Track] to the desired key using [ Custom Key/Dial Set.] in advance. The [Select Face to Track] screen appears when you press the key to which [Select Face to Track] is assigned.
Selecting faces by registering them
Faces that you register in advance are given priority when the camera focuses.
Select MENU → (Focus) → [Subject Recognition] → [Face Memory] to register face data.
- To choose a face to be identified among registered faces, select the face you want to identify on the [Face Memory] screen and press the center of the control wheel. The radio button for the face set as the identification target will turn on. When the camera recognizes the face set as the identification target in the focus area, the camera will focus on the face with priority.
- Select MENU → (Focus) → [Subject Recognition] → [Regist. Faces Priority] → [On] to focus on the registered face with priority.
Note
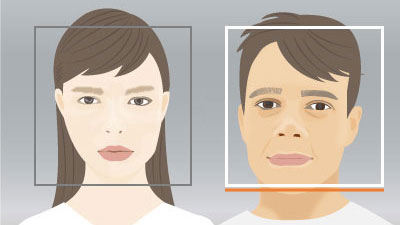
- When performing [Face Memory], do so in a bright place with the subject facing forward. It will be easier to register a face if you position it inside the frame in the center of the monitor and position the neck and shoulders under the frame. If the face is hidden by a hat, mask, sunglasses, etc. or the neck or shoulders are hidden, you may not be able to register it correctly.
- Even if you perform [Delete This Face], the registered face data will remain in the camera. If you want to delete it from the camera as well, perform [Delete All Faces].
Switching the eye to detect
You can set whether to focus on the left or right eye in advance by selecting MENU → (Focus) → [Subject Recognition] → [Right/Left Eye Select]. You can also switch the eye using the following procedure.
Switching with a custom key assigned to [Switch Right/Left Eye]
* [Switch Right/Left Eye] operations are possible when you are not pressing the shutter button halfway down.
When [Right/Left Eye Select] is set to [Right Eye] or [Left Eye], each time you press the custom key to which you have assigned the [Switch Right/Left Eye] function, you can switch the eye on which the camera will focus.
When [Right/Left Eye Select] is set to [Auto], you can temporarily switch the eye to be recognized by pressing the custom key to which you have assigned the [Switch Right/Left Eye].
Note
When [Right/Left Eye Select] is set to [Auto], the temporary left/right selection is canceled when you perform the following operations, etc. The camera returns to automatic eye selection.
- Pressing the center of the control wheel
- Pressing the center of the multi-selector
- Pressing the MENU button
- Change the shooting mode using the mode dial.
Tracking from the focus area position
- You can use [Tracking On] or [Tracking on Toggle] to start tracking by operating a custom key.
- When the focus area is set to [Center Fix], [Spot], or [Expand Spot] in advance, tracking starts from the position of the set focus area.
- When the focus area is set to [Wide] or [Zone] in advance, tracking will start from the position of the subject recognized in the area.
- Tracking is performed in the entire screen (during tracking) regardless of the focus area setting.
- Focusing on a subject by pressing a custom key to which [Tracking On] is assigned
While the assigned custom key is pressed, the camera continues to track a subject. - Focusing on a subject by pressing a custom key to which [Tracking on Toggle] is assigned
When you press the custom key, the camera starts tracking the subject. When you press the custom key again, the camera stops tracking.
- Focusing on a subject by pressing a custom key to which [Tracking On] is assigned
- To use a custom key, perform the following setting in advance.
Select MENU →(Setup) → [Operation Customize] → [Custom Key/Dial Set.], select a button to which the function is assigned, and then set (Focus) → [Focus Area] → [Tracking On] or [Tracking on Toggle]. - You can use tracking by operating the custom key even when the focus mode is set to manual focus.
When you want to focus on an eye, etc. using a custom key to which the [Subject Recognition AF] function is assigned
Setting the camera
Set the Still/Movie/S&Q dial to (Movie) to select movie recording mode.
-
[
Custom Key/Dial Set.]Select MENU →
(Setup) → [Operation Customize] → [Custom Key/Dial Set.], select a button to which the function is assigned, and then set (Focus) → [Subject Recognition] → [Subject Recognition AF]. -
[
Recognition Target]MENU →
(Focus) → [Subject Recognition] → [Recognition Target] → [Human] -
[
Sbj Recog Frm Disp.]MENU →
(Focus) → [Subject Recognition] → [Sbj Recog Frm Disp.] → [On]
Guide to using the camera
Focusing on a part of the subject such as an eye by pressing the custom key to which [Subject Recognition AF] is assigned
When you press a custom key to which [Subject Recognition AF] is assigned and the camera recognizes an eye, a white subject-recognition frame appears. If the eye cannot be recognized, the subject-recognition frame for a face or body may appear. If you zoom in on a face under this condition, a subject-recognition frame for the eye may appear in some cases.
Selecting faces by registering them
Faces that you register in advance are given priority when the camera focuses.
Select MENU → (Focus) → [Subject Recognition] → [Face Memory] to register face data.
- To choose a face to be identified among registered faces, select the face you want to identify on the [Face Memory] screen and press the center of the control wheel. The radio button for the face set as the identification target will turn on. When the camera recognizes the face set as the identification target in the focus area, the camera will focus on the face with priority.
- Select MENU → (Focus) → [Subject Recognition] → [Regist. Faces Priority] → [On] to focus on the registered face with priority.
Note
- When performing [Face Memory], do so in a bright place with the subject facing forward. It will be easier to register a face if you position it inside the frame in the center of the monitor and position the neck and shoulders under the frame. If the face is hidden by a hat, mask, sunglasses, etc. or the neck or shoulders are hidden, you may not be able to register it correctly.
- Even if you perform [Delete This Face], the registered face data will remain in the camera. If you want to delete it from the camera as well, perform [Delete All Faces].
Switching the eye to detect
You can set whether to focus on the left or right eye in advance by selecting MENU → (Focus) → [Subject Recognition] → [Right/Left Eye Select]. You can also switch the eye using the following procedure.
Switching with a custom key assigned to [Switch Right/Left Eye]
When [Right/Left Eye Select] is set to [Right Eye] or [Left Eye], each time you press the custom key to which you have assigned the [Switch Right/Left Eye] function, you can switch the eye on which the camera will focus.
When [Right/Left Eye Select] is set to [Auto], you can temporarily switch the eye to be recognized by pressing the custom key to which you have assigned the [Switch Right/Left Eye].
Note
When [Right/Left Eye Select] is set to [Auto], the temporary left/right selection is canceled when you perform the following operations, etc. The camera returns to automatic eye selection.
- Pressing the center of the control wheel
- Pressing the center of the multi-selector
- Pressing the MENU button
- Change the shooting mode using the mode dial.
* All images and illustrations used on this web page are provided for illustrative purposes only.