

- Visual Story
- How to use
- 2. Preparation (Android)
 Visual Story
2. Preparation (Android)
2-1. Project creation
Create a project for each shooting event.
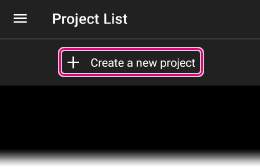
2-1-1. Tap [+ Create a new project] on the [Project List] screen.
A sample project is included when you initially start Visual Story after creating an account. The images can also be published as a gallery. Delete the project if it is not needed. (Note that deletion cannot be undone.)
2-1-2. Enter information about the new project.
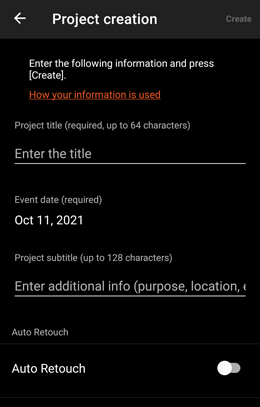
Enter project information.
- Story gallery titles consist of the project title, event date, and project subtitle.
- Auto Retouch: Set whether to automatically apply retouching to images.
When this option is on, you will specify the retouching parameters to apply.
2-5. Setting and applying Auto Retouch - Set as Import Destination: Turn on to use the current project as the camera's import destination.
2-4. Image transfer setting - Watermark: Turn on [Watermark] as needed.
2-6. [Watermark] setting - Create Live Gallery: Turn on if you would like live galleries to be created.
2-7. Live Gallery settings
2-1-3. Tap [Create] in the upper right to save your new project.
Projects you create are listed on the [Project List] screen.
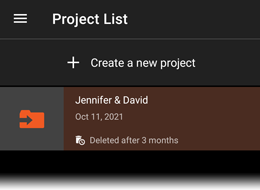
Editing and deleting projects
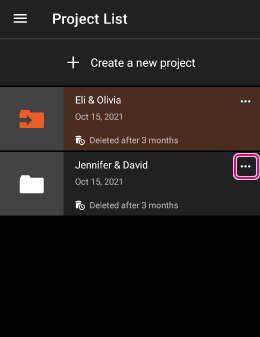
- To edit the settings of projects you have created, tap
 to the right of the project and then [Project Settings] to open the setting screen.
3-6. Subsequent project editing - Projects can also be deleted. Be careful when deleting projects, because deleted projects cannot be recovered.
3-7. Project and cache deletion
2-2. Image file format
JPEG images are the only type of photos that can be transferred to galleries by Visual Story. Set up the camera to shoot this type of photos as follows.
In the MENU →  (Shooting), set [File Format] to [JPEG] or [RAW & JPEG].
- This setting determines file formats used when you shoot. [FTP Transfer Func.] determines the file formats transferred.
2-3-7
2-3. Import destination setting for FTP connections
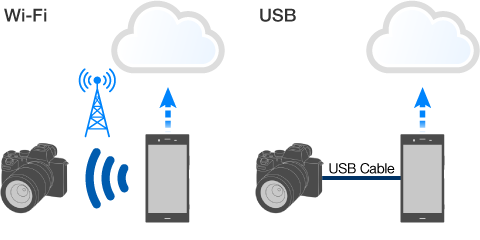
Complete settings on the mobile device to import to. The following three connection methods are available for transferring images from the camera to the mobile device.
- When importing images directly from the smartphone or an SD card, steps 2-3 and 2-4 can be skipped.
[Connecting through a Wi-Fi access point]
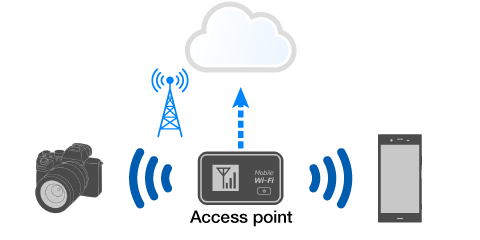
[Connecting your camera and this smartphone directly] (Personal Hotspot)
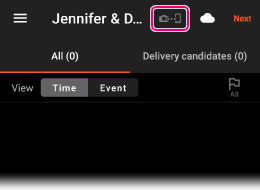
2-3-1.  Open the project you want to import to, and tap the connection icon (
 ) at the top.
- Review the details after the [Import Images from Camera] screen is displayed, and then tap [Next] in the lower right.
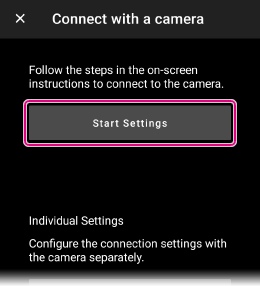
2-3-2. Tap [Start Settings] after the [Connect with a camera] screen is displayed.
- This screen is not displayed when connecting for the first time. Skip to the next step.
2-3-3. On the [Import Images from Camera] screen, tap [Next] at the lower right.
2-3-4. On the [Smartphone settings] screen, select the connection method between the camera and the smartphone (via access point or direct connection).
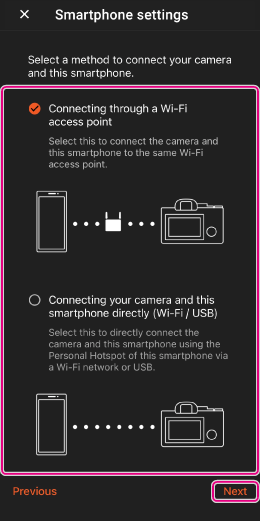
2-3-5. Configure as follows, referring to the following [Smartphone settings] screen.
- Operating methods differ depending on connection methods.
Connecting through a Wi-Fi access point
- Tap [Open Smartphone Settings] to open the Smartphone Wi-Fi settings screen, and turn on Wi-Fi to connect to the access point.
- After configuration, return to Visual Story and tap [Next].
 Select MENU →
  (Network) → [Wi-Fi]/[Wi-Fi Setting] → [Access Point Set.] on the camera to connect the camera to the access point.
- Set [Priority Connection] to [On] is recommended.
Connecting your camera and this smartphone directly (Wi-Fi)
- Tap [Open Smartphone Settings] to open the Smartphone mobile data transfer settings, and turn on tethering.
- After configuration, return to Visual Story and tap [Next].
- Select MENU → (Network) → [Wi-Fi]/[Wi-Fi Settings] → [Access Point Set.] on the camera to connect the access point (smartphone).
- Use the password displayed in [Personal Hotspot] on the smartphone.
- Set [Priority Connection] to [On] is recommended.
Connecting your camera and this smartphone directly (USB)
- Select the following items from MENU → (Network) → [Transfer/Remote] → [FTP Transfer func.] on the camera.
- [FTP Connect Method] : [USB Tethering]
- [FTP Function] : [On]
- / Connect the camera to the smartphone using a USB cable.
- Do not connect the camera to the smartphone via a conversion adaptor. Be sure to connect them using a single cable.
- Tap [Open Smartphone Settings] to open the Smartphone mobile data transfer settings, and turn on tethering.
- After configuration, return to Visual Story and tap [Next].
- If the camera is not recognized by your smartphone, disconnect the cable, select [FTP Transfer func.] → [USB-LAN/Tethering Connect], and then reconnect the cable.
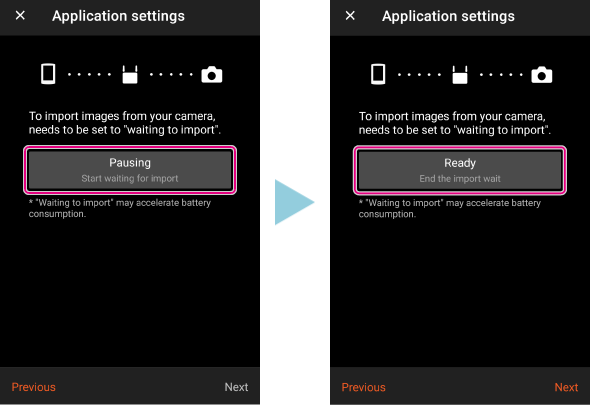
When the [Pausing] button appears, tap it to set your smartphone ready for import.
2-3-6. Referring to the [Camera Settings] screen, select the method for setting the FTP data of your smartphone from "Set using Bluetooth" or "Set manually".
- Perform the FTP settings for ILCE-9/7RM4A/7RM4 manually since the settings via Bluetooth are not available.
Set using Bluetooth
- Select MENU → (Network) → [Bluetooth]/[Bluetooth Settings] → [Bluetooth Function] → [On] on the camera to turn on the Bluetooth.
- Connect the smartphone to the Bluetooth.
When connecting the smartphone via Bluetooth for the first time
The camera and smartphone must be paired. After selecting MENU >
(Network) > [Bluetooth]/[Bluetooth Settings] > [Pairing] on the camera, tap the [Pairing] of the camera to be paired on the [Camera Settings] screen of the smartphone. Follow the instructions on the camera and smartphone to complete the pairing process.When the camera and smartphone are already paired
Tap the name of the camera to be paired on the [Camera Settings] screen of the smartphone after it is displayed. Tap [OK] when the confirmation message appears.
- Check the settings to be stored on the camera, make changes if necessary, and tap [Write].
- Select the storage destination for the FTP server settings, and tap [Run].
You can also change the name of the server (up to eight alphanumeric characters).
Set manually
- FTP setting details are displayed on the [Camera Settings] screen.
- You can change PORT, USER, and PASSWORD, if required. Tap the item to be changed.
- Select MENU → (Network) → [FTP Transfer Func.] → [Server Setting] on the camera. Select a server to which the smartphone is registered, and press the center button → right button → center button in that order.
- Enter the detailed information of the smartphone on the camera as indicated below.
- [Destination Settings]
In 1 [Host Name] and 2 [Port], enter the information shown on the mobile device.
Set [Secure Protocol] to [Off].
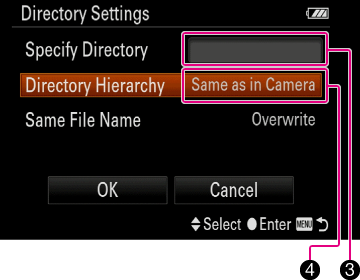
- [Directory Settings]
Leave 3 [Specify Directory] blank and set 4 [Directory Hierarchy] to [Same as in Camera].
If multiple cameras are connected, enter a camera name for [Specify Directory]. The camera name can be freely assigned.
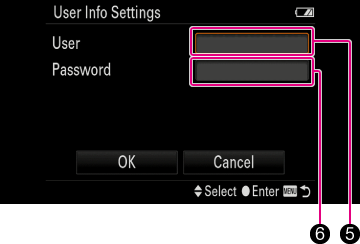
- [User Info Settings]
In 5 [User] and 6 [Password], enter the information shown on the mobile device.
- [Destination Settings]
2-3-7. Configure the FTP settings from MENU > (Network) > ([Transfer/Remote]) > [FTP Transfer Func.] on the camera, referring to the [Camera Settings] screen.
- Some of the settings below may not be available on some cameras.
When making a wireless connection
- [FTP function] : [On]
- [FTP Connect Method] : [Wi-Fi]
- [Auto Trans When Shot] : [On]
This setting enables automatic transfer of all shots to the mobile device.
-
[RAW+J/H Transfer Target] : [JPEG & HEIF] (For HEIF-supported models)
[RAW+J Trans. Trgt.] : [JPEG only] (For HEIF-unsupported models)
Only JPEG images are used for the projects and online photo galleries. We do not recommend including RAW images since it will take longer to transfer.
- [FTP Power Save] : [Off]
When connecting using a USB cable
- [Auto Trans When Shot] : [On]
This setting enables automatic transfer of all shots to the mobile device.
-
[RAW+J/H Transfer Target] : [JPEG & HEIF]
Only JPEG images are used for the projects and online photo galleries. We do not recommend including RAW images since it will take longer to transfer.
- [FTP Power Save] : [Off]
2-3-8. Tap [Next].
- When the [Settings completed] screen is displayed, the connection between the camera and smartphone is completed.
2-4. Image transfer setting
2-4-1. Import Destination setting
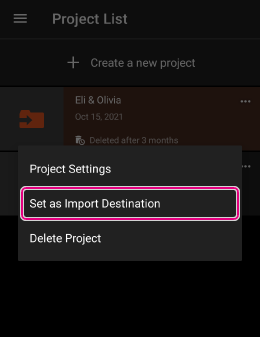
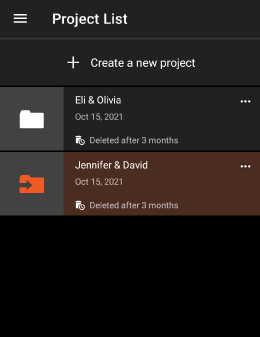
The orange import icon  is displayed for the project specified as the image import destination. When a new project is created, this project will be automatically specified as the import destination.
Setting after project creation
On the [Project List] screen, tap to the right of the project and then [Set as Import Destination].

2-4-2. FTP transfer status check
You can check transfer status by referring to the connection icon at the top of the screen after project selection.
 : FTP transfer standby
 (flashing in green) : Transfer in progress
- : FTP transfer not active
 : error
2-5. Setting and applying Auto Retouch
By completing retouch settings in advance, you can have the settings applied uniformly to all images. This saves work in retouching after you shoot. You can use the same retouch settings for multiple projects or specify separate retouch settings for individual projects.
2-5-1. Creating [Retouch Preset Settings]
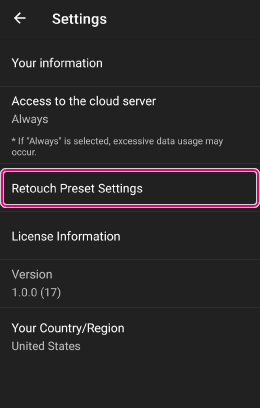
- On the [Project List] screen, tap
 (menu in the upper left) > [Settings] > [Retouch Preset Settings].
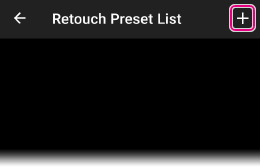
- Tap [+] to create new settings.
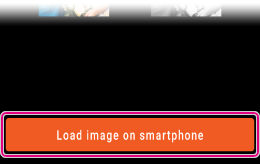
- Tap [Load image on smartphone] at the bottom and select an image of your choice.
- This will be used as the sample image when configuring retouch settings. You will decide retouching parameters based on retouching the sample image.
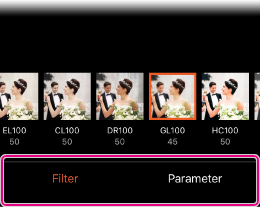
- Use [Filter] and [Parameter] at the bottom to set your preferred filter and parameter.
- For filters, tap the selected item again to adjust the level.
- Tap [Save] in the upper right, and then enter a title for the settings and save them.
2-5-2. Applying [Retouch Preset Settings]
- On the [Project List] screen, select a project to apply the retouch settings to, and then open at the right end.
- Select [Project Settings].
- Turn on [Auto Retouch] and tap [Detailed Settings].
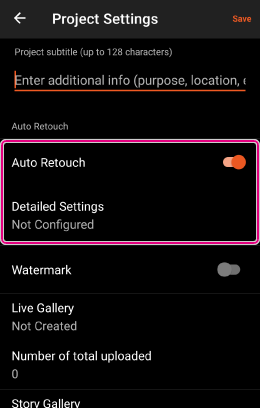
-
To apply the Preset Settings as they are
Tap the corresponding preset name. Setting is complete. (Skip Steps 5 to 7.)
To edit the image using the Preset Settings as a base
Tap […] on the right side of the corresponding preset name, and tap [Edit the parameter based on this preset].
If you do not want to use the Preset Settings
Select [Set without preset].
- After the Camera Roll images are loaded, select an image to be used as a retouch sample.
- Use [Filter] and [Parameter] at the bottom to set your preferred filter and parmeter.
- For filters, tap the selected item again to adjust the level.
- After completing adjustment of all items, tap [Save] in the upper right.
2-6. Photographer Information Settings
The watermark to be inserted into the image, and the nicknames and contact details to be displayed in the gallery can be set.
- On the [Project List] screen, tap the upper left menu → [Settings] → [Your information].
- Enter the required information.
Watermarked Images
Photographer names or other identification can be added as a watermark to photos in the story galleries delivered to clients.
- PNG and JPEG files can be used as watermarks. When a JPEG file is used, it is layered over the images at 50% transparency.
- Watermarks are layered over images in the story galleries (1080 pixels on the short side) in the lower-right corner in a size that will fit in a square measuring 250 × 250 pixels. If the watermark is smaller than 250 × 250 pixels, it is overlayed without resizing.
2-7. Live Gallery settings
You will need to create live galleries and share the gallery URL with clients in advance.
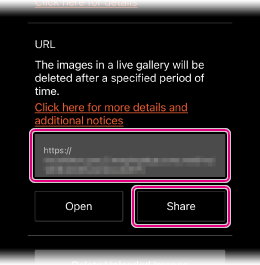
- On the [Project List] screen, access [Project Settings] by tapping [...] to the right of the project.
- With a project open, selection is also possible by tapping in the upper left.
- With a project open, selection is also possible by tapping
- Tap [Live Gallery] → [Create Live Gallery] to create a live gallery.
- Share the indicated URL with your clients.
