- Visual Story
- How to use
- 2. Importing images
 Visual Story
2. Importing images
2-1. Import Method Setup
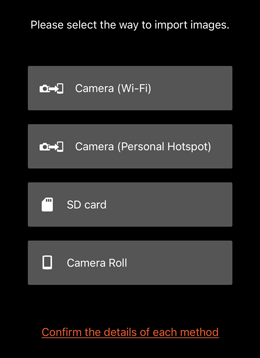
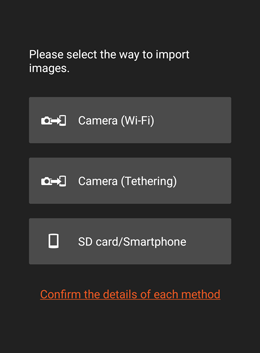
You can select one of the following methods for importing images from your camera into Visual Story. The steps involved differ depending on the method.
iOS
Android
Importing from a camera
-
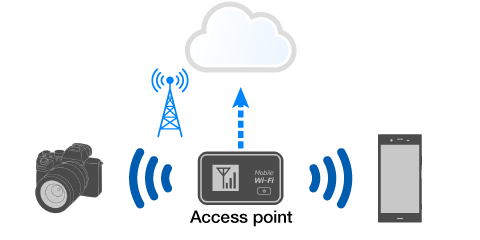
Camera (Wi-Fi)
You can import images from a camera using a Wi-Fi access point.
-
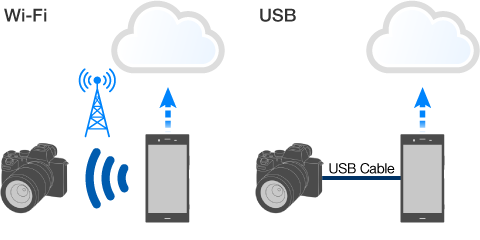
Camera (Personal Hotspot or Tethering)
Without using an access point, you can import images from a camera using the Personal Hotspot feature on an iPhone or iPad or the tethering feature on an Android device. You can import images either wirelessly using Wi-Fi or via a wired connection using USB tethering.
- Cameras that do not support USB tethering: ILCE-9M2, 9, 7RM4A, 7RM4, 7C, and 7M3
- Smartphones that support USB tethering: Smartphones compatible with USB Power Delivery (PD) only
Importing from an SD card
-
SD card
You can connect your smartphone to an SD card reader or camera and import images from a mounted SD card directly to Visual Story.
- Importing movies is not supported on iOS devices.
Importing from Camera Roll or smartphone
-
Camera Roll or Smartphone
You can import images stored on a smartphone (in Camera Roll on an iPhone or iPad, or in an album, etc., on an Android device) to Visual Story.
If you are not sure which method to use for importing images, click here.
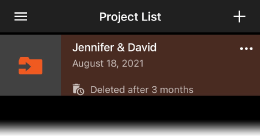
2-1-1. Tap the import destination project to open it.
- An orange folder icon
 is displayed to indicate the import destination project.
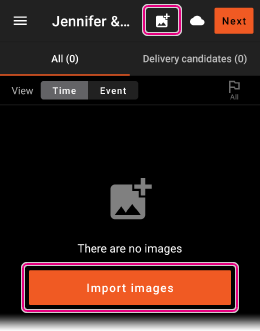
2-1-2. Tap ![]() (Import) at the top of the screen or [Import images].
(Import) at the top of the screen or [Import images].
2-1-3. Select your desired import method.
iOS
Android
2-2. Importing from a Camera
This method automatically imports images to Visual Story from a camera over an FTP connection. The following three connection methods are supported.
Camera (Wi-Fi)
Camera (Personal Hotspot or Tethering)
2-2-1. Follow the on-screen prompts to prepare to connect to the smartphone as follows.
Using [Camera (Wi-Fi)]
Open [Settings] on the smartphone and turn on Wi-Fi.
Using [Camera (Personal Hotspot)] on iOS
Select [Settings] → [Personal Hotspot] on the smartphone and turn on [Allow Others to Join].
Establishing a wireless Wi-Fi connection using [Camera (Tethering)] on Android
Tap [Open Smartphone Settings] to open the smartphone’s mobile data communication settings and turn on tethering.
Establishing a wired USB tethering connection using [Camera (Tethering)] on Android
It is necessary to connect a cable before configuring smartphone settings, so proceed as is to the next step.
- If already turned on, the screen shown in 2-2-2 appears immediately when you select an import method, so proceed as is to the next step.
- If the message [Stop importing] appears on iOS, an FTP connection has already been established. Close the message and proceed to “3. Live Gallery” or “4. Story Gallery 1.” To change the import method, stop importing and then select a different import method.
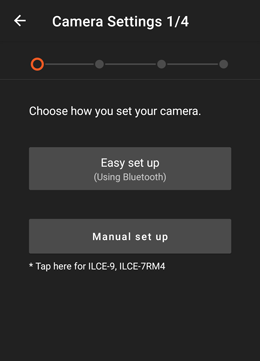
2-2-2. Follow the indications on the [Camera Settings 1/4] screen on Visual Story and select a method for configuring the smartphone’s FTP information in the camera settings.
Easy set up
The smartphone’s FTP information is sent to the camera using Bluetooth. ILCE-9, ILCE-7RM4, and ILCE-7RM4A do not support importing of FTP information via Bluetooth, so use manual setup for these models.
Manual set up
The smartphone’s FTP information is input to the camera manually.
Easy set up
 Select MENU →
  (Network) → [Bluetooth]/[Bluetooth Settings] → [Bluetooth Function] → [On] on the camera to turn on the Bluetooth.
 Connect the smartphone to Bluetooth as follows.
When connecting the smartphone via Bluetooth for the first time
The camera and smartphone must be paired. After selecting MENU >
(Network) > [Bluetooth]/[Bluetooth Settings] > [Pairing] on the camera, tap the name of the camera to be paired on the [Camera Settings 2/4] screen of the Visual Story . Follow the instructions on the camera and smartphone to complete the pairing process.When the camera and smartphone are already paired
Tap the name of the camera to be paired on the [Camera Settings 2/4] screen of the Visual Story after it is displayed
If you have more than one camera of the same model and cannot distinguish among them, select MENU on the camera and set [Write Serial Number] to [On] (except in the case of ILCE-7M3).
- Confirm the destination and tap [Start settings].
- You can also change the name of the server (up to eight alphanumeric characters).
Manual set up
- FTP setting details are displayed on the [Camera Settings 2/4] screen.
- You can change PORT, USER, and PASSWORD, if required. Tap the item to be changed.
- Select MENU → (Network) → [FTP Transfer Func.] → [Server Setting] on the camera. Select a server to which the smartphone is registered, and press the center button → right button → center button in that order.
- Enter the detailed information of the smartphone on the camera as indicated below.
- [Destination Settings]
In 1 [Host Name] and 2 [Port], enter the information shown on the mobile device.
Set [Secure Protocol] to [Off].
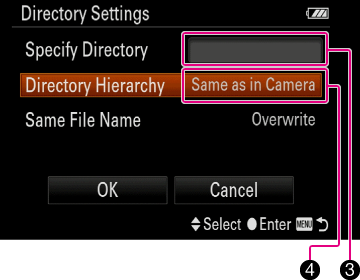
- [Directory Settings]
Leave 3 [Specify Directory] blank and set 4 [Directory Hierarchy] to [Same as in Camera].
If multiple cameras are connected, enter a camera name for [Specify Directory]. The camera name can be freely assigned.
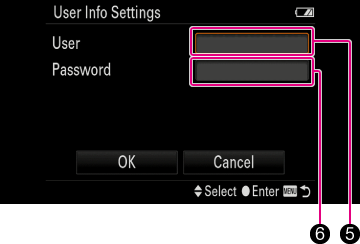
- [User Info Settings]
In 5 [User] and 6 [Password], enter the information shown on the mobile device.
- [Destination Settings]
2-2-3. Follow the indications on the [Camera Settings 3/4] screen to connect the camera to the smartphone.
Using [Camera (Wi-Fi)]
On the camera, select MENU → ![]() (Network) → [Wi-Fi]/[Wi-Fi Settings] → [Access Point Set.] to connect to an access point.
(Network) → [Wi-Fi]/[Wi-Fi Settings] → [Access Point Set.] to connect to an access point.
- Set [Priority Connection] to [On] is recommended.
Establishing a wireless Wi-Fi connection using [Camera (Personal Hotspot or Tethering)]
On the camera, select MENU → ![]() (Network) → [Wi-Fi]/[Wi-Fi Settings] → [Access Point Set.] to connect to an access point (smartphone).
(Network) → [Wi-Fi]/[Wi-Fi Settings] → [Access Point Set.] to connect to an access point (smartphone).
- Use the password displayed on the smartphone.
- Set [Priority Connection] to [On] is recommended.
Establishing a wired USB tethering connection using [Camera (Personal Hotspot)]
- On the camera, select MENU → (Network) → [Transfer/Remote] → [FTP Transfer Func.] and then select the following items.
- [FTP Connect Method] : [USB Tethering]
- [FTP Function] : [On]
- Connect the camera to the smartphone using a USB cable.
- Do not connect the camera to the smartphone via a conversion adaptor. Be sure to connect them using a single cable.
- On Android, tap [Open Smartphone Settings] to open the smartphone’s mobile data communication settings and turn on tethering. This operation is not necessary on iOS.
- If the smartphone does not recognize the camera, unplug the cable, select [FTP Transfer Func.] → [USB-LAN/Tethering Connect] on the camera, and then reconnect the cable.
2-2-4. ![]() Configure the FTP settings from MENU >
Configure the FTP settings from MENU > ![]() (Network) > ([Transfer/Remote]) > [FTP Transfer Func.] on the camera, referring to the [Camera Settings 4/4] screen.
(Network) > ([Transfer/Remote]) > [FTP Transfer Func.] on the camera, referring to the [Camera Settings 4/4] screen.
- Some of the settings below may not be available on some cameras.
When making a wireless connection
- [FTP function] : [On]
- [FTP Connect Method] : [Wi-Fi]
- [Auto FTP Transfer] or [Auto Trans When Shot] : [On]
This setting enables automatic transfer of all shots to the mobile device.
- [Auto FTP Target]: Select images to be transferred, such as still images or movies. (Only models that support the automatic transfer of movies)
-
[RAW+J/H Transfer Target] : [JPEG & HEIF] (For HEIF-supported models)
[RAW+J Trans. Trgt.] : [JPEG only] (For HEIF-unsupported models)
Only JPEG images are used for the projects and online photo galleries. We do not recommend including RAW images since it will take longer to transfer.
- [FTP Power Save] : [Off]
When connecting using a USB cable
- [Auto FTP Transfer] or [Auto Trans When Shot] : [On]
This setting enables automatic transfer of all shots to the mobile device.
- [Auto FTP Target]: Select images to be transferred, such as still images or movies. (Only models that support the automatic transfer of movies)
-
[RAW+J/H Transfer Target] : [JPEG & HEIF]
Only JPEG images are used for the projects and online photo galleries. We do not recommend including RAW images since it will take longer to transfer.
- [FTP Power Save] : [Off]
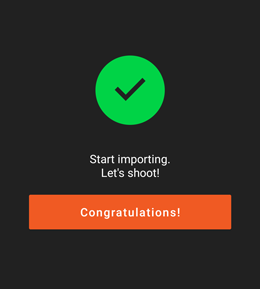
2-2-5. When the settings are complete, tap [Complete Settings].
- Preparation is complete when [Congratulations!] is displayed.
2-3. Importing from an SD Card
You can connect your smartphone to an SD card reader or camera and import images from a mounted SD card directly to Visual Story.
iOS
Importing movies is not supported on iOS devices.
- Refer to “2-1. Import Method Setup” and select [SD card].
- Insert an SD card into the SD card reader or camera and connect it to the smartphone.
- To use the Lightning terminal of your iPhone or iPad to connect to the camera, connect to the USB Type-C terminal or Multi/Micro USB terminal of the camera via a Lightning to USB 3 Camera Adapter from Apple. The camera will not be recognized if you use a direct connection.
- If your iPad has a USB Type-C terminal, you can use a Type-C to Type-C cable to connect to the camera. The ILCE-9 does not have a USB Type-C terminal, so you will need to use the USB-C to USB Adapter from Apple.
- Select the images you want to import and tap [Import] to import them.
- When the message [Copied XX image(s).] appears, you can disconnect the SD card reader or camera.
- It may take some time to import images and for the images to appear in Visual Story after they are imported.
- Only JPEG images that are at least 320 pixels on the short edge can be imported into Visual Story.
- Images with file names exceeding 100 characters cannot be imported.
Android
- Refer to “2-1. Import Method Setup” and select [SD card/Smartphone].
- Insert an SD card into the SD card reader or camera and connect it to the smartphone.
- Connect the cable to the USB Type-C terminal or Multi/Micro USB terminal on the camera. The ILCE-9 does not have a USB Type-C terminal, so please use the Multi/Micro USB terminal.
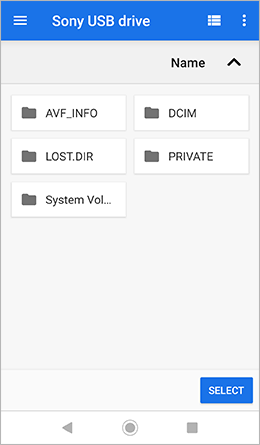
- Select [Settings] at the bottom right of the screen.
- From
 (Menu)*1 at the top left of the screen that appears, select the name of the card reader if you are using a card reader, or [Sony USB drive]*2 if you are using a camera.
 - Select the folder where the images are stored (such as [DCIM]) to display images. Then tap [SELECT]*2 at the bottom right of the screen.
*1 Depending on the device you are using and past operations, the locations displayed and the file names may differ.
*2 The text may differ depending on the device you are using.
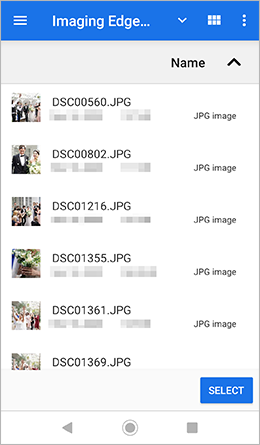
- Select images to be imported, then tap [Import] at the bottom of the screen.
- When the message [Copied XX image(s).] appears, you can disconnect the SD card reader or camera.
- It may take some time to import images and for the images to appear in Visual Story after they are imported.
- Only JPEG images measuring at least 320 pixels on the short side and proxy movies in XAVC S HD format and up to 5 minutes long can be imported to Visual Story.
- Images with file names exceeding 100 characters cannot be imported.
2-4. Importing from a Smartphone
You can import images to Visual Story from Camera Roll on an iPhone or iPad or from an album, etc., on Android.
iOS
- Refer to “2-1. Import Method Setup” and select [Camera Roll].
- Select your preferred images and tap [Import] to import them.
- Up to 100 images can be selected at once.
- Only JPEG images measuring at least 320 pixels on the short side and proxy movies in XAVC S HD format and up to 5 minutes long can be imported to Visual Story.
- Images with file names exceeding 100 characters cannot be imported.
Android
- Refer to “2-1. Import Method Setup” and select [SD card/Smartphone].
- Select [Settings] at the bottom right of the screen.
- From (Menu)*1 at the top left of the screen that appears, select the name of your smartphone.
- If you cannot find the name of your smartphone, first select [Show internal storage] from
 (Settings) at the top right of the screen.
- If you cannot find the name of your smartphone, first select [Show internal storage] from
- Select the folder where the images are stored (such as [DCIM] or [Imaging Edge Mobile]) to display images. Then tap [SELECT]*2 at the bottom right of the screen.
*1 Depending on the device you are using and past operations, the locations displayed and the file names may differ.
*2 The text may differ depending on the device you are using.
- Select images to be imported, then tap [Import] at the bottom of the screen.
- When the message [Copied XX image(s).] appears, you can disconnect the SD card reader or camera.
- It may take some time to import images and for the images to appear in Visual Story after they are imported.
- Only JPEG images measuring at least 320 pixels on the short side and proxy movies in XAVC S HD format and up to 5 minutes long can be imported to Visual Story.
- Images with file names exceeding 100 characters cannot be imported.
2-5. Manual Importing over an FTP Connection
You can import images manually over an FTP connection. This can be useful in the following cases.
- Ratings set on the camera are transferred and reflected in Visual Story. Camera rating settings are not carried over by automatic transfers, but they are carried over when manual transfer is used. They are also transferred when importing from an SD card or a smartphone. It is also possible to set ratings in Visual Story.
- If you shot images when out of Wi-Fi range, you can transfer them once you are back in range.
- Follow the steps in “2-2. Importing from a Camera” to connect the camera to the smartphone.
- In the camera MENU, select (Network) → ([Transfer/Remote]) → [FTP Transfer Func.] → [FTP Transfer].
- Specify the images you wish to transfer, then follow the instructions on the screen to transfer them.
- Images cannot be rated while transferring images. If transferring takes time, try changing the image quality and image size. For example, when using ILCE-7RM4, the image size of M is recommended for using this feature.