

- Visual Story
- How to use
- 3. First steps on the day of shooting - Shooting, selection, and upload (iOS)
 Visual Story
3. First steps on the day of shooting - Shooting, selection, and upload (iOS)
3-1. Steps before shooting
3-1-1. Check settings and operation
Confirm that you have set the correct project as the import destination for images from the camera.
- Check the settings on the camera.
2-2. Image file format 2-3. Import destination setting for FTP connections - Check the settings on the mobile device.
2-4. Image transfer setting - Make sure the time set on the camera is correct, as gallery display is based on the shooting time.
3-1-2. Preparations immediately before shooting
- Start Visual Story. Leave the Visual Story screen displayed while shooting.
- Tap
 (menu in the upper left) → [Screen Lock] to lock the screen.
- Lock the screen to prevent disconnection caused by the device entering sleep mode or other apps starting up.
- Start shooting.
- In the case of movies, only movies whose length is less than 5 minutes can be imported.
- To have a live gallery created as you shoot, see 3-2-1.
3-2. Shoot
3-2-1. Shoot while streaming to a live gallery (when using the live gallery feature)
Turning on live galleries will enable automatic real-time sharing of galleries with AI-selected photos. The time frame for streaming is decided by the photographer. Gallery viewers can "like" their favorite images. Referring to these AI-selected images and the images liked by viewers can help you create story galleries after events.
- Only photos are streamed. Movies are not streamed.
- After streaming, live galleries can be viewed for about 24 hours before they are automatically deleted.
- Maintain a connection during live gallery streaming by selecting [Settings] → [Access to the cloud server] → [Always], or by establishing a connection with the camera via an access point connected to the Internet.
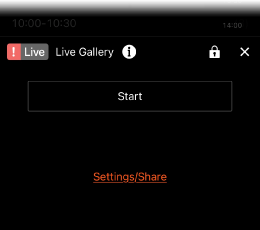
- In shooting situations where you want to start streaming, open the project and tap [Start] on the Live Gallery panel to start streaming.
- If you have closed the Live Gallery panel, tap
 to reopen it.
- Tap (menu in the upper left) → [Screen Lock] to lock the screen.
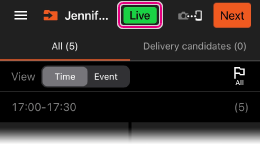
- Start shooting.
- AI analyzes your shots, selects images, and uploads them to the live gallery.
- The Live icon turns green during image streaming.
- Streaming can be paused and resumed with [Pause] and [Resume] on the Live Gallery panel.
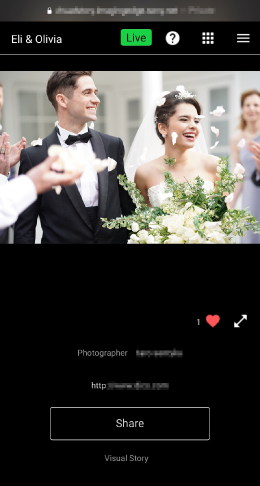
- You can check live galleries in real time. Uploading manually selected images is not supported.
- Removing images from live galleries
FAQ for live galleries  : Indicates liked images and the number of likes
- After you finish shooting, tap [Finish] on the Live Gallery panel to stop streaming.
- Once stopped, streaming can be resumed again by reaccessing [Live Gallery] in [Project Settings].
- Auto retouching (but not individual retouching) is applied to images in live galleries.
- Live gallery images cannot be downloaded or watermarked.
- For details on live galleries, see the FAQ.
FAQ for live galleries
3-2-2. Movie shooting (ILCE-1/7SM3/7M4, ILME-FX3 only)
Shot movies can also be imported into the story gallery.
- See below for the formats of images that can be imported.te
Supported image types
For ILCE-7M4
Set [Auto FTP Transfer] to [On] to automatically import movies as well as still images into Visual Story.
For ILCE-1/7SM3, ILME-FX3
To import movies into Visual Story, you will need to manually transfer them to a smartphone using FTP transfer after shooting.
- Automatic transfer is not possible. Importing from the camera roll or an SD card is also not possible.
- In the camera MENU, select
 (Network) → ([Transfer/Remote]) → [FTP Transfer Func.] → [FTP Transfer].
 - Specify the movie to be transferred and follow the on-screen instructions to carry out the transfer.
3-3. Importing images
Though they can be transferred automatically using FTP, you can also import images into Visual Story by following the steps below.
3-3-1. Transfer images rated on the camera
Rating with Visual Story is described in section 3-4-2, but ratings set on the camera can also be transferred to a smartphone and used in Visual Story.
- In the camera MENU, select (Network) → ([Transfer/Remote]) → [FTP Transfer Func.] → [FTP Transfer].
- Specify the still images you wish to transfer, then follow the instructions on the screen to transfer them.
- Images cannot be rated while transferring images. If transferring takes time, try changing the image quality and image size. For example, when using ILCE-7RM4, the image size of M is recommended for using this feature.
3-3-2. Import images from camera roll
Before selecting images, make sure the images you need are ready. Images imported to the iPhone/iPad camera roll from an SD card reader or Imaging Edge Mobile can also be used in story galleries. You can do this either before or after shooting at an event.
- Choose a project as the import destination.
- Tap (menu in the upper left) > [Import from Camera Roll].
- Select your preferred images and tap [Import] to import them.
- Up to 100 images can be selected at once. Movies cannot be imported.
- Only JPEG images that are at least 320 pixels on the short edge can be imported into Visual Story.
- Images with file names exceeding 100 characters cannot be imported.
- Images are arranged in the story gallery in the order of shooting (by shooting date/time).
Sharing camera roll images in live galleries
Images imported to the iPhone/iPad camera roll can also be shared in live galleries.
- After starting live gallery streaming (indicated by a green Live icon), begin the process of shooting and importing captured shots into Visual Story. Images captured during live gallery streaming times will be candidates for streaming.
- When uploading images imported from the camera roll, imported images are not uploaded if newer images have already been uploaded.
3-3-3. Importing from an SD card
You can import images directly into Visual Story from an SD card via an SD card reader. The import operation can be performed either before or after shooting images at an event.
- Select the project into which you want to import the images.
- Tap the MENU at top left → [Import from SD card].
- Insert the SD card into the SD card reader, and connect the SD card reader to a smartphone.
- Select the images you want to import and tap [Import] to import them.
- When selecting images, you can narrow the displayed items to protected images only, batch select images by date, etc.
- When the message [Imported XX image(s). ] is displayed, you can disconnect the SD card reader from the smartphone.
- It may take some time to import images and for the images to appear in Visual Story after they are imported.
- Only JPEG images that are at least 320 pixels on the short edge can be imported into Visual Story.
- Images with file names exceeding 100 characters cannot be imported.
- Images are arranged in the gallery in the order of shooting (by shooting date/time).
Sharing SD card images in live galleries
It is also possible to stream SD card images through Live Gallery.
- After starting Live Gallery streaming (indicated by a green Live icon), begin the process of shooting and importing captured shots into Visual Story. Images captured during live gallery streaming are candidates for streaming.
- When uploading images imported from the camera roll, imported images are not uploaded if newer images have already been uploaded.
3-4. Select images
Choose the images imported to each project that you will use as the final story gallery.
Basic editing of individual images, such as retouching, is also possible when you select images.
3-4-1. Image display overview
Thumbnail display
Selecting a project to edit on the [Project List] screen displays a list of imported images as thumbnails.
The number of images shown can be increased or decreased by pinching in or out.
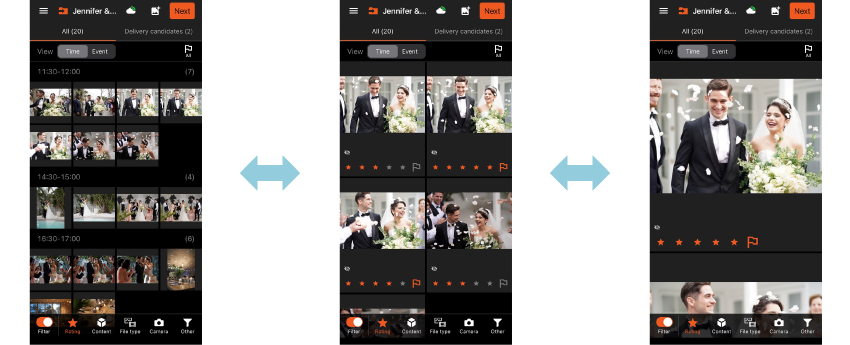
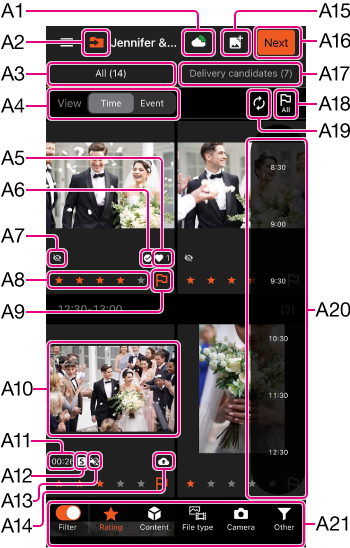
- A1 Live gallery streaming: Displayed when you have turned on the live gallery feature.
 indicates live gallery streaming in progress, and indicates that streaming has not yet started or is paused.
 - A2 [All] tab: Displays all images transferred to the project.
- A3 [Time/Event] tab: Select the "Time" tab to display the images in the order of the time they were shot. Select the "Event" tab to display the images of each shooting event or scene horizontally.
- A4
 (Like)(Photos Only): Displayed for images liked by gallery viewers.
 - A5
 (Live Gallery)(Photos Only): Displayed for images selected by the AI for live galleries.
 - A6 Blinking (Photos Only): Displayed for images with people who are blinking.
- A7 Rating: Enables you to rate each image, from no stars to five stars.
3-4-2. Filtering images - A8 Flag: Flagging images distinguishes them so that you can consider including them in the story gallery. Flagged images are displayed on the [Delivery candidates] tab.
3-4-4. Deciding candidates based on flagged images - A9 Image thumbnails: Tap any image to view it in single-image display.
- A10 Duration (movies only): Shows the length of the movie.
- A11
 Shot Mark (ILCE-7M4 only): Indicates that a movie has a shot mark added.
 - A12
 Audio (movies only): Shows the movie is silent when delivered.
 - A13
 Syncing (waiting to upload): Marks images that are syncing with the cloud. After a little while, the image will sync and the icon will disappear.
 - A14 Next: Goes to the next step.
- A15 [Delivery candidates] tab: Displays images that have been flagged, so that they can be considered for inclusion in the story gallery.
3-4-5. Select highlights and a cover - A16 Flag [All]: Flags all current images (distinguishing them as story gallery candidates), or clear all flags.
- A17 Jump bar: Swipe slightly from the right corner of the screen toward the left side to display the jump bar. If you tap on the bar, you can jump to an image that was shot at that time or event.
- A18 Filter: Enables you to filter image display by rating, content, or other criteria. Multiple filters can be selected.
3-4-2. Filtering images
Single-image display
For single-image display, tap the thumbnail images. To return from single-image display to thumbnail display, tap [×] in the upper left. There are different screens for photos and for movies.
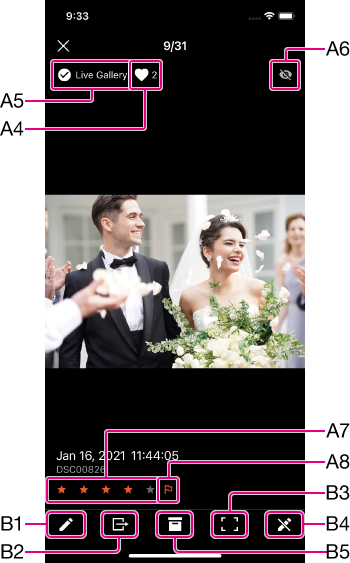
Photos
- B1 Retouch: For individual images, apply a filter or adjust brightness.
3-4-3. Retouch - B2 Export: Exports images to the camera roll.
- B3 Focus point display: Displays the focus point used to focus in autofocus shooting.
- B4 Show original: Tapping this icon shows the original images if the current images were retouched.
- B5 Archive: Tapping this icon moves the images to Archive. You can use the "Filtering" setting to switch between displaying and not displaying the images stored in Archive. You will find it useful to set "Filtering" for not displaying images that are obviously poor shots after moving them to Archive.
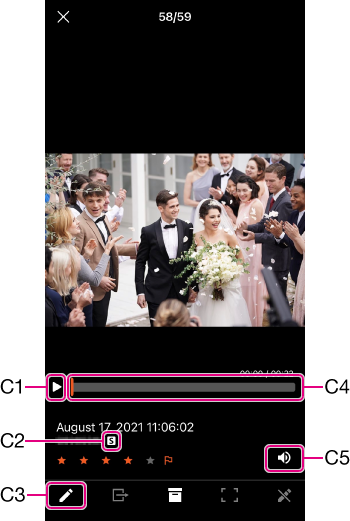
Movies
To play a movie, tap the play button ▶ C1.
- C2 Shot Mark: Indicates when a shot mark is added (only for cameras that support shot marks).
- C3 Edit (trimming): Allows you to trim the movie.
- C4 Seek bar: Shows the playback status of the movie. Click to play from a specific position.
- C5 Audio: Specifies whether or not audio is included when delivered.
Event display
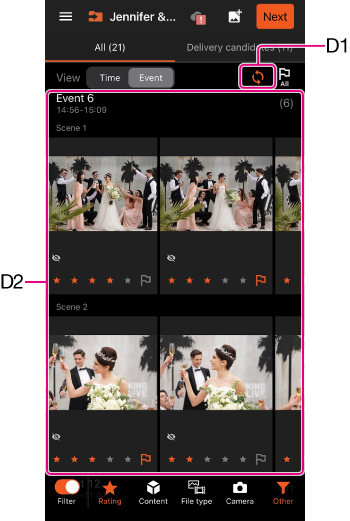
- D1 Update: This icon is displayed when you select the Event tab for the first time after importing a new image. Tapping this icon analyzes and sorts the new image, and this image will appear in the Event display.
- D2 Event/scene image: Automatically sorts the imported images for each shooting event. The images to be displayed in the Event tab are further broken down into the different scenes, and are displayed in a horizontal row. To view hidden images, swipe horizontally.
- You cannot separate or combine events or scenes manually.
3-4-2. Filtering images
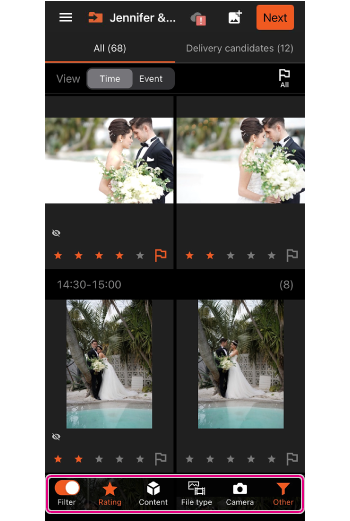
Image display can be filtered in several ways. Turn on Filter and select filters to apply. Image display can be switched between filtered images and all images by turning Filter on and off. Selecting images is easier if you combine these filters as needed.
Rating
Shots can be rated from no stars to five stars.
- Besides rating images in the app, you can also transfer ratings applied on the camera.
Content, File Type, and Camera
You can filter image display by content (such as shots that show jewelry, etc.), by whether the file type is movie or photo, or by the camera used.
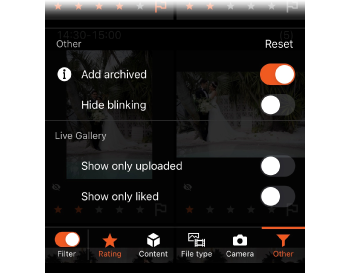
Other
These filtering options are available.
- Archived images
- Images with people who are blinking
- Uploaded images (Images selected by the AI for live galleries)
- Liked images
3-4-3. Retouch
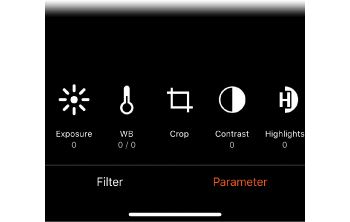
Photos
For individual images, you can apply a filter or adjust a parameter such as brightness.
- Tap
 (pencil icon) at the bottom left in single-image display.
 - Select [Filter] and [Parameter] at the bottom of the screen to set your preferred filter and parameter. For filters, tap again to adjust the level, as needed.
- Tap [Save] in the upper right.
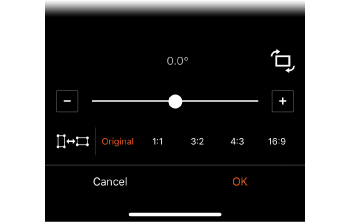
[Crop] setting in [Parameter]
This feature can be used to trim away unneeded image areas. The smallest size when cropped is half the length and height of the original image.
You can also straighten images and change the aspect ratio. If you straighten images, crop them afterwards.
Movies
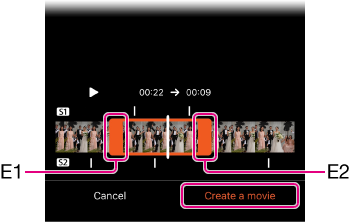
You can trim movies.
- In single-image display, tap (Pencil) at the bottom left.
- Drag the orange in point (E1) and out point (E2) on the seek bar to the left or right to specify new in and out points.
- Tap [Create a movie].
- A new movie is saved to the same locations as the original movie.
- Trimming is applied to movies in the cloud after they have been uploaded, so the process takes about the same amount of time as the playback duration of the trimmed movie. For example, it takes about one minute to trim a movie to a duration of one minute.
- It is not possible to trim a movie down to a single photo.
- When a shot mark is added to a movie with a shot mark-compatible camera, it will be displayed above and below the seek bar.
3-4-4. Deciding candidates based on flagged images
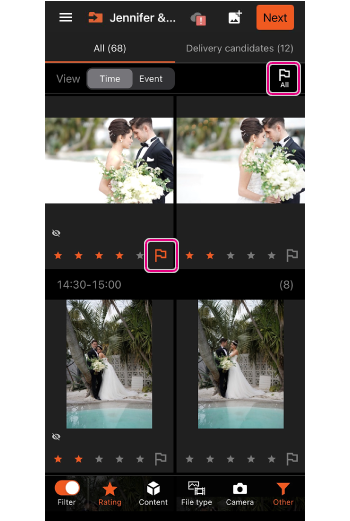
Candidates for uploading to story galleries can be distinguished by narrowing down images as described and then flagging them. Flagged images are displayed on the [Delivery candidates] tab.
Images can be flagged in either of the following ways.
- Tap
 to flag images individually (or clear the flag).
 - Tap
 to flag all current images individually (or clear the flags).
- There is a limit on the number of movies that can be uploaded to a gallery. (The limit differs depending on the plan.)
3-4-5. Select highlights and a cover
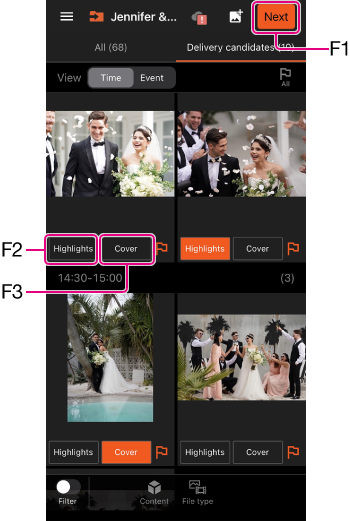
On the [Delivery candidates] tab, specify images to highlight in the gallery and a cover.
- F1 Next: Goes to the next step.
- F2 Highlights: Images set as highlights are displayed larger in the story gallery.
- Specify about one highlight image per 5 images.
- If the number of images set as highlights is too small, images not set as highlights may also be used as highlight images.
- F3 Cover: This image is used as the cover of the story gallery. Only one image per project can be set as the cover.
- You can specify a movie as the cover, but it is displayed as a static image of the starting point of the movie, and the movie does not play.
- On the [Delivery candidates] tab, images can only be filtered by content and file type.
Tap [Next] to go to the next step when you are finished setting the highlights and cover.
3-5. Creating an story gallery for editing
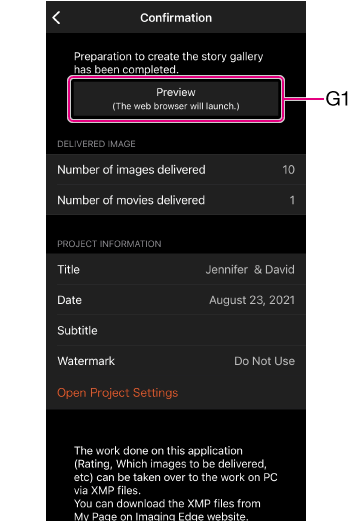
Review the details and upload the images to create an story gallery for editing purposes.
- Review the information shown, which includes the title, date, number of story gallery images, and so on.
- Tap [Preview] G1. The story gallery is now created.
- Tap [Open] after the story gallery has been created.
An story gallery for editing purposes opens in the browser.
4. Second steps on the day of shooting
- Images uploaded to story galleries are automatically converted to 2 megapixels.
- To edit settings such as titles or dates, tap [Open Project Settings] to return to the setting screen.
- To view any changes made from another smartphone on your smartphone if you are using two or more smartphones for the same project, display the thumbnail screen and flick down.
3-6. Subsequent project editing
Review the story gallery, and follow these steps if subsequent project editing is needed.
Add or remove images
To edit delivery candidates, open the project from the [Project List] screen, and then either set or clear flags.
Edit information other than images
Open the project, and then tap (menu in the upper left) → [Project Settings] to open the project editing screen.
3-7. Project and cache deletion
3-7-1. Cache deletion
After uploading to the cloud, images on the mobile device can be deleted. This does not affect images in the cloud story gallery.
- Open the project, and then tap (menu in the upper left) → [Project Settings] to open the project editing screen.
- Tap [Delete Images in this smartphone].
- For subsequent editing, open the project again. This triggers syncing with the cloud and downloads story gallery images (including images that were not selected or streamed).
3-7-2. Delete Project
Projects can be deleted in either of the following ways.
Delete from the [Project List] screen
On the [Project List] screen, tap  to the right of the project and then [Delete Project].
Delete from [Project Settings]
- Open the project and tap (menu in the upper left) → [Project Settings].
- Tap [Delete Project].
- Deleted projects cannot be recovered.
3-8. Changing initial settings later
To change initial settings later after saving, do the following.
Cloud uploads when not connected via Wi-Fi
(menu in the upper left) → [Settings] → [Access to the cloud server]
Photographer information
(menu in the upper left) → [Settings] → [Your information]
