
 Image Management Software
PlayMemories Home Support
|
PlayMemories Home provides the following video edit functions.
A simple edit function which can cut out your favorite parts of movie content and saves them as new video files in the same format. You can also capture photos of your favorite scene in videos and save them as a still image.
Click [Tools] > [Edit/Convert Videos] > [Trim Videos].
Drag and drop the video file shown in thumbnails into the right area then click [Next] to open the edit window.
Set the IN point (start) / OUT point (end).
The video data designated between the IN Point and OUT Point remains.
Move the ![]() (IN Point) or
(IN Point) or ![]() (OUT Point) slider, or start the playback and click the [Set IN Point] or [Set OUT Point] button during the playback.
(OUT Point) slider, or start the playback and click the [Set IN Point] or [Set OUT Point] button during the playback.
When the trimming is complete, click [Save Edited Video...].
When the [Save Video] window opens, optionally change the file name and select [Save]. The trimmed video file is saved on the same folder leaving the original video file as it is.

This function can combine multiple video files to one file. You can only process the video materials in the same file format.
Click [Tools] > [Edit/Convert Videos] > [Combine Videos].
Drag and drop the video file shown in thumbnails into the right area then click [Next] to open the edit window.
Change the order of selected multiple video files by dragging and dropping if necessary. Click [Combine] to start the combining process.
When the combining process is complete, the combined video file is saved on the same folder of the first video material. Each video file remains on the same place the original video file existed.
You can capture photos of your favorite scenes from videos and save them as picture files.
Click [Tools] > [Edit/Convert Videos] > [Save Frame].
Drag and drop the video file shown in thumbnails into the right area then click [Next] to open the edit window.
Play back the video and pause it at your favorite scene.
Select trimming or autocorrecting option if necessary, and click the [Save] button.
You can save video files after converting them to MP4 format. MP4 format is suitable for uploading to the Web.
Click [Tools] > [Edit/Convert Videos] > [Convert to MP4 and Save].
Drag and drop the video file shown in thumbnails into the right area then click [Next] to open the edit window.
Set the image quality and destination folder for the converted video, and click [Start]. The convert process begins.
You can rotate videos in XAVC S, MP4 format or photos 90 degrees to the left or right.
Click [Tools] > [Edit/Convert Videos].
Select the video file shown in thumbnails, then click [Rotate Left] or [Rotate Right] to rotate the video 90 degrees to the left or right.
You can create a multi view video using up to four videos. The edited videos are saved in MP4 format. In the multi view, you can use various edit functions, for example:
inserting music or captions.
displaying the track information including the route and speed data.
Click [Tools] > [Edit/Convert Videos] > [Create Multi View].
Drag and drop the video files* shown in thumbnails into the right area then click [Next] to open the [Edit] window.
Edit the video contents in the [Edit] window. When editing is complete, click [Next].
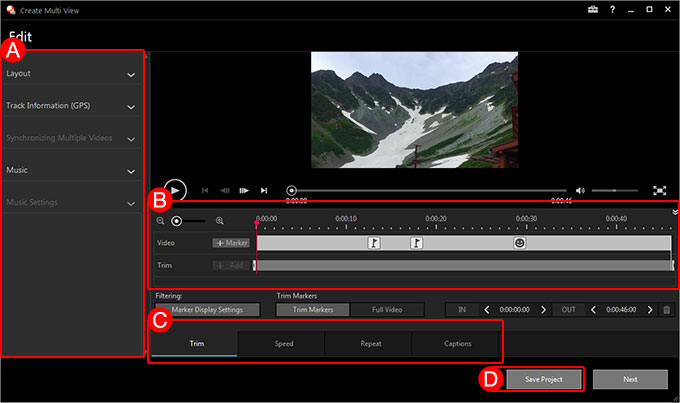
Changing the location of video materials
Selecting applied sound materials and GPS information
Rotating or reversing the direction of video material
Changing the display size for some layout
Enter the file name, select the destination folder and image quality, and click [Save] to save the edited video.
You can create time-lapse movies using photos captured with the continuous shooting or interval timer shooting modes. The created video is saved in MP4 format.
Click [Tools] > [Edit/Convert Videos] > [Create time-lapse movie].
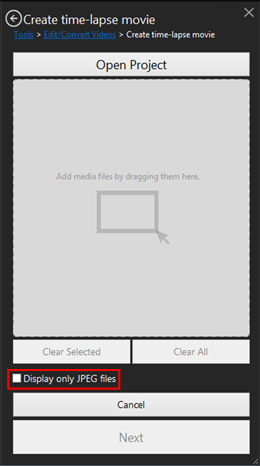
Drag and drop multiple photos shown in thumbnails into the right area, then click [Next] to open the edit window.
If other file formats are mixed in with the video or JPEG files, check the box for [Display only JPEG files] to sort out the JPEG files.
Edit the video contents in the edit window. When editing is complete, click [Next].
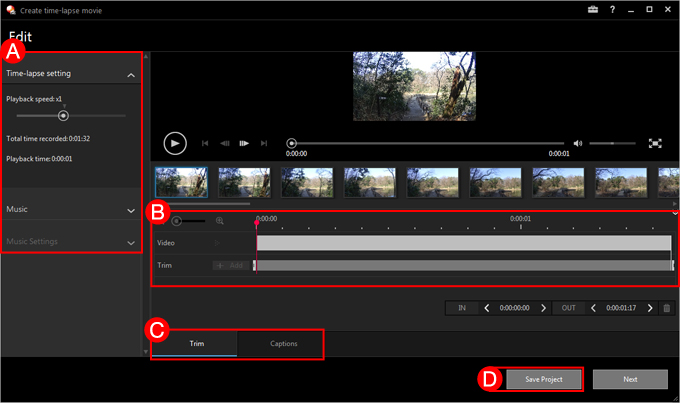
Enter the file name, select the destination folder and image quality, and click [Save] to save the edited time-lapse video.
You can use various edit functions such as inserting music or captions. The edited videos are saved in MP4 format. When you edit multiple videos, the vidoes are saved as one combined video.
Click [Tools] > [Edit/Convert Videos] > [Multiple Edit (speed/captions/sound)].
Drag and drop a video or multiple video files shown in thumbnails into the right area then click [Next] to open the edit window.
Edit the video contents in the edit window. When editing is complete, click [Next].
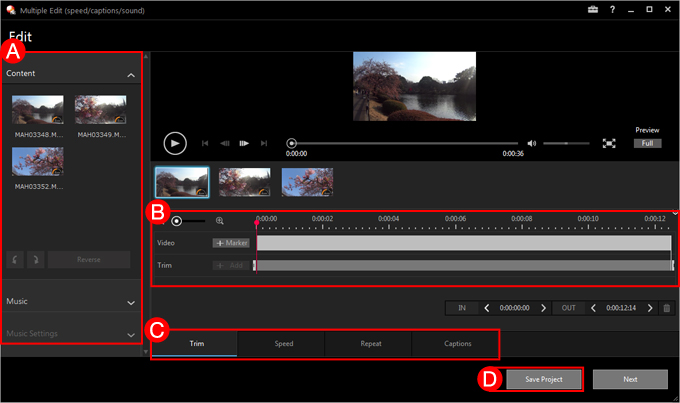
Enter the file name, select the destination folder and image quality, and click [Save] to save the edited video.