2.1. Importing images using FTP
The camera's [FTP Transfer Func.] lets you transfer images to smartphones that have Transfer & Tagging installed.
2.1.1. Selecting the import method
You can import images using FTP either wirelessly (Wi-Fi or personal hotspot) or via a wired connection (USB tethering or Ethernet tethering). The procedure differs depending on the import method you choose.
- The descriptions below apply when the latest version of the camera system software is installed.
Personal Hotspot
Your smartphone’s tethering or personal hotspot function is used to connect.
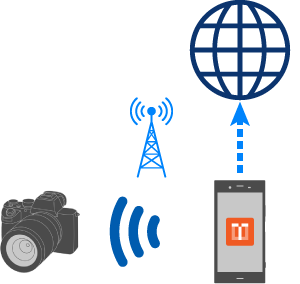
Transfer & Tagging
(works as an FTP server)
- Connect the camera and the smartphone via Hotspot & tethering (Android) / Personal Hotspot (iOS)
- Smartphone: Turn on the tethering or personal hotspot function.
- Camera: Select MENU >
 (Network) > [Wi-Fi]/[Wi-Fi Settings] to connect to the smartphone. If the camera supports [Camera Wi-Fi settings], you can enter camera Wi-Fi settings from your smartphone. (For more information, see “2.5 Configuring camera Wi-Fi settings from your smartphone.”)
- On the camera, select MENU > (Network), and select the following items (except on the ILCE-7RM3A/7RM3).
- ILCE-1M2, 1, 9M3, 7RM5, 7SM3, 7M5, 7M4, 7CR, 7CM2
- [FTP Transfer] > [FTP Transfer Func.] > [FTP Function] > [On]
- Other
- [FTP Transfer Func.] > [FTP Function] > [On]
- [FTP Transfer Func.] > [FTP Connect Method] > [Wi-Fi] (Only available on some camera models.)
- ILCE-1M2, 1, 9M3, 7RM5, 7SM3, 7M5, 7M4, 7CR, 7CM2
Wi-Fi (via access point)
A Wi-Fi network (access point) is used to connect.
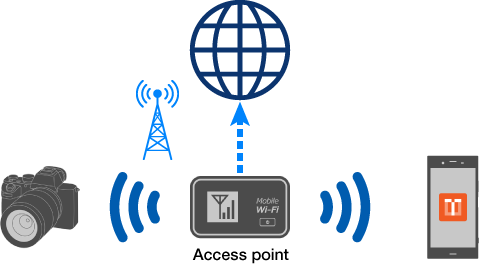
Transfer & Tagging
(works as an FTP server)
- On the camera, select MENU > (Network) > [Wi-Fi]/[Wi-Fi Settings] to connect the camera to the same access point as the smartphone.
- If the camera supports [Camera Wi-Fi settings], you can enter camera Wi-Fi settings from your smartphone. (For more information, see “2.5 Configuring camera Wi-Fi settings from your smartphone.”)
- On the camera, select MENU > (Network), and select the following items (except on the ILCE-7RM3A/7RM3).
- ILCE-1M2, 1, 9M3, 7RM5, 7SM3, 7M5, 7M4, 7CR, 7CM2
- [FTP Transfer] > [FTP Transfer Func.] > [FTP Function] > [On]
- Other
- [FTP Transfer Func.] > [FTP Function] > [On]
- [FTP Transfer Func.] > [FTP Connect Method] > [Wi-Fi] (Only available on some camera models.)
- ILCE-1M2, 1, 9M3, 7RM5, 7SM3, 7M5, 7M4, 7CR, 7CM2
USB tethering
Your smartphone’s tethering or personal hotspot function is used to connect via a USB cable.
Supported camera: ILCE-1M2, 1, 9M3, 7RM5, 7SM3, 7M5, 7M4, 7CR, 7CM2
Supported smartphones: Smartphones compatible with USB Power Delivery (PD) only Verified Mobile Devices
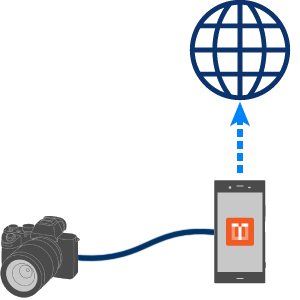
USB cable connection
Transfer & Tagging
(works as an FTP server)
- On the camera, select MENU > (network), then select the following items.
- ILCE-1M2, 1, 9M3
- [Tethering Connection] > [Tethering Connection]
- ILCE-7RM5, 7SM3, 7M5, 7M4, 7CR, 7CM2
- [USB-LAN/Tethering] > [Tethering Connection]
- ILCE-1M2, 1, 9M3
- Connect the camera and smartphone with a USB cable.
- You must use a single cable to make the connection rather than connecting via a conversion adapter.
- On the camera, select MENU > (network), then select the following items.
- [FTP Transfer] > [FTP Transfer Func.] > [FTP Function] > [On]
Ethernet tethering (Android only)
Your smartphone’s tethering or personal hotspot function is used to connect via a LAN cable.
Supported cameras: ILCE-1M2, 1, 9M3, 9M2, 9, 7RM5, 7SM3, 7M5, 7M4, 7CR, 7CM2
Ethernet cable connection
Transfer & Tagging
(works as an FTP server)
- On the camera, select MENU > (network), then select the following items.
- ILCE-1M2, 1, 9M3
- [WireLAN] > Configure the connection settings via a wired LAN.
- ILCE-7RM5, 7SM3, 7M5, 7M4, 7CR, 7CM2
- [USB-LAN/Tethering] > [USB-LAN Connection]
- ILCE-9M2, 9
- [FTP Transfer Func.] > [FTP Function] > [On]
- [FTP Transfer Func.] > [FTP Connect Method] > [WireLAN]
- ILCE-1M2, 1, 9M3
- Connect the camera and smartphone with a LAN cable.
- You will need a USB-LAN conversion adapter on the smartphone side. If the camera does not have a LAN terminal, you will need a conversion adapter on the camera side as well.
- On the camera, select MENU > (network), then select the following items (except on the ILCE-9M2/9).
- [FTP Transfer] > [FTP Transfer Func.] > [FTP Function] > [On]
2.1.2. Loading FTP import settings to the camera
Load FTP settings for Transfer & Tagging to the camera. What you can do and the operation method differs depending on the camera model.
ILCE-1M2/1/9M3/7RM5/7SM3/7M5/7M4/7CR/7CM2
You can load the FTP server configuration set in the Transfer & Tagging to the camera using Bluetooth communications. This function eliminates the need to input the settings into the camera.
- If [Location Information Linkage] is set to [On] in Creators’ App or Imaging Edge Mobile, this function will not be available. Set it to [Off] beforehand.
-
 1. Select Menu >(Network) > [Bluetooth] > [Bluetooth Function] > [On].
 -
 2. Select MENU [
 ] > [Import Guide], then select the desired connection method, referring to 2.1.1.
-
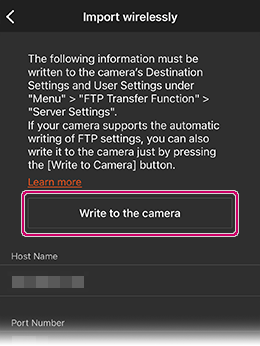
3. When the host name or port number is displayed, tap [Write to the camera].
-
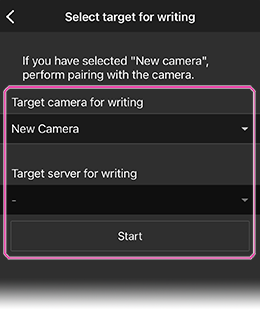
4. When connecting for the first time or when connecting a new camera, select [New Camera] and tap [Start].
- When connecting to a camera that has been connected previously, select the camera and the server to be loaded, then tap [Start]. (The previously loaded server is already selected.) Steps 5 to 8 below are unnecessary.
-
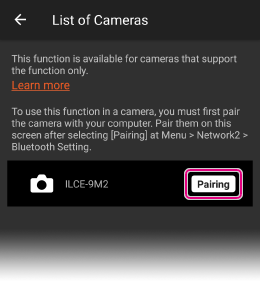
5. Select MENU >(Network) > [Bluetooth] > [Pairing].
-
6. The message [Pairing] will appear on the side of the camera to be connected. Tap the message.
-
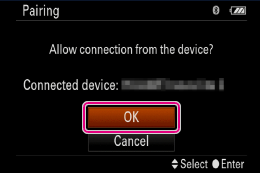
7. The message [Allow connection from the device?] will appear. Press [OK].
- Pairing will start, and the FTP server configuration set on the camera will be displayed on the smartphone. Up to nine FTP server settings can be saved.
-
8. Select an unused server as the destination to save.
- The FTP server configuration will be saved on the camera.
Hint:
- When you load FTP settings to the camera using Bluetooth, the following settings will be changed automatically. (Does not apply to the ILCE-1/7SM3.)
- [RAW+J/H Transfer Target] will change to [JPEG & HEIF].
- [Auto FTP Target] will change to [Still Image]. (If [Auto FTP Target] on the camera has the option [Protect Only], you can select in Transfer & Tagging whether to transfer all still images or only protected still images.)
- You can manually import FTP Import settings rather than writing to the camera via Bluetooth. Refer to the instructions for the ILCE-9.
ILCE-9M2/7M3/7C
You can load the FTP server configuration set in the Transfer & Tagging to the camera using Bluetooth communications. This function eliminates the need to input the settings into the camera.
- If [Location Information Linkage] is set to [On] in Creators’ App or Imaging Edge Mobile, this function will not be available. Set it to [Off] beforehand.
-
1. Select Menu > [Network2] > [Bluetooth Settings] > [Bluetooth Function] > [On].
-
2. Select MENU [] > [Import Guide], then select the desired connection method, referring to 2.1.1.
-
3. When the host name or port number is displayed, tap [Write to the camera].
-
4. When connecting for the first time or when connecting a new camera, select [New Camera] and tap [Start].
- When connecting to a camera that has been connected previously, select the camera and the server to be loaded, then tap [Start]. (The previously loaded server is already selected.) Steps 5 to 8 below are unnecessary.
-
5. Select Menu > [Network2] > [Bluetooth Settings] > [Pairing].
-
6. The message [Pairing] will appear on the side of the camera to be connected. Tap the message.
-
7. The message [Allow connection from the device?] will appear. Press [OK].
- Pairing will start, and the FTP server configuration set on the camera will be displayed on the smartphone. Up to nine FTP server settings can be saved.
-
8. Select an unused server as the destination to save.
- The FTP server configuration will be saved on the camera.
Hint:
- You can manually import FTP Import settings rather than writing to the camera via Bluetooth. Refer to the instructions for the ILCE-9.
ILCE-9/7RM4A/7RM4
Input the FTP server configuration into the camera.
-
1. Select MENU [] > [Import Guide], then select the desired connection method, referring to 2.1.1.
-
2. Switch to the screen on which Host Name, Port Number, etc., appear.
-
3. Enter FTP transfer settings on the camera, including the information displayed on the smartphone.
Menu > [Network] > [FTP Transfer Func.]Page 1
- [FTP Function] > [On]
- [FTP Connect Method] > [Wi-Fi] (ILCE-9 only)
- [Server Setting] > Press the center button to select the server to connect to from 9 options > Press the right button to configure the selected server settings.
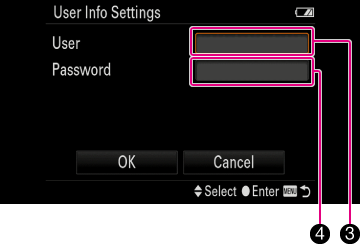
- [Destination Settings] > In 1 Host Name / 2 Port, enter the items displayed on the Transfer & Tagging screen.[Secure Protocol] > [Off]
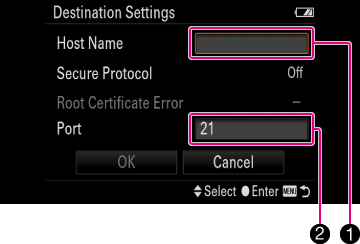
- [Directory Settings]

- [User Info Settings] > In 3 User / 4 Password, enter the items displayed on the Transfer & Tagging screen.
Page 3
- [RAW+J Trans. Trgt.] > [JPEG only]
- [FTP Power Save] > [Off]
-
4. Perform the FTP transfer.
Menu > [Network] > [FTP Transfer Func.] > [FTP Transfer]
After checking and confirming [Target Group,] [Target Image] and [Transfer Status,] select [OK] to start the transfer.
During the transfer, the green Transfer & Tagging [FTP■] symbol will flash.
ILCE-7RM3A/7RM3
Input the FTP server configuration into the camera.
-
1. Select MENU [] > [Import Guide], then select the desired connection method, referring to 2.1.1.
-
2. Switch to the screen on which Host Name, Port Number, etc., appear.
-
3. Enter FTP transfer settings on the camera, including the information displayed on the smartphone.
Select Menu > [Network] > [FTP Transfer Func.] > Select the server from FTP Server 1, 2, or 3.- [Destination Settings] > In 1 Host Name / 2 Port, enter the items displayed on the Transfer & Tagging screen.
[Secure Protocol] > [Off]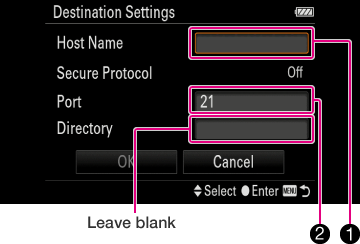
- [User Info Settings] > In 3 User / 4 Password, enter the items displayed on the Transfer & Tagging screen.

- [Destination Settings] > In 1 Host Name / 2 Port, enter the items displayed on the Transfer & Tagging screen.
-
4. Perform the FTP transfer.
Menu > [Network] > [FTP Transfer Func.] > [FTP Transfer]
Hint:
- Photos can be transferred at their original size using FTP image import.
- The port number can be changed in [Setting] > [FTP Import common settings]. Change the setting if necessary.
- Images transferred via FTP import can be confirmed below.
(Menu) > [FTP Import History]
Note:
- When connected via the Hotspot & tethering or the Personal Hotspot function, the connection will be terminated after a period of inactivity. If this occurs, please reconnect.
- When using the iOS version, please keep Transfer & Tagging in the foreground and refrain from using any other apps during FTP import.
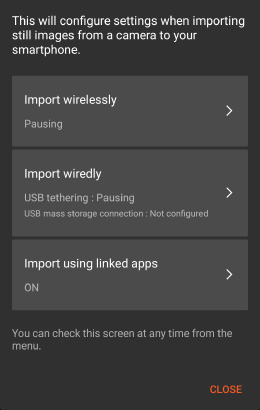
2.1.3. Using FTP to import images
There are two ways to import images using FTP. One automatically imports all the images you shoot while you are shooting (FTP background transfer), and the other allows you to select the images you wish to transfer after shooting.
- The ILCE-7RM3A/7RM3 do not have a background transfer function, so importing images after shooting is the only option available.
Automatically importing images while shooting
- Adjust the camera settings beforehand as follows.
- ILCE-1M2, 1, 9M3, 7RM5, 7SM3, 7M5, 7M4, 7CR, 7CM2 :
- MENU > (Network) > [FTP Transfer] > [FTP Transfer Func.] > [Auto FTP Transfer] > [On]
- ILCE-9M2, 9, 7RM4A, 7RM4, 7C, 7M3:
- MENU > (Network) > [FTP Transfer Func.] > [Auto Trans When Shot] > [On]
- After establishing an FTP connection, start shooting.
Importing images after shooting
- After shooting, select [FTP Transfer] using the following procedures.
- ILCE-1M2, 1, 9M3, 7RM5, 7SM3, 7M5, 7M4, 7CR, 7CM2 :
- MENU > (Network) > [FTP Transfer] > [FTP Transfer Func.] > [FTP Transfer]
- ILCE-9M2, 9, 7RM4A, 7RM4, 7RM3A, 7RM3, 7C, 7M3 :
- MENU > (Network) > [FTP Transfer Func.] > [FTP Transfer]
- Specify the images you want to transfer and select [OK].
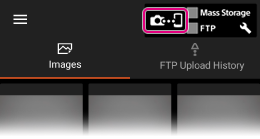
Viewing the FTP connection status
![]() FTP server (smartphone) suspended
FTP server (smartphone) suspended
![]() Initiating FTP server (smartphone): Flashes during FTP import
Initiating FTP server (smartphone): Flashes during FTP import
![]() Connection error:If wireless connection cannot be restored within a certain period of time, FTP will be suspended
Connection error:If wireless connection cannot be restored within a certain period of time, FTP will be suspended
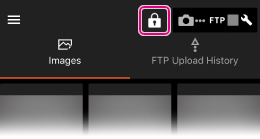
You can lock the screen to prevent unintended operation caused by accidentally touching the screen while importing images via FTP, etc. Tap the lock button.