2.2. Importing images via a USB mass storage connection
Your camera connects as a mass storage device via a USB cable in order to import images. Auto import, in which importing starts automatically when the USB cable is connected, and manual import, in which importing starts after you select the images to be imported, are supported.
- Shooting is not possible while importing images.
2.2.1 Android
To use the USB mass storage connection method with an Android device, the following requirements must be met.
- Mobile device:
- Smartphone or tablet with support for USB host function, USB-C® connector, and mass storage device class. Models without support for microSDXC cards may not be compatible. Refer to the “Verified mobile devices” page for a list of verified models.
- SD memory card:
- Cards with a capacity of 64 GB or greater must be exFAT-formatted.
- USB cable:
- Commercially available USB Type-C® cable (Type-C to Type-C). If the camera came with a USB cable, it can be used in combination with a commercially available USB Type-A (female) to Type-C (male) conversion adapter to connect to the Multi/Micro USB terminal on the camera.
- You can also insert an SD card containing images into an SD card reader, connect the SD card reader to your smartphone, and import the images.
Preparation
- Make the following settings from the camera menu.
When using the ILCE-1M2/1/9M3/7RM5/7SM3/7M5/7M4
Make sure that the camera is not connected to a smartphone beforehand.- (Network) > [Cnct./Remote Sht.] > [Remote Shoot Function] > [Remote Shooting] > [Off]
- (Setup) > [USB] > [USB Connection Mode] > [Sel. When Connect] or [MassStorage(MSC)]
- (Setup) > [USB] > [USB LUN Setting] > [Single]
- (Setup) > [USB] > [USB Power Supply] > [Off]
When using the ILCE-7CR/7CM2
Make sure that the camera is not connected to a smartphone beforehand.- (Network) > [Cnct./PC Remote] > [PC Remote Function] > [PC Remote] > [Off]
- (Setup) > [USB] > [USB Connection Mode] > [Sel. When Connect] or [MassStorage(MSC)]
- (Setup) > [USB] > [USB LUN Setting] > [Single]
- (Setup) > [USB] > [USB Power Supply] > [Off]
When using another camera
- (Network) > [Ctrl w/ Smartphone] > [Off]
- (Setup) > [USB Connection] > [Mass Storage]
- (Setup) > [USB LUN Setting] > [Single]
- (Setup) > [USB Power Supply] > [Off]
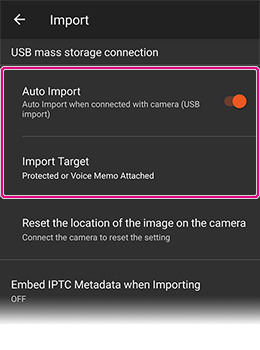
- Select auto import or manual import.
In Transfer & Tagging, select
 (Menu) → [Setting] → [Import].
For auto import, turn on [Auto Import] and select the import target. With the default settings, only protected images are imported automatically.
Operating procedure
- Display a list of images in Transfer & Tagging.
- Connect the camera to the smartphone using a USB cable.
- If a message for selecting the USB connection mode is displayed on the camera, select [MassStorage(MSC)] or [Mass Storage].
- If you already made the selection during preparation, this step is omitted.
- Select the memory card [Sony USB Drive]* in the camera.
* The text may differ depending on your smartphone model.
- When the contents of the memory card are displayed as shown below, either authorize access without proceeding to a lower level or tap [SELECT].
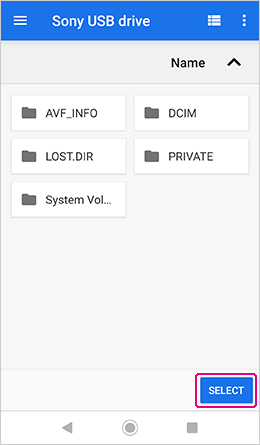
Import starts when you make the selection if auto import is enabled.

Viewing the USB connection status
- 1
 Camera not connected
 Blinks when camera is connected and while importing images
- 2Tap here to change the transfer method.
- When the contents of the memory card are displayed as shown below, either authorize access without proceeding to a lower level or tap [SELECT].
- For manual import, select images as described below.
Once the connection is established, the following screen is displayed.
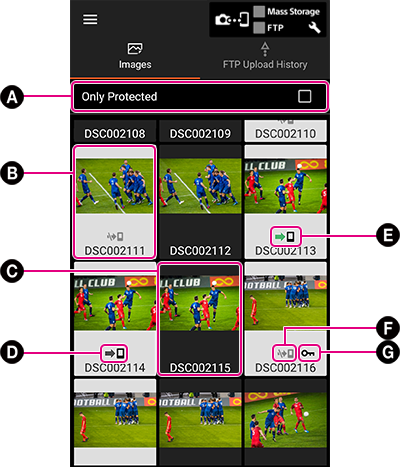
A Check this box to only display images that are protected on the camera B White background An image that has not yet been imported C Black background An image that has already been imported D  (Black arrow)
Image import standby E  (Green arrow)
Importing the image from the camera to the smartphone F 
An image that will not be imported *1 G 
An image protected on the camera *2 *1 This icon is displayed under images when the Auto Import setting is turned off, or under images not protected on the camera when the import setting is [Only Protected].
*2 This icon is displayed under images protected on the memory card of the camera. Protection settings configured on the camera are not applied when images are imported to the Transfer & Tagging.
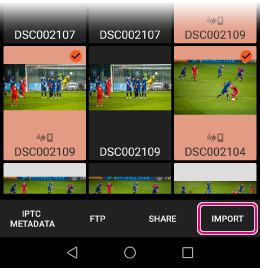
Select the image to be imported, then tap [Import] at the bottom right of the screen. To select multiple images, long press each image.
Note:
- In rare instances on some camera models, it may not be possible to import images from a memory card inserted into slot 2 the first time a connection is established. In this case, use slot 1 instead.
- The imported images are always stored in internal memory.
- Please do not edit the names of photos on the Memory Card, for example, using a PC.
- If the memory card contains a large number of images, adding captions and FTP uploading may take a long time.
- Opening another app or locking the device while multiple images are selected will deselect them.
2.2.2. iPhone/iPad
To use the USB mass storage connection method, your device must meet the following requirements.
- To use the Lightning terminal of your iPhone or iPad to connect to the camera, connect to the USB Type-C terminal or Multi/Micro USB terminal of the camera via a Lightning to USB 3 Camera Adapter from Apple. The camera will not be recognized if you use a direct connection.
- If your iPad has a USB Type-C terminal, you can use a Type-C to Type-C cable to connect to the camera. The ILCE-9 does not have a USB Type-C terminal, so you will need to use the USB-C to USB Adapter from Apple.
- You can also insert an SD card containing images into an SD card reader, connect the SD card reader to your iPhone, and import the images.
Notes on importing images
- HEIF images cannot be imported.
- In the case of images with voice memos, the images are imported but the voice memo audio data is not imported.
Preparation
- Make the following settings from the camera menu.
When using the ILCE-1M2/1/9M3/7RM5/7SM3/7M5/7M4
Make sure that the camera is not connected to a smartphone beforehand.- (Network) > [Cnct./Remote Sht.] > [Remote Shoot Function] > [Remote Shooting] > [Off]
- (Setup) > [USB] > [USB Connection Mode] > [Sel. When Connect] or [MassStorage(MSC)]
- (Setup) > [USB] > [USB LUN Setting] > [Single]
- (Setup) > [USB] > [USB Power Supply] > [Off]
When using the ILCE-7CR/7CM2
Make sure that the camera is not connected to a smartphone beforehand.- (Network) > [Cnct./PC Remote] > [PC Remote Function] > [PC Remote] > [Off]
- (Setup) > [USB] > [USB Connection Mode] > [Sel. When Connect] or [MassStorage(MSC)]
- (Setup) > [USB] > [USB LUN Setting] > [Single]
- (Setup) > [USB] > [USB Power Supply] > [Off]
When using another camera
- (Network) > [Ctrl w/ Smartphone] > [Off]
- (Setup) > [USB Connection] > [Mass Storage]
- (Setup) > [USB LUN Setting] > [Single]
- (Setup) > [USB Power Supply] > [Off]
Operating procedure
- Display a list of images in Transfer & Tagging.
- Connect the camera to the smartphone using a USB cable.
- When you connect for the first time, a message about access permission appears, so please agree. If you do not agree at this time, you will need to do so from [Settings] on the iPhone/iPad later. (On the iPhone/iPad, select [Settings] → [Privacy] → [Files and Folders] → [Transfer] → ON.)
- If a message for selecting the USB connection mode is displayed on the camera, select [MassStorage(MSC)] or [Mass Storage].
- If you already made the selection during preparation, this step is omitted.
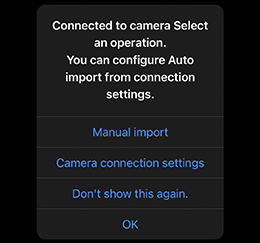
- When the message [Connected to camera. Select an operation.] appears, select [Manual import] to import images or [Camera connection settings] to make changes to the settings.
- To proceed with manual import, continue from step 5 below.
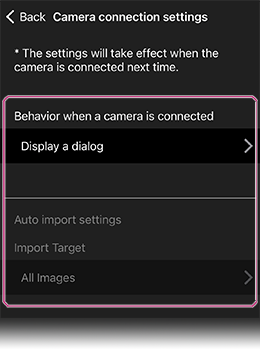
Camera connection settings
- Behavior when a camera is connected
- Display a dialog (default setting): A dialog is displayed when you connect a camera.
- Auto Import: Unimported images among images matching the conditions specified in [Auto import settings] are imported automatically.
- Do nothing: Nothing happens when you connect a camera.
- Auto import settings
- You can select either all photos (default setting) or protected images as the auto import target.
Viewing the USB connection status
- 1
- Camera not connected
- Blinks when camera is connected and while importing images
- 2Tap here to change the transfer method.
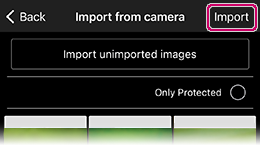
- To perform a manual import, select the images you want to import and tap [Import].
- If you select [Import unimported images], you can specify conditions such as unimported images or the timeframe when images were shot.
- Select [Only Protected] to import only images that are protected.
Note:
- In rare instances on some camera models, it may not be possible to import images from a memory card inserted into slot 2 the first time a connection is established. In this case, use slot 1 instead.
- The imported images are always stored in internal memory.
- Please do not edit the names of photos on the Memory Card, for example, using a PC.
- If the memory card contains a large number of images, adding captions and FTP uploading may take a long time.
- Opening another app or locking the device while multiple images are selected will deselect them.