Switching exposure mode
To control exposure to suit your purpose of shooting or the amount of light in the scene, you can switch exposure modes. Background blurring and brightness adjustment is available not only when shooting still images but also for movies.
Setting the camera
- Setting the shooting mode for movie recording
- Setting the shooting mode for slow-motion/quick-motion movie recording
- Setting the shooting mode for still image shooting
Setting the shooting mode for movie recording
-
Still/Movie/S&Q button
Press the Still/Movie/S&Q button (A) to select the movie recording mode.
The (movie recording mode) icon will be displayed in the top left of the monitor.
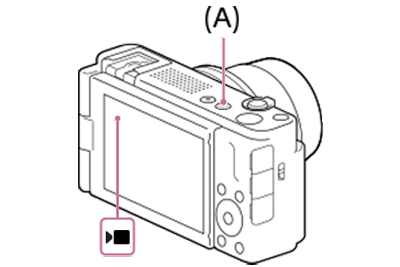
-
[
 Shoot Mode]
 MENU →
(Shooting) → [Shooting Mode] → [Shoot Mode] → desired shooting mode. (Intelligent Auto)
 - The camera shoots with automatic.
 (Program Auto)
 - Allows you to shoot with the exposure adjusted automatically (both the shutter speed and the aperture value).
 (Aperture Priority)
- Allows you to shoot after adjusting the aperture value manually.
- You can shoot by adjusting the aperture and changing the range in focus, or by defocusing the background.
- Please turn the control wheel to select the desired F-value.
With a smaller F-value, the subject is in focus, but objects in front of and beyond the subject are blurred.
With a larger F-value, the subject and its foreground and background are all in focus.
 (Shutter Priority)
- Allows you to shoot after adjusting the shutter speed manually.
- You can express the movement of a moving subject in various ways by adjusting the shutter speed, for example, at the instant of the movement with high speed shutter, or as a trailing image with low speed shutter.
- Please turn the control wheel to select the desired shutter speed.
 (Manual Exposure)
 - Allows you to shoot still images with the desired exposure by adjusting the exposure (both the shutter speed and the aperture value (F value)).
- Press the down side of the control wheel to select the shutter speed or F-value, and then turn the control wheel to select the desired value.
[
 Cam.Set]
 - Allows you to shoot an image after recalling your preferred shooting settings registered with [Camera Set. Memory].
Registering shooting settings using [
Camera Set. Memory]- Set the product to the setting you want to register.
- MENU → (Shooting) → [Shooting Mode] → [Camera Set. Memory] → desired number.
- Press the center of the control wheel to confirm.
Hint
- You can adjust the brightness and the color tone of the image, and select the finish of the image in the [Intelligent Auto] mode using the touch function icons on the screen. (My Image Style)
Setting the shooting mode for slow-motion/quick-motion movie recording
-
Still/Movie/S&Q button
Press the Still/Movie/S&Q button (A) to select the slow-motion/quick-motion recording mode.
The (slow-motion/quick-motion recording mode) icon will be displayed in the top left of the monitor.
-
[
Shoot Mode] MENU →
(Shooting) → [Shooting Mode] → [Shoot Mode] → desired setting. (Intelligent Auto)
 - The camera shoots with automatic.
 (Program Auto)
- Allows you to shoot with the exposure adjusted automatically (both the shutter speed and the aperture value).
 (Aperture Priority)
- Allows you to shoot after adjusting the aperture value manually.
- You can shoot by adjusting the aperture and changing the range in focus, or by defocusing the background.
- Please turn the control wheel to select the desired F-value.
With a smaller F-value, the subject is in focus, but objects in front of and beyond the subject are blurred.
With a larger F-value, the subject and its foreground and background are all in focus.
 (Shutter Priority)
- Allows you to shoot after adjusting the shutter speed manually.
- You can express the movement of a moving subject in various ways by adjusting the shutter speed, for example, at the instant of the movement with high speed shutter, or as a trailing image with low speed shutter.
- Please turn the control wheel to select the desired shutter speed.
 (Manual Exposure)
 - Allows you to shoot still images with the desired exposure by adjusting the exposure (both the shutter speed and the aperture value (F value)).
- Press the down side of the control wheel to select the shutter speed or F-value, and then turn the control wheel to select the desired value.
[
Cam.Set] - Allows you to shoot an image after recalling your preferred shooting settings registered with [Camera Set. Memory].
Registering shooting settings using [
Camera Set. Memory]- Set the product to the setting you want to register.
- MENU → (Shooting) → [Shooting Mode] → [Camera Set. Memory] → desired number.
- Press the center of the control wheel to confirm.
Hint
- You can adjust the brightness and the color tone of the image, and select the finish of the image in the [Intelligent Auto] mode using the touch function icons on the screen. (My Image Style)
Setting the shooting mode for still image shooting
-
Still/Movie/S&Q button
Press the Still/Movie/S&Q button (A) to select the still image shooting mode.
The (still image shooting mode) icon will be displayed in the top left of the monitor.
-
[
 Shoot Mode]
 MENU →
 (Shooting) → [Shooting Mode] → [Shoot Mode] → desired setting.
 (Intelligent Auto)
- The camera shoots with automatic.
 (Program Auto)
- The camera will automatically set the exposure (both the shutter speed and aperture value), but you can change the [
 ISO] and other shooting functions to your preferred settings.
 - You can change the shutter speed and aperture (F-value) combination without changing the appropriate exposure set by the camera.
Turn the control wheel to select the aperture value and shutter speed combination.
 (Aperture Priority)
- Allows you to adjust the aperture and shoot when you want to blur the background, etc.
- You can shoot by adjusting the aperture and changing the range in focus, or by defocusing the background.
- Please turn the control wheel to select the desired F-value.
With a smaller F-value, the subject is in focus, but objects in front of and beyond the subject are blurred.
With a larger F-value, the subject and its foreground and background are all in focus.
 (Shutter Priority)
- Allows you to shoot fast-moving subjects etc., by manually adjusting the shutter speed.
- You can express the movement of a moving subject in various ways by adjusting the shutter speed, for example, at the instant of the movement with high speed shutter, or as a trailing image with low speed shutter.
- Please turn the control wheel to select the desired shutter speed.
 (Manual Exposure)
- Allows you to shoot still images with the desired exposure by adjusting the exposure (both the shutter speed and the aperture value (F value)).
- Press the down side of the control wheel to select the shutter speed or F-value, and then turn the control wheel to select the desired value.
[
Cam.Set] - Allows you to shoot an image after recalling your preferred shooting settings registered with [Camera Set. Memory].
Registering shooting settings using [
Camera Set. Memory]- Set the product to the setting you want to register.
- MENU → (Shooting) → [Shooting Mode] → [Camera Set. Memory] → desired number.
- Press the center of the control wheel to confirm.
[Scene Selection]
- Allows you to shoot with preset settings according to the scene.
- You can adjust the brightness and the color tone of the image, and select the finish of the image in the [Intelligent Auto] or [Scene Selection] mode using the touch function icons on the screen. (My Image Style)
Hint
- You can adjust the brightness and the color tone of the image, and select the finish of the image in the [Intelligent Auto] or [Scene Selection] mode using the touch function icons on the screen. (My Image Style)
*The menu screen images on this web page have been simplified for display purposes, and do not exactly reflect the actual screen display of the camera.