Shooting Product Reviews
[Product Showcase Set] is useful when you wish to focus on a subject close to the camera, such as when shooting movies for product reviews.
This section describes the steps to shoot a product review when shooting a movie.
Setting the camera
-
Still/Movie/S&Q button
Press the Still/Movie/S&Q button (A) to select the movie recording mode.
The (movie recording mode) icon will be displayed in the top left of the monitor.
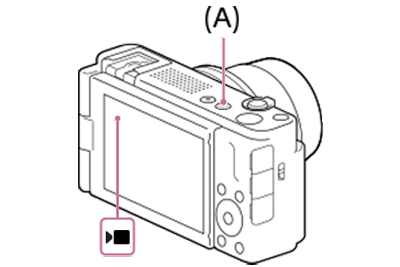
-
[
 Shoot Mode]
MENU →
(Shooting) → [Shooting Mode] → [Shoot Mode] → desired shooting mode.
When shooting a movie automatically with the camera, (Intelligent Auto) is convenient.
 -
[
 Focus Mode]
MENU →
 (Focus) → [AF/MF] → [Focus Mode] →
  [Continuous AF].
 -
[
File Format]MENU →
(Shooting) → [Image Quality/Rec] → [File Format] → desired setting. -
[
Movie Settings]MENU →
(Shooting) → [Image Quality/Rec] → [Movie Settings] → [Rec Frame Rate] → desired setting.MENU →
(Shooting) → [Image Quality/Rec] → [Movie Settings] → [Record Setting] → desired setting.
Guide to using the camera
This section describes the shooting steps if you have set [Shoot Mode] to (Intelligent Auto) when shooting a movie.
Shooting instructions
-
 Setting [Product Showcase Set]Press the (Product Showcase Set) button (A) to set [Product Showcase Set] to [On].
[
Subject Recog in AF] under [Subject Recognition] is locked to [Off], and [Focus Area] is set to [Zone].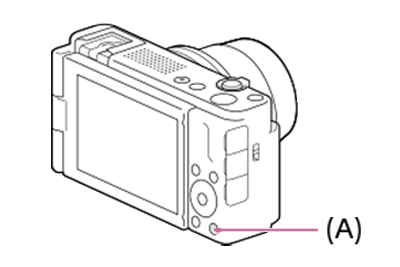
- [On] and [Off] will switch every time you press the (Product Showcase Set) button (A).
- Settings for [Product Showcase Set] cannot be changed during movie recording.
- [On] and [Off] will switch every time you press the
-
Preparing the camera
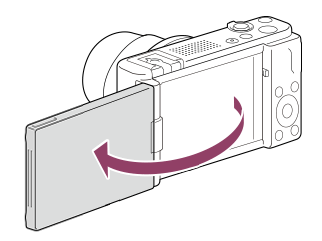
Open the monitor transversely, face it forward, and then point the lens at yourself.
-
Checking the angle of view in advance
Determine the shooting range of the camera while checking the image on the screen, make adjustments to display the subject within the focusing frame, and then make sure that the subject is in focus.

The reviewer is in focus.
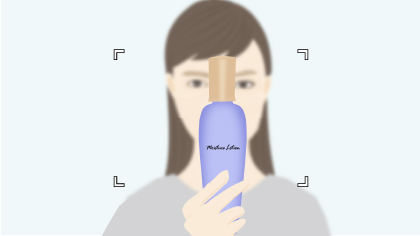
The product is in focus.
Hint
- When [Cinematic Vlog Set.] is set to [On], black bars are added at the top and bottom of the image, and the frame rate is locked to 24 fps. You can easily shoot cinematic images.
- You can set the direction of sound pickup when using the built-in microphone. Select your desired setting using [Microphone Directivity].
-
Shooting movies
Press the MOVIE button to start recording.
- Press the MOVIE button again to stop recording.
Hint
- You can start/stop movie recording remotely by using the RMT-P1BT remote commander (sold separately).
Related camera help guide
*The menu screen images on this web page have been simplified for display purposes, and do not exactly reflect the actual screen display of the camera.