To add a Shot Mark to a movie
You can add a Shot Mark while shooting or playing a movie.
If you add a Shot Mark to a movie, you can use it as a mark for selecting, transferring, or editing the movie.
To add a Shot Mark, there is a method in which you touch the touch operation icon on the monitor and a method in which you press the custom key.
Adding a Shot Mark to a movie being shot
This section describes the operation method to add Shot Mark1/Shot Mark2 with the following operation to a movie being shot.
- Operation method to add Shot Mark1
Touch the (Shot Mark1 addition) icon on the monitor.
 - Operation method to add Shot Mark2
Press the Left Button of the control wheel to which [Add Shot Mark2] has been assigned.
Setting the camera
-
Still/Movie/S&Q button
Press the Still/Movie/S&Q button (A) to select the movie recording mode.
The (movie recording mode) icon will be displayed in the top left of the monitor.
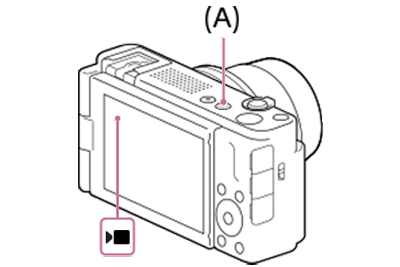
-
[Touch Operation]
MENU →
 (Setup) → [Touch Operation] → [Touch Operation] → [On].
 -
[Shooting Screen]
MENU →
(Setup) → [Touch Operation] → [Shooting Screen] → select menu item and then perform the following settings.
[Shooting Screen]: [On]
[Swipe Right]: [Icon Display: L&R]
[Swipe Left]: [Icon Display: Right] or [Icon Display: L&R] -
[
 Custom Key Setting]
MENU →
(Setup) → [Operation Customize] → [Custom Key Setting].- Select [Rear] using the top/bottom side of the control wheel, and then press the center of the control wheel.
- Select [Left Button] using the top/bottom side of the control wheel, and then press the center of the control wheel.
- Select [Add Shot Mark2] using the top/bottom/left/right side of the control wheel, and then press the center of the control wheel.
Guide to using the camera
Check that the touch function icons are displayed on the left and right sides, or on the right side of the screen.
If the touch function icons are not displayed, swipe right or left on the screen.
Adding Shot Mark1 to a movie being shot
If you start shooting a movie, the (Shot Mark1 addition) icon will be displayed in the bottom right of the monitor.
If you touch the (Shot Mark1 addition) icon in a scene to which you want to add Shot Mark1 while shooting a movie, you can add Shot Mark1 to the movie.
Adding Shot Mark2 to a movie being shot
If you press the Left Button of the control wheel to which [Add Shot Mark2] has been assigned in a scene to which you want to add Shot Mark2 while shooting a movie, you can add Shot Mark2 to the movie.
Checking the position with the Shot Mark
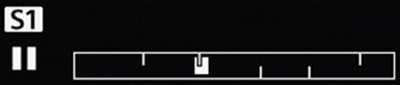
If you play a movie to which a Shot Mark has been added, the positions of the Shot Marks are displayed on the playback bar.
The position to which Shot Mark1 has been added will be displayed at the top of the playback bar, while the position to which Shot Mark2 has been added will be displayed at the bottom of the playback bar.

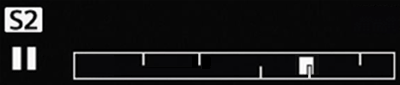
Playback bar display example: position with Shot Mark1 / Shot Mark2
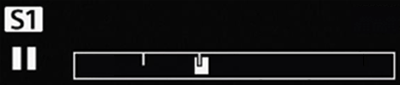
If you pause while playing a movie, the 
 (Jump to the positions of Shot Marks) icon will be displayed on the right side of the monitor.
To confirm the position with a Shot Mark added, please touch the (Jump to the positions of Shot marks) icon.
If you touch the icon, you will jump to the position to which the Shot Mark has been added.
Playback bar display example: When jumping to the position with Shot Mark1
Adding/deleting a Shot Mark to a movie being played
This section describes the operation method to add or delete Shot Mark1/Shot Mark2 with the following operation to a movie being played.
- Operation method to add/delete Shot Mark1
Touch the (Add/Delete Shot Mark1) icon on the monitor. - Operation method to add/delete Shot Mark2
Press the custom button 1 (C1) to which [Add/Delete Shot Mark2] has been assigned.
Setting the camera
-
[Touch Operation]
MENU →
(Setup) → [Touch Operation] → [Touch Operation] → [On]. -
[Playback Screen]
MENU →
(Setup) → [Touch Operation] → [Playback Screen] → [On]. -
[
 Custom Key Setting]
MENU →
(Setup) → [Operation Customize] → [Custom Key Setting].- Select [Top] using the top/bottom side of the control wheel, and then press the center of the control wheel.
- Select [Custom Button 1] by pressing the top/bottom sides of the control wheel and then press the center button of the control wheel.
- Select [Add/Delete Shot Mark2] by pressing the top/bottom/left/right sides of the control wheel and then press the center button of the control wheel.
Guide to using the camera
Adding Shot Mark1 to a movie being played
The (Add/Delete Shot Mark1) icon will be displayed on the right side of the monitor while a movie is being played or paused.
If you touch the (Add/Delete Shot Mark1) icon in a scene to which you want to add Shot Mark1, you can add Shot Mark1 to the movie.
The position to which Shot Mark1 has been added will be displayed at the top of the playback bar.
Playback bar display example: Movie playback paused to add Shot Mark1
Adding Shot Mark2 to a movie being played
If you press the custom button 1 (C1) to which [Add/Delete Shot Mark2] has been assigned in a scene to which you want to add Shot Mark2 while a movie is being played or paused, you can add Shot Mark2 to the movie.
The position to which Shot Mark2 has been added will be displayed at the bottom of the playback bar.
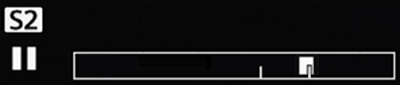
Playback bar display example: Movie playback paused to add Shot Mark2
Deleting a Shot Mark
To delete a Shot Mark, please perform the following operations.
- Pause the playback of the movie.
- If you touch (Jump to the positions of Shot Marks) displayed on the right side of the monitor, you will jump to the position to which a Shot Mark has been added, so jump until the position with the Shot Mark you want to delete.
Playback bar display example: Jumping to the position with Shot Mark1 that you want to delete
Playback bar display example: Jumping to the position with Shot Mark2 that you want to delete
- To delete Shot Mark1, touch the (Add/Delete Shot Mark1) icon on the monitor and then delete Shot Mark1.
To delete Shot Mark2, press the custom button 1 (C1) to which [Add/Delete Shot Mark2] has been assigned and then delete Shot Mark2.
*The menu screen images on this web page have been simplified for display purposes, and do not exactly reflect the actual screen display of the camera.
Note: The images on this web page are provided as examples only. They are not actual images taken by this camera.