Setting up the camera
Here is an introduction to the camera's setup.
Inserting the battery pack/memory card (sold separately) into the camera
-
Inserting the battery pack
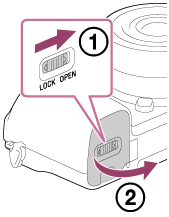
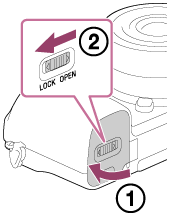
Open the battery/memory card cover.
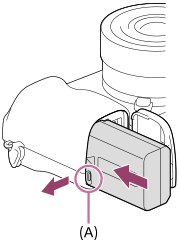
Insert the battery pack while pressing the lock lever (A) with the tip of the battery until the battery locks into place.
-
Insert the memory card.
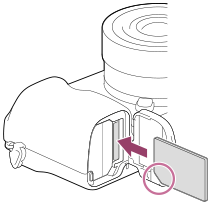
With the notched corner facing in the direction illustrated, insert the memory card until it clicks into place. Insert the memory card correctly. Not doing so may cause a malfunction.
Close the cover.
Hint
When you use a memory card with the camera for the first time, it is recommended that you format the card on the camera for more stable performance of the memory card. Once you format the memory card, all the data recorded on the memory card will be deleted and cannot be restored. Before formatting, copy the data to a computer or other device.
Related camera help guide
Memory cards that can be used
When using microSD memory cards or Memory Stick Micro media with this camera, be sure to use the appropriate adaptor.
| Recording format | Supported memory card |
|---|---|
| Still image | SD/SDHC/SDXC card |
| AVCHD | SD/SDHC/SDXC card (Class 4 or faster, or U1 or faster) |
| XAVC S
4K 60Mbps* |
SDHC/SDXC card (Class 10, or U1 or faster) |
| XAVC S 4K 100Mbps* |
SDHC/SDXC card (U3) |
* Including when recording proxy movies at the same time
| Recording format | Supported memory card |
|---|---|
| Still image | Memory Stick PRO Duo Memory Stick PRO-HG Duo |
| AVCHD | Memory Stick PRO Duo (Mark 2) Memory Stick PRO-HG Duo |
| XAVC S
4K 60Mbps* |
Memory Stick PRO-HG Duo |
| XAVC S
4K 100Mbps* |
‐ |
* Including when recording proxy movies at the same time
Related camera help guide
Charging the battery pack while it is inserted in the camera
-
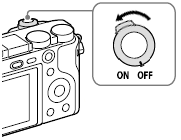
Turn the power off.
Turn off the camera before charging the battery.
-
Charging the battery pack
Connect the camera with the battery pack inserted to the AC Adaptor (supplied) using the micro USB cable (supplied), and connect the AC Adaptor to the wall outlet (wall socket).
Charging time (Full charge): The charging time is approximately 150 min.
The charge lamp turns off when charging is completed.
* The type of the AC Adaptor may differ depending on the country/region.
Charge lamp on the camera (orange)
Lit: Charging
Off: Charging finished
Flashing: Charging error or charging paused temporarily because the camera is not within the proper temperature rangeHint
The battery pack can be charged by connecting the camera to a computer using a micro USB cable.
Related camera help guide
Attaching a lens
Turn off the camera before attaching or removing the lens.
-
Remove the body cap and the lens cap.
Remove the body cap (A) from the camera and the rear lens cap (B) from the rear of the lens.
It is recommended that you attach the front lens cap when you have done shooting.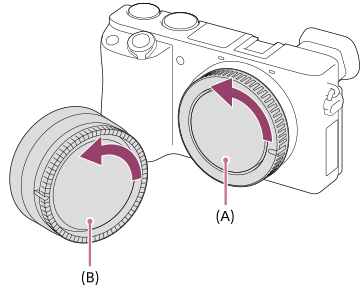
-
Attaching a lens
Mount the lens by aligning the two white index marks (mounting indexes) on the lens and camera.
Hold the camera with the lens mount facing down to prevent dust and debris from entering the camera.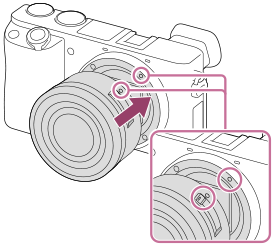
While pushing the lens lightly toward the camera, turn the lens slowly in the direction of the arrow until it clicks into the locked position.
Be sure to hold the lens straight when attaching it.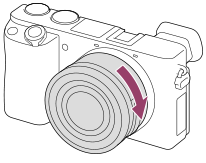
Related camera help guide
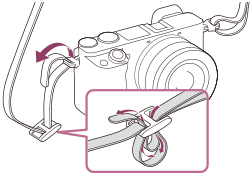
Attaching the strap onto the camera.
Attach both ends of the strap onto the camera.
Attaching the eyepiece cup
It is recommended that you attach the eyepiece cup when you intend to use the viewfinder.
Match the bottom side of the eyepiece cup to the viewfinder, and attach it by pushing the top side of the eyepiece cup in.
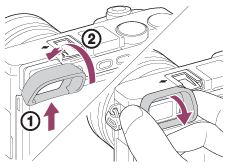
To remove the eyepiece cup, grasp it on the left and right sides and pull it down.