Overview and Home screen
Key Imaging Edge Desktop features
Remote
- Allows you to shoot images remotely on the computer by connecting the camera and computer via USB, Wi-Fi, or LAN. You can display the shooting screen on the computer in Live View, and shoot images seamlessly while adjusting the shooting settings.
- On some supported cameras, you can perform the following types of shooting.
Viewer
- Allows you to browse and search images, and to filter images by ratings.
- Allows you to create time-lapse movies.
- Combines multiple images shot on some supported cameras to generate high-quality composite images.
- Creating composite images with Pixel Shift Multi Shooting
- Creating composite images with Noise Reduction Shooting
- Creating composite images with Shooting for HDR
- Allows you to apply deep learning technology to make RAW images shot on some supported cameras more high-grade and to expand their resolution.
Edit
- Allows you to adjust the brightness and color of images and to apply Creative Look settings.
- Allows you to apply cropping and inclination correction to images.
- Allows you to convert adjusted images to JPEG or TIFF format to match your usage requirements.
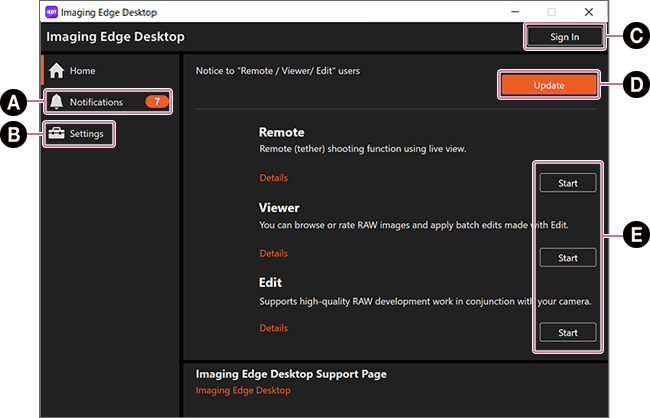
Home screen
From the Home screen, you can perform tasks such as starting and updating each function, logging in to your account, and checking notifications.

-
A Notifications
-
B Settings
Settings such as whether or not Imaging Edge Desktop remains resident in the background and “About Imaging Edge Desktop” are shown here.
Checking the box next to “Keep Imaging Edge Desktop resident.” causes the application icon to always be displayed in the Windows taskbar or Mac menu bar.
-
C Sign In
Register for Creators' Cloud membership or sign in here.
- When you open My Page, you will be asked to sign in again.
- Imaging Edge Desktop can be used without registering.
-
D Download/Update
[Download]: Remote/Viewer/Edit is not yet installed. Please download and install it.
[Update]: Remote/Viewer/Edit is ready for updates.
When nothing is displayed: The latest version of Remote/Viewer/Edit is installed. -
E Start
Remote/Viewer/Edit will each start.
Switching between Remote/Viewer/Edit
Once Remote/Viewer/Edit has started, use the switch button in the upper left of the screen to switch to other functions.
Remote
![Remote window. The [Viewer] button at the upper left of the window is highlighted.](../../img/instruction/inst_p_11_concept_3.png)
Viewer
![Viewer window. The [Remote] button and the [Edit] button at the upper left of the window are highlighted.](../../img/instruction/inst_p_11_concept_1.png)
Edit
![Edit window. The [Viewer] button at the upper left of the window is highlighted.](../../img/instruction/inst_p_11_concept_2.png)