Operations on the Live View screen
You can make finer adjustments to the composition and exposure by using magnification, overlaying, and the guides and grid in the Live View screen for Remote.
Note
- Depending on your camera, the Live View screen may not be displayed. Supported Devices
Tutorial video for creating stop-motion movies
The overlay function allows you to lay an image over another. It is helpful to create stop-motion movies which require one-by-one shooting.
Hint
- To change the language for subtitles, select
 (Settings) at the lower right corner > [Subtitles] > [Auto-translate], and select the desired language.
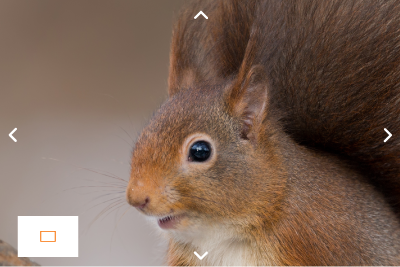
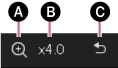
Magnification
Cursors appear in the top/bottom/left/right of the Live View screen when you magnify an image. A positioning frame is also displayed to indicate the position of the magnified portion of the image.
Operations in the magnified display
You can magnify the Live View screen to adjust the composition and exposure while checking the focus and degree of exposure in the details.
The indications on the toolbar may differ depending on the camera model. Depending on the camera model you are using, Focus Magnifier may not be displayed.
-
A Focus magnifier
The position of the focus is magnified.
-
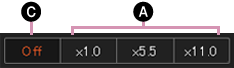
B Magnification scale
The current magnification scale of the Live View screen is displayed.
-
C Exit the focus magnifier.
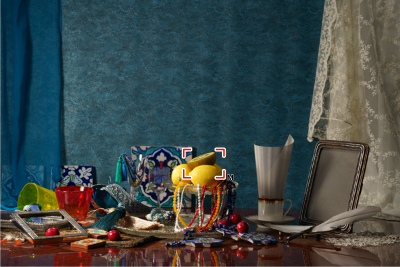
AF area
When [Focus Area] is set to [Flexible Spot] or [Expand Flexible Spot], the focusing frame appears as follows on the Live View screen. If you click on a point, the focusing frame will appear around that point. Click the AF/AE button in this state to focus on a subject inside the focusing frame.
If a different setting is selected for the focus area, the focusing frame will not appear.
To shoot with the manual focus, use MF in the focus panel and move the position of the focus with  . You can also focus manually using the camera.
- The AF area may not be displayed, depending on your camera or lens.
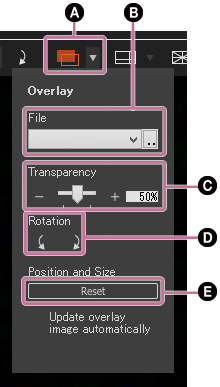
Display Overlay
You can display a pre-shot image as a transparent image and superimpose it over the currently displayed subject in the Live View. Then, you can use the pre-shot image as a guide for shooting images.
Click (Display Overlay) in the toolbar or select [Overlay] → [Display Overlay] from the [Tools] menu.

Operations for the overlaid image
-
A Overlaying on/off
-
B Select an image file to overlay.
-
C Transparency of the overlaid image
-
D Rotate the overlaid image.
-
E Resetting the overlay enlargement/reduction size
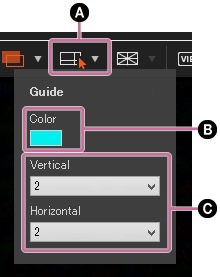
Display Guide
The guide helps you verify whether horizontal or vertical lines are straight, and align the subjects easily. You can also change the color of the guide.
Click (Display Guide) in the toolbar or select [Guide] → [Display Guide] from the [Tools] menu.
Operations in the guide display
-
A Activate/deactivate/drag the guide.
-
B Guide color
Use the color palette to select a guide color. You can make it easier to distinguish the guide from the subject.
-
C Changing the number of guides
You can specify 0 to 2 vertical and 0 to 2 horizontal guides.
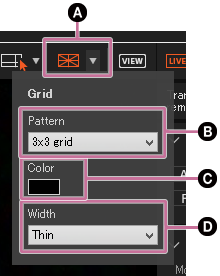
Display grid
The grid lets you verify the alignment of horizontal or vertical lines and the angle of the subject.
Click (Display grid) in the toolbar or select [Grid] → [Display grid] from the [Tools] menu.

Operations in the grid display
-
A Grid on/off
-
B Type of grid
There are three types of grid (three divisions, square grid, and grid with diagonals), and three sizes for the square grid.
-
C Grid color
Use the color palette to select a grid color. You can make it easier to distinguish the grid from the subject.
-
D Grid thickness
You can select either thick or thin as the grid thickness.
Rotate
Click (Rotate Live View Counterclockwise) or (Rotate Live View Clockwise) on the toolbar to rotate the Live View display 90 degrees at a time.