

Remote Shooting
When you connect the camera to the computer via USB, Wi-Fi, or LAN, you can shoot images from the operation panel in Remote.
- On some supported cameras, you can perform the following types of shooting.
Shooting still images
-
Check settings on the camera.
In the Remote Shooting settings on the camera, you can check the destination for saving images, the size of saved images, and the format in which images are saved, and you can make changes if necessary.
* The displayed menu items will differ depending on the camera model you are using. If a corresponding item is not displayed, that operation is not necessary.
-
Connect the computer and the camera.
- Refer to the page linked below for how to make connections and configure settings.
-
Configure shooting settings in Remote.
- Adjust the settings (focus, exposure, white balance, etc.) from the operation panel. Operation panel
- If you want to save the images you shoot to the computer, set a save destination on the image save settings panel.
-
Shoot using Remote.
Confirm that the subject is in focus in Live View, then click
 (Photo) on the shooting panel.
Note
- Depending on the camera model you are using, Live View may not be displayed. Supported Devices
- If you cannot record images in self-timer shooting, etc., the focus may be incorrect. In this case, use the AFL button or the manual focus function.
Hint
- In Remote, select [Settings] from the [Tools] menu (Windows)/[Remote] menu (Mac) and check the box next to “Display preview in Viewer” to display images shot remotely in [Remote shots] in Viewer so you can review them immediately.
* If [Camera Only] is selected in the camera settings as the storage destination for still images shot remotely, the images are not displayed in [Remote shots] in Viewer.
![Viewer window. The [Remote shots] folder is highlighted.](img/p_45_tethershoot_2.png)
Interval Timer Shooting
Interval shooting is a function for taking repeated shots automatically according to the specified shooting start time, shooting interval, and number of shots. We recommend that you check the images periodically during interval shooting.
- If you have 15 or more still images captured using interval timer shooting, you can create a time-lapse movie using Viewer. Creating time-lapse movies
-
Click
 (Interval timer shooting from this application) on the shooting panel.
 -
Set the shooting start time and shooting conditions.
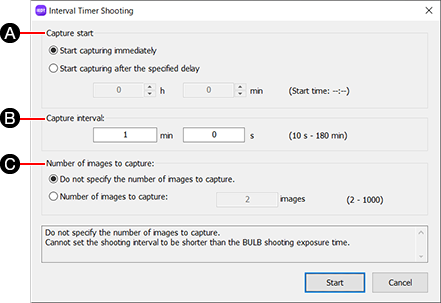
-
A Capture start
Start capturing immediately: Add a check mark to start shooting immediately.
Start capturing after the specified delay: Add a check mark to specify the timing of shooting. Enter a time to start. -
B Capture interval
Enter the shooting interval in minutes and seconds.
-
C Number of images to capture
Do not specify the number of images to capture.: Shoot repeatedly until the [Stop] button is clicked.
Number of images to capture: Enter a number of shots.
-
-
Click [Start] to start interval timer shooting.
To quit interval timer shooting midway, click [Stop].
Note
- For interval shooting, set the drive mode to [Single Shooting].
- Before starting the Interval timer shooting, delete all files in the destination folder. Interval timer shooting does not start if some files remain in the destination folder.
- The [Display preview in Viewer] function will be disabled during the Interval timer shooting.
Shooting movies
-
Set the camera to the movie mode.
-
Click
 (Video) on the shooting panel to start shooting.
To stop shooting movies, click
(Video) again.- Recorded video will be saved to your camera's memory card.
- Movies are not displayed in [Remote shots] at the top of the folder area of Viewer.
