Noise Reduction Shooting
This shooting mode enables you to create low-noise images not possible with conventional photography by shooting from 4 to 32 RAW images continuously and then using Imaging Edge Desktop (Viewer) to combine them into a composite image.
There are two methods of using noise reduction shooting: remote shooting using Imaging Edge Desktop (Remote) and shooting on the camera.
The method using Remote for shooting is described here. For the method using shooting on the camera, refer to the Help Guide.
Viewer is used to combine multiple RAW images into a single composite image. When shooting on the camera, you need to import the images to your computer and then use Viewer to combine them.
You can then use Imaging Edge Desktop (Edit) or another compatible application to adjust or develop the composite file.
Note
- Depending on the shooting venue and conditions, the desired effect may not be achieved.
Supported Devices
Refer to the following page for information on supported devices.
Recommended system requirements
The operation and process for combining images on a computer may take time in some cases.
You can reduce the time required when processing high-resolution images by using a supported GPU.
Refer to the following page for information on switching between your CPU and GPU.
When combining images using the CPU
- Windows
CPU: 11th Generation Intel Core i7 Processors 3.0 GHz or higher Computer memory: At least 16 GB
32 GB or more recommended (if the number of images to be combined is 8 or moreStorage: Built-in SSD - Mac
Mac computers with Apple silicon Computer memory: At least 8 GB
16 GB or more recommended (if the number of images to be combined is 8 or more)Storage: Built-in SSD
When combining images using the GPU
- Windows
GPU: GPU supporting Vulkan 1.1 or later
6 GB or more VRAM recommended (when the number of recorded pixels is 50M)Computer memory: At least 8 GB
16 GB or more recommended (if the number of images to be combined is 8 or more)Storage: Built-in SSD - Mac
Mac computers with Apple silicon Computer memory: At least 8 GB
16 GB or more recommended (if the number of images to be combined is 8 or more)Storage: Built-in SSD
The time required to combine the images is as follows. (Based on the test conditions defined by Sony)
- When using the CPU, it takes about 6 minutes to create a composite image when the number of images to be combined is 32.
- When using the GPU, it takes about 1 minute to create a composite image when the number of images to be combined is 32.
Depending on factors such as the usage environment, the performance of the computer, and the camera used, it may take a long time to finish combining the images.
Note
- If the number of recorded pixels per image is 24M, depending on the number of images to be combined, approximately 24 GB of memory (including available space on the system drive) may be required.
- If the number of recorded pixels per image is 50M, depending on the number of images to be combined, approximately 50 GB of memory (including available space on the system drive) may be required.
- It may not be possible to combine the images if the amount of available memory is insufficient. In this case, free up space on the system drive and try combining the images again.
- The GPU cannot be used to combine images if the supported API version is Vulkan 1.0. Upgrade to the latest graphics driver and then try combining images.
Remote Shooting
-
Configure the following settings on the camera to transfer RAW images to the computer.
- MENU →
 (Network) → [Cnct./Remote Sht.] → [Remote Shoot Setting] → [Save Image Size] → [Original]
- MENU →
-
Connect the computer and the camera.
- Refer to the page linked below for how to make connections and configure settings.
Connecting the camera to the computer
- Refer to the page linked below for how to make connections and configure settings.
-
In Remote, enable noise reduction shooting.
- On the mode panel, select [Noise Reduction Shooting].
Alternatively, select [Noise Reduction Shooting] from the [CameraSettings] menu.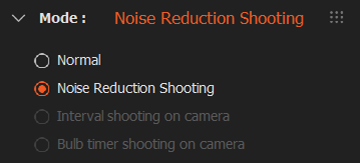
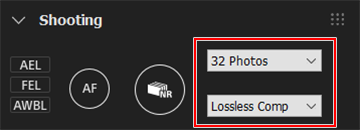
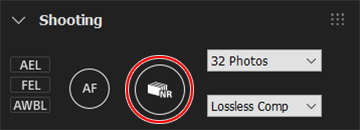
- Select the number of shots and the RAW file type from the available options on the shooting panel.
- On the mode panel, select [Noise Reduction Shooting].
-
Shoot using Remote.
- Click the shutter button on the shooting panel.
The specified number of RAW images is shot continuously.
- Click the shutter button on the shooting panel.
Combining images
Combine the multiple RAW images you shot into a single composite image and save it in the specified file format.
-
Launch Viewer, select the folder containing the RAW images from “Folders” on the left side of the window, and select one RAW image you shot using noise reduction shooting.
-
From the [File] menu, select [Process Composite RAW Shooting] → [Create Noise Reduction Shooting Composite Image].
Alternatively, right-click (Windows) or click while holding down the Control key (Mac) and select [Process Composite RAW Shooting] → [Create Noise Reduction Shooting Composite Image]. -
Configure settings for items such as No. of source images and File settings.
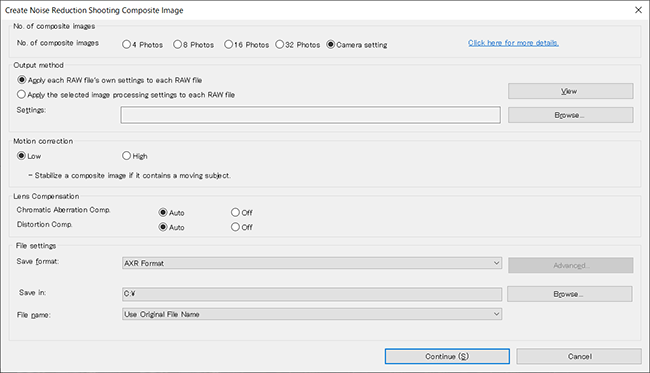
- No. of source images
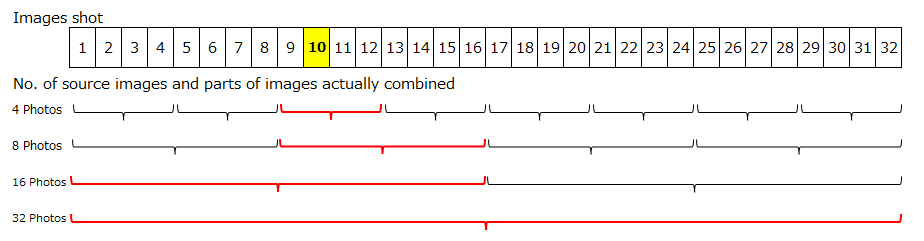
If the number of shots and number of images to be combined are different, the images that are combined will differ depending on the image you select.- Example 1: Combining images when the number of shots is 32 and the “10th” image is selected
- No. of source images is “4 Photos”: The 4 images from the 9th to the 12th image are combined.
- No. of source images is “8 Photos”: The 8 images from the 9th to the 16th image are combined.
- No. of source images is “16 Photos”: The 16 images from the 1st to the 16th image are combined.
- No. of source images is “32 Photos”: All the images from the 1st to the 32nd image are combined.
- Camera Setting: All the images from the 1st to the 32nd image are combined.
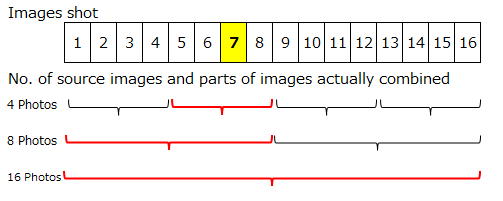
- Example 2: Combining images when the number of shots is 16 and the “7th” image is selected
- No. of source images is “4 Photos”: The 4 images from the 5th to the 8th image are combined.
- No. of source images is “8 Photos”: The 8 images from the 1st to the 8th image are combined.
- No. of source images is “16 Photos”: All the images from the 1st to the 16th image are combined.
- Camera Setting: All the images from the 1st to the 16th image are combined.
- Output method
Select image processing setting values.
To apply other image processing settings, refer to the page linked below.
Saving image-processing settings and applying them to another image or to multiple images at once - Lens Compensation
Select whether or not to apply lens compensation to composite images.
Images to which lens compensation has been applied using this setting cannot have lens compensation applied using another application, even if they are saved in AXR format. - File settings
You can select AXR format, JPEG format, or TIFF format.
If you save images in AXR format, you can then use Edit or another compatible application to adjust or develop the file.
- No. of source images
-
Click [Continue] to start the processing to combine the images.
Wait until a message saying “All processing completed” is displayed.
When processing is complete, the image is saved to the specified destination folder.- The composite processing will be skipped if an image does not have enough information of Noise Reduction Shooting or its file format is not supported.
Note
- There may be cases in which images shot under light sources such as fluorescent or LED lamps cannot be combined correctly.
- If combining images fails because the shooting venue included moving objects, it is recommended that you set [Motion correction] to [High] and retry combining the images. Nevertheless, there may be cases where motion correction cannot be applied successfully due to the shooting venue or conditions.
Adjusting and Developing Images
You can switch to Edit to adjust composite images.
Refer to the page linked below for instructions on using Edit.
Edit window
You can also use Viewer in combination with another application, transferring composite files to the other application for image adjustment.
To use another application in combination you will need to configure settings for the external application beforehand.
Refer to the page linked below for how to configure settings.
Registering external programs
When you register an external program, an item for transferring data to the registered application is added to the [Tools] menu in Viewer.