Connecting the camera to the computer
For the Remote shooting, stabilize the camera with a tripod or using some other method, and then connect the camera to the computer.
The connection and setting methods vary depending on the model.
- ILCE-1M2/1/9M3
- ILCE-9M2/7RM4A/7RM4/7C
- ILCE-7SM3/7RM5/7M4, ZV-E1/E10M2, DSC-RX1RM3, ILME-FX3A/FX3/FX30
- ILCE-7CR/7CM2/6700
- ILCE-7RM6/7M5
- ZV-E10
- ZV-1F/1M2
- ZV-1A/1
- ILME-FX2
- ILX-LR1
- When using another camera
- When using the Mac version on macOS 15 or later, a message asking whether to allow the application to access local networks may appear when Remote is launched. When this message appears, allow connections.
- If you have trouble connecting, refer to the FAQ.
ILCE-1M2/1/9M3
You can connect the camera via USB using a USB cable, wireless Wi-Fi connection, or wired LAN connection.
Make sure that the camera is not connected to a smartphone beforehand.
A. Connecting using USB
- A-1. Connect the camera and computer using the supplied USB cable.
* If a USB cable is not supplied with your camera, use a commercially available USB cable.

- A-2. On the camera, select [Remote Shooting].
Alternatively, select MENU → (Setup) → [USB] → [USB Connection Mode] → [Remote Shooting], and then connect the camera to the computer using a USB cable.
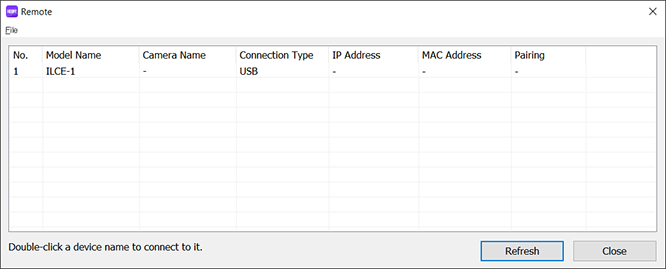
 - A-3. On the computer, launch Remote.
- A-4. In the Device selection window, select a camera to use for Remote Shooting by double clicking.
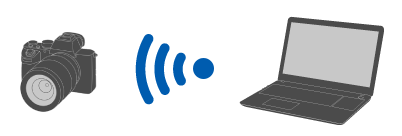
B. Connecting using Wi-Fi Direct
Connect the camera and computer directly using Wi-Fi without passing through an access point.
- B-1. On the camera, select the following setting to display Wi-Fi connection information (SSID and password) for the camera.
- MENU →
 (Network) → [Cnct./Remote Sht.] → [Remote Shoot Function] → [Wi-Fi Direct Info.]
- MENU →
- B-2. Click

 (the network icon) on the computer screen (bottom right on Windows, top right on Mac)* and select the SSID displayed on the camera from the list that is displayed.
* The icon and display position may differ depending on your computer model and settings. - B-3. Use the SSID and password displayed on the camera to establish a Wi-Fi connection between the computer and the camera.
- B-4. On the computer, launch Remote.
- If the name of the camera does not appear, click [Refresh].
- B-5. In the Device selection window, select a camera to use for Remote Shooting by double clicking.
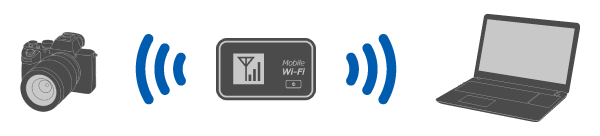
C. Connecting using a Wi-Fi access point
Connect the camera and computer using Wi-Fi via an access point.
- C-1. On the camera, perform the following setting.
- MENU → (Network) → [Wi-Fi] → [Wi-Fi Connect] → [On]
- MENU →
- C-2. Connect the camera to the access point.
- Connect the computer to the same access point.
- Connect the computer to the same access point.
- C-3. On the camera, perform the following setting.
- MENU → (Network) → [Cnct./Remote Sht.] → [Remote Shoot Function] → [Remote Shooting] → [On]
- MENU →
- C-4. A message about access authentication appears on the camera. Select [Access Authen. Info].
- If no message about access authentication is displayed, either perform the following setting on the camera or use pairing to connect. To connect using pairing, refer to “How to pair.”
- MENU → (Network) → [Network Option] → [Access Authen. Settings] → [Access Authen.] → [On]
- MENU → (Network) → [Network Option] → [Access Authen. Info]
- C-5. On the computer, launch Remote.
- If the name of the camera does not appear, click [Refresh].
- C-6. In the Device selection window, select a camera to use for Remote Shooting by double clicking.
- C-7. Refer to the access authentication information displayed on the camera, enter the user name and password on the computer, and click [OK].
- Once the input credentials have been saved, you will subsequently be able to connect without entering a user name and password.
- You can delete the saved user name and password from the menu bar of the Remote application on the computer.
Note
- When entering usernames, passwords, and fingerprints, make sure that no one is around to avoid the information on the screen being seen by others and to prevent unauthorized use.
- If you unmask your password when entering it, there is a risk that it will be revealed to a third party. Make sure that no one is aroundbefore unmasking.
- C-8. Confirm that the fingerprint displayed on the computer matches the one displayed on the camera, then click [Connect].
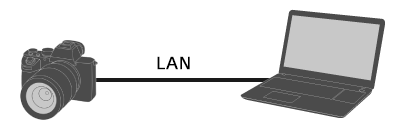
D. Connecting using a wired LAN
Connect the camera and computer using a general LAN cable sold in the market.
- D-1. On the camera, perform the following setting.
- MENU → (Network) → [Wired LAN] → [Wired LAN Connect] → [On]
- MENU → (Network) → [Cnct./Remote Sht.] → [Remote Shoot Function] → [Remote Shooting] → [On]
- MENU →
- D-2. Connect the camera and computer or switching hub using a LAN cable.
* You may need to wait around 1 minute before the LAN cable is recognized.
- D-3. A message about access authentication appears on the camera. Select [Access Authen. Info].
- If no message about access authentication is displayed, either perform the following setting on the camera or use pairing to connect. To connect using pairing, refer to “How to pair.”
- MENU → (Network) → [Network Option] → [Access Authen. Settings] → [Access Authen.] → [On]
- MENU → (Network) → [Network Option] → [Access Authen. Info]
- D-4. On the computer, launch Remote.
- If the name of the camera does not appear, click [Refresh].
- D-5. In the Device selection window, select a camera to use for Remote Shooting by double clicking.
- D-6. Refer to the access authentication information displayed on the camera, enter the user name and password on the computer, and click [OK].
- Once the input credentials have been saved, you will subsequently be able to connect without entering a user name and password.
- You can delete the saved user name and password from the menu bar of the Remote application on the computer.
Note
- When entering usernames, passwords, and fingerprints, make sure that no one is around to avoid the information on the screen being seen by others and to prevent unauthorized use.
- If you unmask your password when entering it, there is a risk that it will be revealed to a third party. Make sure that no one is aroundbefore unmasking.
- D-7. Confirm that the fingerprint displayed on the computer matches the one displayed on the camera, then click [Connect].
How to pair
Pairing is only required on the first connection.
If the camera has a [Connect without Pairing] item, select [Enable] to connect without pairing.
- After connecting the camera and computer via a Wi-Fi access point or by connecting to a wired LAN, on the camera select [Remote Shoot Function] → [Pairing].
The pairing screen is displayed on the camera. - On the computer, launch Remote.
- In the Device Selection Window, double-click the camera you wish to pair.
・If the name of the camera does not appear, click [Refresh]. - Follow the messages displayed in Remote on the computer, and select [Pairing].
- Select [OK] on the connection permission confirmation screen and on the pairing confirmation screen displayed on the camera to finish pairing.
・Pairing information is deleted when you initialize the camera.
ILCE-9M2/7RM4A/7RM4/7C
You can connect the camera via USB using a USB cable, wired LAN connection*, or wireless W-Fi connection.
* Supported devices: ILCE-9M2
-
On the camera, perform the following setting.
- MENU → (Network) → [Ctrl w/ Smartphone] → [Ctrl w/ Smartphone] → [Off]
- MENU → (Network) → [PC Remote Function] → [PC Remote Cnct Method] → Select the connection method of your choice
- MENU → (Network) → [PC Remote Function] → [PC Remote] → [On]
- MENU →
-
The procedure is different for each [PC Remote Cnct Method] selection.
A. [USB]
Connect the camera and computer using the supplied USB cable.
B. [Wi-Fi Direct]
Connect the camera and computer using Wi-Fi without passing through an access point.
- B-1. On the camera, select [PC Remote Function] → [Wi-Fi Direct Info.] to display the camera’s SSID and password.
- B-2. Click (the network icon) on the computer screen (bottom right on Windows, top right on Mac)* and select the SSID displayed on the camera from the list that is displayed.
* The icon and display position may differ depending on your computer model and settings. - B-3. Use the SSID and password displayed on the camera to establish a Wi-Fi connection between the computer and the camera.
C. [Wi-Fi Access Point]
Connect the camera and computer using Wi-Fi via an access point. It is necessary to perform pairing of the camera and computer.
- C-1. On the camera, select [WPS Push] or [Access Point Set.] to connect the camera and computer to the same access point.
- C-2. Wait for [Connected via Wi-Fi.] to appear on the camera, then select [PC Remote Function] → [Pairing].
If the camera has a [Connect without Pairing] item, select [Enable] to connect without pairing. - C-3. Proceed with steps 3 and 4 and follow the messages in the Remote application on the computer to complete pairing.
D. [Wired LAN] (ILCE-9M2 only)
Connect the camera and computer using a general LAN cable sold in the market. After connecting, perform pairing of the camera with the computer.
- D-1. Connect the camera and computer or switching hub using a LAN cable.
* Wait about 1 minute for [Connected via wired LAN.] to appear on the camera. - D-2. Select [PC Remote Function] → [Pairing].
If the camera has a [Connect without Pairing] item, select [Enable] to connect without pairing. - D-3. Proceed with steps 3 and 4 and follow the messages in the Remote application on the computer to complete pairing.
-
On the computer, launch Remote.
-
In the Device selection window, select a camera to use for Remote Shooting by double clicking.
If the name of the camera does not appear, click [Refresh].
ILCE-7SM3/7RM5/7M4, ZV-E1/E10M2, DSC-RX1RM3, ILME-FX3A/FX3/FX30
You can connect the camera via USB using a USB cable or via a wireless Wi-Fi connection.
Make sure that the camera is not connected to a smartphone beforehand.
A. Connecting using USB
- A-1. Connect the camera to the computer using a USB cable.
* If a USB cable is not supplied with your camera, use a commercially available USB cable.
- A-2. On the camera, select [Remote Shoot (PC Remote)] or [Remote Shooting].
Alternatively, select MENU →(Setup) → [USB] → [USB Connection Mode] → [Remote Shooting], and then connect the camera to the computer using a USB cable. - A-3. On the computer, launch Remote.
- A-4. In the Device selection window, select a camera to use for Remote Shooting by double clicking.
B. Connecting using Wi-Fi Direct
Connect the camera and computer directly using Wi-Fi without passing through an access point.
- B-1. On the camera, select the following setting to display Wi-Fi connection information (SSID and password) for the camera.
- MENU → (Network) → [Cnct./Remote Sht.] → [Remote Shoot Function] → [Wi-Fi Direct Info.]
- MENU →
- B-2. Click (the network icon) on the computer screen (bottom right on Windows, top right on Mac)* and select the SSID displayed on the camera from the list that is displayed.
* The icon and display position may differ depending on your computer model and settings. - B-3. Use the SSID and password displayed on the camera to establish a Wi-Fi connection between the computer and the camera.
- B-4. On the computer, launch Remote.
- If the name of the camera does not appear, click [Refresh].
- B-5. In the Device selection window, select a camera to use for Remote Shooting by double clicking.
C. Connecting using a Wi-Fi access point
Connect the camera and computer using Wi-Fi via an access point.
- C-1. On the camera, perform the following setting.
- MENU → (Network) → [Wi-Fi] → [Wi-Fi Connect] → [On]
- MENU →
- C-2. Connect the camera to the access point.
- Connect the computer to the same access point.
- Connect the computer to the same access point.
- C-3. On the camera, perform the following setting.
- MENU → (Network) → [Cnct./Remote Sht.] → [Remote Shoot Function] → [Remote Shooting] → [On]
- MENU →
- C-4. A message about access authentication appears on the camera. Select [Access Authen. Info].
- If no message about access authentication is displayed, either perform the following setting on the camera or use pairing to connect. To connect using pairing, refer to “How to pair.”
- MENU → (Network) → [Network Option] → [Access Authen. Settings] → [Access Authen.] → [On]
- MENU → (Network) → [Network Option] → [Access Authen. Info]
- C-5. On the computer, launch Remote.
- If the name of the camera does not appear, click [Refresh].
- C-6. In the Device selection window, select a camera to use for Remote Shooting by double clicking.
- C-7. Refer to the access authentication information displayed on the camera, enter the user name and password on the computer, and click [OK].
- Once the input credentials have been saved, you will subsequently be able to connect without entering a user name and password.
- You can delete the saved user name and password from the menu bar of the Remote application on the computer.
Note
- When entering usernames, passwords, and fingerprints, make sure that no one is around to avoid the information on the screen being seen by others and to prevent unauthorized use.
- If you unmask your password when entering it, there is a risk that it will be revealed to a third party. Make sure that no one is aroundbefore unmasking.
- C-8. Confirm that the fingerprint displayed on the computer matches the one displayed on the camera, then click [Connect].
How to pair
Pairing is only required on the first connection.
If the camera has a [Connect without Pairing] item, select [Enable] to connect without pairing.
- After connecting the camera and computer via a Wi-Fi access point, on the camera select [Remote Shoot Function] → [Pairing].
The pairing screen is displayed on the camera. - On the computer, launch Remote.
- In the Device Selection Window, double-click the camera you wish to pair.
・If the name of the camera does not appear, click [Refresh]. - Follow the messages displayed in Remote on the computer, and select [Pairing].
- Select [OK] on the connection permission confirmation screen and on the pairing confirmation screen displayed on the camera to finish pairing.
・Pairing information is deleted when you initialize the camera.
ILCE-7CR/7CM2/6700
You can connect the camera via USB using a USB cable or via a wireless Wi-Fi connection.
Make sure that the camera is not connected to a smartphone beforehand.
A. Connecting using USB
- A-1. Connect the computer to the camera using a commercially available USB cable.
- A-2. On the camera, select [Remote Shoot (PC Remote)].
Alternatively, select MENU → (Setup) → [USB] → [USB Connection Mode] → [PC Remote], and then connect the camera to the computer using a USB cable. - A-3. On the computer, launch Remote.
- A-4. In the Device selection window, select a camera to use for Remote Shooting by double clicking.
B. Connecting using Wi-Fi Direct
Connect the camera and computer directly using Wi-Fi without passing through an access point.
- B-1. On the camera, select the following setting to display Wi-Fi connection information (SSID and password) for the camera.
- MENU → (Network) → [Cnct./PC Remote] → [PC Remote Function] → [Wi-Fi Direct Info.]
- MENU →
- B-2. Click (the network icon) on the computer screen (bottom right on Windows, top right on Mac)* and select the SSID displayed on the camera from the list that is displayed.
* The icon and display position may differ depending on your computer model and settings. - B-3. Use the SSID and password displayed on the camera to establish a Wi-Fi connection between the computer and the camera.
- B-4. On the computer, launch Remote.
- If the name of the camera does not appear, click [Refresh].
- B-5. In the Device selection window, select a camera to use for Remote Shooting by double clicking.
C. Connecting using a Wi-Fi access point
Connect the camera and computer using Wi-Fi via an access point.
- C-1. On the camera, perform the following setting.
- MENU → (Network) → [Wi-Fi] → [Wi-Fi Connect] → [On]
- MENU →
- C-2. Connect the camera to the access point.
- Connect the computer to the same access point.
- Connect the computer to the same access point.
- C-3. On the camera, perform the following setting.
- MENU → (Network) → [Cnct./PC Remote] → [PC Remote Function] → [PC Remote] → [On]
- MENU →
- C-4. A message about access authentication appears on the camera. Select [Access Authen. Info].
- If no message about access authentication is displayed, either perform the following setting on the camera or use pairing to connect.
- MENU → (Network) → [Network Option] → [Access Authen. Settings] → [Access Authen.] → [On]
- MENU → (Network) → [Network Option] → [Access Authen. Info]
- To connect using pairing, refer to the procedure for the ZV-E10.
- C-5. On the computer, launch Remote.
- If the name of the camera does not appear, click [Refresh].
- C-6. In the Device selection window, select a camera to use for Remote Shooting by double clicking.
- C-7. Refer to the access authentication information displayed on the camera, enter the user name and password on the computer, and click [OK].
- Once the input credentials have been saved, you will subsequently be able to connect without entering a user name and password.
- You can delete the saved user name and password from the menu bar of the Remote application on the computer.
Note
- When entering usernames, passwords, and fingerprints, make sure that no one is around to avoid the information on the screen being seen by others and to prevent unauthorized use.
- If you unmask your password when entering it, there is a risk that it will be revealed to a third party. Make sure that no one is around before unmasking.
- C-8. Confirm that the fingerprint displayed on the computer matches the one displayed on the camera, then click [Connect].
ILCE-7RM6/7M5
You can connect the camera via USB using a USB cable or via a wireless Wi-Fi connection.
Make sure that the camera is not connected to a smartphone beforehand.
A. Connecting using USB
- A-1. Connect the computer to the camera using a commercially available USB cable.
- A-2. On the camera, select [Remote Shoot/Trn.].
Alternatively, select MENU →
(Setup) → [USB] → [USB Cnct Mode (PORT1)] / [USB Cnct Mode (PORT2)] →
[Remote Shoot/Trn.], and then connect the camera to the computer using a USB cable. - A-3. On the computer, launch Remote.
- A-4. In the Device selection window, select a camera to use for Remote Shooting by double clicking.
B. Connecting using Wi-Fi Direct
Connect the camera and computer directly using Wi-Fi without passing through an access point.
- B-1. On the camera, select the following setting to display Wi-Fi connection information (SSID and password) for the camera.
- MENU → (Network) → [Cnct./Remote Sht.] → [Remote Shoot Function] → [Wi-Fi Direct Info.]
- MENU →
- B-2. Click (the network icon) on the computer screen (bottom right on Windows, top right on Mac)* and select the SSID displayed on the camera from the list that is displayed.
* The icon and display position may differ depending on your computer model and settings. - B-3. Use the SSID and password displayed on the camera to establish a Wi-Fi connection between the computer and the camera.
- B-4. A message about access authentication appears on the camera. Select [Access Authen. Info].
- You can check the information by selecting MENU → (Network) → [Network Option] → [Access Authen. Info].
- You can check the information by selecting MENU →
- B-5. On the computer, launch Remote.
- If the name of the camera does not appear, click [Refresh].
- B-6. In the Device selection window, select a camera to use for Remote Shooting by double clicking.
- B-7. Refer to the access authentication information displayed on the camera, enter the user name and password on the computer, and click [OK].
- Once the input credentials have been saved, you will subsequently be able to connect without entering a user name and password.
- You can delete the saved user name and password from the menu bar of the Remote application on the computer.
Note
- When entering usernames, passwords, and fingerprints, make sure that no one is around to avoid the information on the screen being seen by others and to prevent unauthorized use.
- If you unmask your password when entering it, there is a risk that it will be revealed to a third party. Make sure that no one is aroundbefore unmasking.
- B-8. Confirm that the fingerprint displayed on the computer matches the one displayed on the camera, then click [Connect].
C. Connecting using a Wi-Fi access point
Connect the camera and computer using Wi-Fi via an access point.
- C-1. On the camera, perform the following setting.
- MENU → (Network) → [Wi-Fi] → [Wi-Fi Connect] → [On]
- MENU →
- C-2. Connect the camera to the access point.
- Connect the computer to the same access point.
- Connect the computer to the same access point.
- C-3. On the camera, perform the following setting.
- MENU → (Network) → [Cnct./Remote Sht.] → [Remote Shoot Function] → [Remote Shooting] → [On]
- MENU →
- C-4. A message about access authentication appears on the camera. Select [Access Authen. Info].
- You can check the information by selecting MENU → (Network) → [Network Option] → [Access Authen. Info].
- You can check the information by selecting MENU →
- C-5. On the computer, launch Remote.
- If the name of the camera does not appear, click [Refresh].
- C-6. In the Device selection window, select a camera to use for Remote Shooting by double clicking.
- C-7. Refer to the access authentication information displayed on the camera, enter the user name and password on the computer, and click [OK].
- Once the input credentials have been saved, you will subsequently be able to connect without entering a user name and password.
- You can delete the saved user name and password from the menu bar of the Remote application on the computer.
Note
- When entering usernames, passwords, and fingerprints, make sure that no one is around to avoid the information on the screen being seen by others and to prevent unauthorized use.
- If you unmask your password when entering it, there is a risk that it will be revealed to a third party. Make sure that no one is aroundbefore unmasking.
- C-8. Confirm that the fingerprint displayed on the computer matches the one displayed on the camera, then click [Connect].
ZV-E10
You can connect the camera via USB using a USB cable or via a wireless Wi-Fi connection.
-
On the camera, perform the following setting.
- MENU → (Network) → [Smartphone Connect] → [Smartphone Connection] → [Off]
- MENU → (Network) → [PC Remote Function] → [PC Remote Cnct Method] → Select the connection method of your choice
- MENU → (Network) → [PC Remote Function] → [PC Remote] → [On]
- MENU →
-
The procedure is different for each [PC Remote Cnct Method] selection.
A. [USB]
Connect the camera and computer using the supplied USB cable.
B. [Wi-Fi Direct]
Connect the camera and computer using Wi-Fi without passing through an access point.
- B-1. On the camera, select [PC Remote Function] → [Wi-Fi Direct Info.] to display the camera’s SSID and password.
- B-2. Click (the network icon) on the computer screen (bottom right on Windows, top right on Mac)* and select the SSID displayed on the camera from the list that is displayed.
* The icon and display position may differ depending on your computer model and settings. - B-3. Use the SSID and password displayed on the camera to establish a Wi-Fi connection between the computer and the camera.
C. [Wi-Fi Access Point]
Connect the camera and computer using Wi-Fi via an access point. It is necessary to perform pairing of the camera and computer.
- C-1. On the camera, select [WPS Push] or [Access Point Set.] to connect the camera and computer to the same access point.
- C-2. Wait for [Connected via Wi-Fi.] to appear on the camera, then select [PC Remote Function] → [Pairing].
If the camera has a [Connect without Pairing] item, select [Enable] to connect without pairing. - C-3. Proceed with steps 3 and 4 and follow the messages in the Remote application on the computer to complete pairing.
-
On the computer, launch Remote.
-
In the Device selection window, select a camera to use for Remote Shooting by double clicking.
If the name of the camera does not appear, click [Refresh].
ZV-1F/1M2
You can connect the camera via USB connection using a USB cable.
Make sure that the camera is not connected to a smartphone beforehand.
-
Connect the camera to the computer using a USB cable.
* If a USB cable is not supplied with your camera, use a commercially available USB cable.
-
On the camera, select [Remote Shoot (PC Remote)].
Alternatively, select MENU →
(Setup) → [USB] → [USB Connection Mode] → [PC Remote], and then connect the camera to the computer using a USB cable. -
On the computer, launch Remote.
-
In the Device selection window, select a camera to use for Remote Shooting by double clicking.
If the name of the camera does not appear, click [Refresh].
ZV-1A/1
You can connect the camera via USB connection using a USB cable.
-
Use the MENU on the camera to perform the following setting.
- MENU → (Network) → [Ctrl w/ Smartphone] → [Ctrl w/ Smartphone] → [Off]
- MENU → (Network) → [PC Remote Function] → [PC Remote] → [On]
- MENU →
-
Connect the camera to the computer using a USB cable.
“Connecting... ” will appear on the monitor of the camera.
-
On the computer, launch Remote.
-
In the Device selection window, select a camera to use for Remote Shooting by double clicking.
If the name of the camera does not appear, click [Refresh].
ILME-FX2
You can connect the camera via USB using a USB cable or via a wireless Wi-Fi connection.
Make sure that the camera is not connected to a smartphone beforehand.
A. Connecting using USB
- A-1. Connect the computer to the camera using a commercially available USB cable.
- A-2. On the camera, select [Remote Shoot/Trn.].
Alternatively, select MENU →(Setup) → [USB] → [USB Connection Mode] → [Remote Shoot/Trn.], and then connect the camera to the computer using a USB cable. - A-3. On the computer, launch Remote.
- A-4. In the Device selection window, select a camera to use for Remote Shooting by double clicking.
B. Connecting using Wi-Fi Direct
Connect the camera and computer directly using Wi-Fi without passing through an access point.
- B-1. On the camera, select the following setting to display Wi-Fi connection information (SSID and password) for the camera.
- MENU → (Network) → [Cnct./Remote Sht.] → [Remote Shoot Function] → [Wi-Fi Direct Info.]
- MENU →
- B-2. Click (the network icon) on the computer screen (bottom right on Windows, top right on Mac)* and select the SSID displayed on the camera from the list that is displayed.
* The icon and display position may differ depending on your computer model and settings. - B-3. Use the SSID and password displayed on the camera to establish a Wi-Fi connection between the computer and the camera.
- B-4. On the computer, launch Remote.
- If the name of the camera does not appear, click [Refresh].
- B-5. In the Device selection window, select a camera to use for Remote Shooting by double clicking.
C. Connecting using a Wi-Fi access point
Connect the camera and computer using Wi-Fi via an access point.
- C-1. On the camera, perform the following setting.
- MENU → (Network) → [Wi-Fi] → [Wi-Fi Connect] → [On]
- MENU →
- C-2. Connect the camera to the access point.
- Connect the computer to the same access point.
- Connect the computer to the same access point.
- C-3. On the camera, perform the following setting.
- MENU → (Network) → [Cnct./Remote Sht.] → [Remote Shoot Function] → [Remote Shooting] → [On]
- MENU →
- C-4. A message about access authentication appears on the camera. Select [Access Authen. Info].
- If no message about access authentication is displayed, either perform the following setting on the camera or use pairing to connect. To connect using pairing, refer to “How to pair.”
- MENU → (Network) → [Network Option] → [Access Authen. Settings] → [Access Authen.] → [On]
- MENU → (Network) → [Network Option] → [Access Authen. Info]
- C-5. On the computer, launch Remote.
- If the name of the camera does not appear, click [Refresh].
- C-6. In the Device selection window, select a camera to use for Remote Shooting by double clicking.
- C-7. Refer to the access authentication information displayed on the camera, enter the user name and password on the computer, and click [OK].
- Once the input credentials have been saved, you will subsequently be able to connect without entering a user name and password.
- You can delete the saved user name and password from the menu bar of the Remote application on the computer.
Note
- When entering usernames, passwords, and fingerprints, make sure that no one is around to avoid the information on the screen being seen by others and to prevent unauthorized use.
- If you unmask your password when entering it, there is a risk that it will be revealed to a third party. Make sure that no one is aroundbefore unmasking.
- C-8. Confirm that the fingerprint displayed on the computer matches the one displayed on the camera, then click [Connect].
How to pair
Pairing is only required on the first connection.
If the camera has a [Connect without Pairing] item, select [Enable] to connect without pairing.
- After connecting the camera and computer via a Wi-Fi access point, on the camera select [Remote Shoot Function] → [Pairing].
The pairing screen is displayed on the camera. - On the computer, launch Remote.
- In the Device Selection Window, double-click the camera you wish to pair.
・If the name of the camera does not appear, click [Refresh]. - Follow the messages displayed in Remote on the computer, and select [Pairing].
- Select [OK] on the connection permission confirmation screen and on the pairing confirmation screen displayed on the camera to finish pairing.
・Pairing information is deleted when you initialize the camera.
ILX-LR1
You can connect the camera via USB using a USB cable, wireless Wi-Fi connection, or wired LAN connection.
Make sure that the camera is not connected to a smartphone beforehand.
A. Connecting using USB
- A-1. Connect the computer to the camera using a commercially available USB cable.
- A-2. On the camera, select [Remote Shoot (PC Remote)].
Alternatively, select MENU →(Setup) → [USB] → [USB Connection Mode] → [PC Remote], and then connect the camera to the computer using a USB cable. - A-3. On the computer, launch Remote.
- A-4. In the Device selection window, select a camera to use for Remote Shooting by double clicking.
B. Connecting using Wi-Fi Direct
Connect the camera and computer directly using Wi-Fi without passing through an access point.
- B-1. On the camera, select the following setting to display Wi-Fi connection information (SSID and password) for the camera.
- MENU → (Network) → [Cnct./PC Remote] → [PC Remote Function] → [Wi-Fi Direct Info.]
- MENU →
- B-2. Click (the network icon) on the computer screen (bottom right on Windows, top right on Mac)* and select the SSID displayed on the camera from the list that is displayed.
* The icon and display position may differ depending on your computer model and settings. - B-3. Use the SSID and password displayed on the camera to establish a Wi-Fi connection between the computer and the camera.
- B-4. On the computer, launch Remote.
- If the name of the camera does not appear, click [Refresh].
- B-5. In the Device selection window, select a camera to use for Remote Shooting by double clicking.
C. Connecting using a Wi-Fi access point
Connect the camera and computer using Wi-Fi via an access point.
- C-1. On the camera, perform the following setting.
- MENU → (Network) → [Wi-Fi] → [Wi-Fi Connect] → [On]
- MENU →
- C-2. Connect the camera to the access point.
- Connect the computer to the same access point.
- Connect the computer to the same access point.
- C-3. On the camera, perform the following setting.
- MENU → (Network) → [Cnct./PC Remote] → [PC Remote Function] → [PC Remote] → [On]
- MENU →
- C-4. A message about access authentication appears on the camera. Select [Access Authen. Info].
- If no message about access authentication is displayed, either perform the following setting on the camera or use pairing to connect.
- MENU → (Network) → [Network Option] → [Access Authen. Settings] → [Access Authen.] → [On]
- MENU → (Network) → [Network Option] → [Access Authen. Info]
- To connect using pairing, refer to the procedure for the ILCE-1.
- C-5. On the computer, launch Remote.
- If the name of the camera does not appear, click [Refresh].
- C-6. In the Device selection window, select a camera to use for Remote Shooting by double clicking.
- C-7. Refer to the access authentication information displayed on the camera, enter the user name and password on the computer, and click [OK].
- Once the input credentials have been saved, you will subsequently be able to connect without entering a user name and password.
- You can delete the saved user name and password from the menu bar of the Remote application on the computer.
Note
- When entering usernames, passwords, and fingerprints, make sure that no one is around to avoid the information on the screen being seen by others and to prevent unauthorized use.
- If you unmask your password when entering it, there is a risk that it will be revealed to a third party. Make sure that no one is aroundbefore unmasking.
- C-8. Confirm that the fingerprint displayed on the computer matches the one displayed on the camera, then click [Connect].
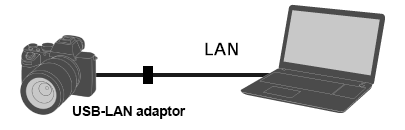
D. Connecting using a wired LAN
Connect the camera and computer using a LAN cable. A USB-LAN conversion adapter is required.
- D-1. On the camera, perform the following setting.
- MENU → (Network) → [USB-LAN/Tethering] → [USB-LAN Connection]
- MENU →
- D-2. Follow the indications displayed on the camera to connect the USB-LAN conversion adapter to the camera.
- D-3. On the camera, perform the following setting.
- MENU → (Network) → [Cnct./PC Remote] → [PC Remote Function] → [PC Remote] → [On]
- MENU →
- D-4. Connect the camera and computer or switching hub using a LAN cable.
* You may need to wait around 1 minute before the LAN cable is recognized.
- D-5. A message about access authentication appears on the camera. Select [Access Authen. Info].
- If no message about access authentication is displayed, either perform the following setting on the camera or use pairing to connect.
- MENU → (Network) → [Network Option] → [Access Authen. Settings] → [Access Authen.] → [On]
- MENU → (Network) → [Network Option] → [Access Authen. Info]
- To connect using pairing, refer to the procedure for the ILCE-1.
- D-6. On the computer, launch Remote.
- If the name of the camera does not appear, click [Refresh].
- D-7. In the Device selection window, select a camera to use for Remote Shooting by double clicking.
- D-8. Refer to the access authentication information displayed on the camera, enter the user name and password on the computer, and click [OK].
- Once the input credentials have been saved, you will subsequently be able to connect without entering a user name and password.
- You can delete the saved user name and password from the menu bar of the Remote application on the computer.
Note
- When entering usernames, passwords, and fingerprints, make sure that no one is around to avoid the information on the screen being seen by others and to prevent unauthorized use.
- If you unmask your password when entering it, there is a risk that it will be revealed to a third party. Make sure that no one is aroundbefore unmasking.
- D-9. Confirm that the fingerprint displayed on the computer matches the one displayed on the camera, then click [Connect].
When using another camera
You can connect the camera via USB connection using a USB cable.
* The displayed terms may differ depending on the camera.
-
Use the MENU on the camera to perform the following setting.
- MENU → (Network) /
 (Wireless) → [Ctrl w/ Smartphone] → [Ctrl w/ Smartphone] → [Off]*
 - MENU → (Setup) → [USB Connection] → [PC Remote]
- MENU →
-
Connect the camera to the computer using a USB cable.
“Connecting... ” will appear on the monitor of the camera.
-
On the computer, launch Remote.
-
In the Device selection window, select a camera to use for Remote Shooting by double clicking.
If the name of the camera does not appear, click [Refresh].