Operation panel
The operation panel provides basic shooting settings such as exposure and image quality. You can also shoot images from the operation panel.
The settings will apply to the camera immediately, and they apply to the Live View as well.
Hint
- You can change the ordering of the panels by dragging and dropping
 (Reorder icon) in the top right of each panel. You can make the panels easier to use by performing customizations such as placing the panel you use most frequently at the top.
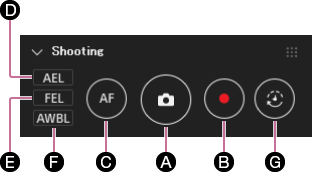
Shooting panel
-
A Shutter button
Click this button to shoot still images.
-
B Movie button
Click this button to shoot movies. Click it again to stop shooting movies.
-
C AF button
Click this button to use autofocus. The camera automatically focuses on the subject. This function is the same as when you press the camera’s shutter button halfway down.
-
D AEL button
The AEL button locks the exposure (AE lock). Use this button to shoot images in the following situations.
・ When you want to set the focus and the exposure separately.
・ When you want to shoot images continuously with a fixed exposure.
-
E FEL button
The FEL button locks the flash level (FEL lock). Use this button to shoot different subjects with the same brightness.
-
F AWBL button
This button locks the white balance (AWB lock). Click this button to lock the auto white balance at a point in time of your choosing.
-
G Interval shooting button
Use this button to perform interval shooting. Interval shooting allows you to take multiple shots with the same angle of view. You can set [Capture start], [Shooting Interval], and [Number of images to capture].
Remote Shooting > Interval Timer Shooting
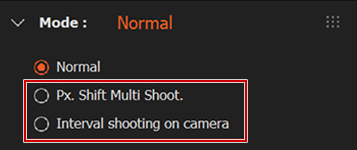
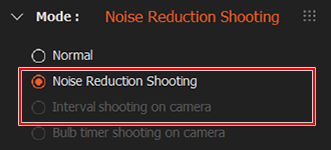
Mode panel
-
When an appropriate camera is connected, the following shooting modes can be selected:
-
Pixel Shift Multi Shooting
You can shoot images with higher resolution by combining four or sixteen images. You can use this feature only if the camera has support for this function. Pixel Shift Multi Shooting
-
Noise Reduction Shooting
You can create low-noise images by shooting 4 to 32 RAW images and then combining them into a composite image. You cannot use this mode if your camera does not support it. Noise Reduction Shooting
-
Interval shooting on camera
Select this menu only when shooting images using interval shooting on the camera. Do not use this button when you set interval shooting by Remote on the computer.
-
Bulb timer shooting on camera
Select this item when shooting using the camera’s Bulb setting. Refer to the camera’s help guide for information on this setting.
-
Shooting for HDR
You can create images with a wide dynamic range by shooting 4 to 16 RAW images and then combining them into a composite image. You can use this feature only if the camera has support for this function. Shooting for HDR
-
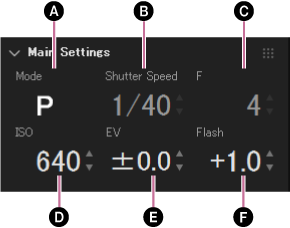
Main Settings panel
-
A Shooting mode
The current shooting mode is displayed. You can change the shooting mode by operating the camera.
-
B Shutter speed
-
C Aperture value
-
D ISO sensitivity (EI value at the time of Cine EI Quick)
-
E Exposure compensation
-
F Flash compensation
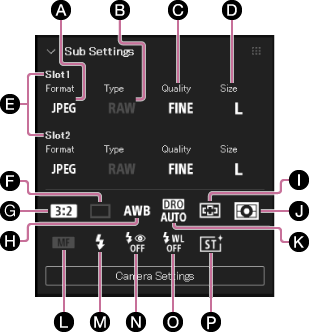
Sub Settings panel
-
A File format
-
B RAW File Type
-
C Image Quality
-
D Image size
-
E Recording Media Settings (not supported by all cameras)
You can set the image file format, picture quality, etc., for recorded images separately for slot 1 and slot 2 on the camera. Set the slot to be used for recording beforehand on the camera at MENU → [Shooting] → [Media] → [Rec. Media Settings].
-
F Drive mode
-
G Aspect ratio
-
H White balance
If you have added the Volume Photography Commands (paid) service, you can set the white balance color temperature in 10K increments.
- Refer to the website linked below for information on the Volume Photography service.
https://helpguide.sony.net/di/volumephoto/v1/h_zz/index.html
- Refer to the website linked below for information on the Volume Photography service.
-
I Focus area
-
J Metering mode
-
K D-Range Optimizer
-
L Focus mode
-
M Flash mode
-
N Red Eye Reduction
-
O Wireless Flash
-
P Creative Look (not supported by all cameras)
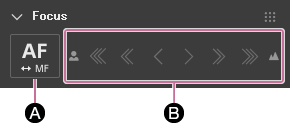
Focus panel
-
A AF/MF toggle
The AF/MF switch may not work when the focus-mode switch on the lens or the camera is set to MF.
-
B Focus distance adjustment buttons
You can adjust the focus distance in the manual focusing mode. The further you move the indicator to the right, the longer the focus distance becomes.
Note
- Depending on the attached lens and the condition of the lens, you may not be able to perform focusing operations from the panel.
- Depending on your camera, the focus panel may not be displayed. Supported Devices
Histogram panel
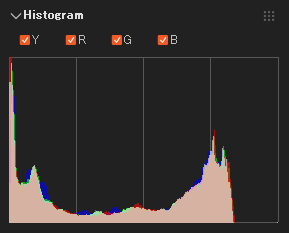
This panel displays a histogram for the image currently displayed on the camera. You can check the brightness, tone, and saturation for each color by selecting Y,R,G, or B.
Image Save Settings panel
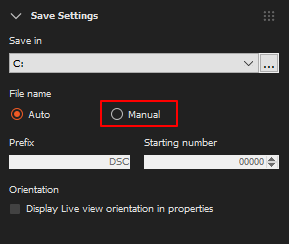
You can set a destination folder for images that you shoot remotely.
When you set [File name] to [Manual], you can specify a string of letters as the prefix and choose the number at which to start the sequence included in file names.