Extended RAW Processing
Extended RAW Processing enables you to create a high-grade image from a single RAW image (ARW) by performing RAW processing incorporating deep learning technology.
This processing performs demosaicing using peripheral information for each pixel to suppress false colors (Moiré patterns) while retaining details in edge portions. It also performs noise reduction to effectively suppress noise.
What’s more, it expands the resolution of images, doubling the number of pixels vertically and horizontally (for a fourfold increase in the total number of pixels). The combination of these processing routines generates images that are vibrant down to the smallest details.
For images stored on your camera, first export the images to your computer and then process them with Imaging Edge Desktop (Viewer).
Make sure to use a computer equipped with a GPU to process high-resolution images.
Refer to the following page for information on switching between your CPU and GPU.
Note
- Depending on the shooting venue and conditions, the desired effect may not be achieved.
Supported Devices
Refer to the following page for information on supported devices.
- Supported Devices
* When using the ILCE-1M2/ILCE-9M3, extended RAW processing cannot be applied to RAW images shot with Lossless Compressed (M) or Lossless Compressed (S) enabled.
Recommended system requirements
- Windows
GPU: GPU supporting Vulkan 1.1 or later
6 GB or more VRAM recommended* Operation is not guaranteed on systems with less than 6 GB of VRAM.
Computer memory: At least 8 GB
16 GB or more recommended* A minimum of 32 GB of memory is required when using Hi-Res processing on images in which the number of recorded pixels exceeds 50 M.
Storage: Built-in SSD - Mac
Mac computers with Apple silicon Computer memory: At least 8 GB
16 GB or more recommendedStorage: Built-in SSD
The time required to complete processing is as follows. (Based on the test conditions defined by Sony)
- For Extended NR, about 20 seconds is required.
- For Extended Hi-Res, about 40 seconds is required.
Depending on the operating environment and the performance of the computer, it may take more time to complete processing.
Note
- It may not be possible to process if the amount of available memory is insufficient. In this case, free up space on the system drive and try processing again.
- The GPU cannot be used for processing if the supported API version is Vulkan 1.0. Upgrade to the latest graphics driver and then try processing.
Extended RAW Processing
Processing is performed on a previously shot RAW image, which is then saved in the specified file format.
-
Launch Viewer, select the folder containing the RAW images from "Folders" on the left side of the window, and select one RAW image (ARW).
-
From the [File] menu, select [Extended RAW Processing] → [Extended NR] or [Extended Hi-Res].
Alternatively, right-click (Windows) or click while holding down the Control key (Mac) and select [Extended RAW Processing] → [Extended NR] or [Extended Hi-Res].
- Extended NR : Allows you to suppress false colors and create clear, low-noise images while retaining the original resolution.
- Extended Hi-Res : Allows you to create images that are vibrant down to the smallest details by applying noise reduction and expanding the resolution by doubling the number of pixels vertically and horizontally (for a fourfold increase in the total number of pixels).
-
Configure settings for items such as Quality Adjustment and File settings.
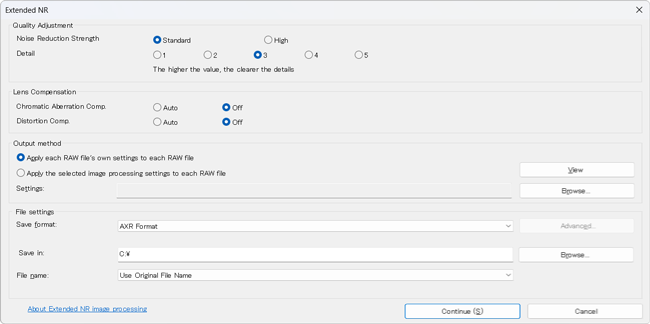
- Quality Adjustment
Select the Noise Reduction Strength and Detail level.
The higher the numeric value selected for Detail, the more vibrant the resulting image will be. However, a higher numeric value also results in more noticeable noise.* If a high numeric value is selected for Detail and Noise Reduction Strength is also set to [High], reproduction of detail takes precedence over noise reduction.
- Lens Compensation
Select whether or not to apply lens compensation to processed images.
* If distortion compensation is applied to an image from this dialog box, it will not be possible to apply lens distortion compensation using Edit.
* Even if an image file is saved in AXR format after applying lens compensation from this dialog box, it will not be possible to apply lens compensation using another application.
- Output method
Select image processing setting values.
To apply other image processing settings, refer to the page linked below.
Saving image-processing settings and applying them to another image or to multiple images at once - File settings
You can select AXR format, JPEG format, or TIFF format.
If you save images in AXR format, you can then use Edit or another compatible application to adjust or develop the file.
- Quality Adjustment
-
Click [Continue] to start processing.
To perform processing, it is necessary to download a model file for the camera used for shooting.
A message is displayed if the model file has not been downloaded. Follow the instructions to download the model file.Wait until a message saying “All processing completed” is displayed.
When processing is complete, the image is saved to the specified destination folder.- The processing will be skipped if the image file format is not supported.
- If the model file is no longer needed, you can delete it.
In Viewer, select [Settings...] from the [Tools] menu (Windows) / [Viewer] menu (Mac), then select [Bulk delete] for "Bulk delete model files" on the [Other] tab.
Adjusting and Developing Images
You can switch to Edit to adjust processed images.
Refer to the page linked below for instructions on using Edit.
Edit window
You can also use Viewer in combination with another application, transferring processed files to the other application for image adjustment.
To use another application in combination you will need to configure settings for the external application beforehand.
Refer to the page linked below for how to configure settings.
Registering external programs
When you register an external program, an item for transferring data to the registered application is added to the [Tools] menu in Viewer.