Shooting Product Reviews
[Product Showcase Set] is useful when you wish to focus on a subject close to the camera, such as when shooting movies for product reviews.
When you set [Product Showcase Set] to [On], [Face/Eye Priority in AF] under [Face/Eye AF Set.] is locked to [Off].
The following is the procedure for switching the camera setting using the [Product Showcase Set] function so that the camera can focus on objects that are closer to it more easily before you start movie recording.
Related camera help guide
Product Showcase Set
Setting the camera
Press the Still/Movie/S&Q button to select the movie recording mode.
The following icon  is displayed at the upper left on the monitor in the movie recording mode.
-
[
Shoot Mode]MENU→
 (Camera Settings2) → [Shoot Mode] → desired setting.
 -
Custom Key
Select MENU →
(Camera Settings2) → [Custom Key] → Assign [Product Showcase Set] to the desired key.* The [Product Showcase Set] function is assigned to the
 (Product Showcase Set) button in the default settings.
 -
[Focus Mode]
MENU →
 (Camera Settings1) → [Focus Mode] →
  [Continuous AF].
Related camera help guide
Hint
You can set whether or not the camera measures brightness based on detected faces.
Related camera help guide
You can set effects that retouch the subject’s skin to make it appear smoother when a face is detected.
Related camera help guide
Guide to using the camera
The following is the procedure for recording movies when the shooting mode is set to  [Intelligent Auto].
Shooting instructions
-
Setting [Product Showcase Set]
Press the Custom Key to which [Product Showcase Set] has been assigned to set it to [On].
- The function switches between [On] and [Off] each time you press the Custom Key.
- Settings for [Product Showcase Set] cannot be changed during movie recording.
-
Setting the position where you want to focus
The following are instructions for when [Focus Area] is set to [Zone].
Select MENU → (Camera Settings1) → [Focus Area] → [Zone].Move the [Zone] focusing frame to the position where you want to focus using the top/bottom/left/right sides of the control wheel, and press the center to confirm.
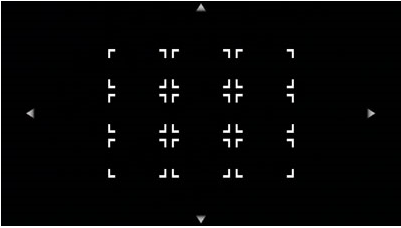
Move the focusing frame using the control wheel.


Confirm the position.
-
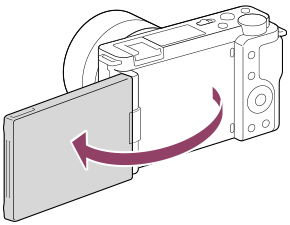
Preparing the camera
Open the monitor transversely, face it forward, and then point the lens at yourself.
-
Checking the angle of view in advance
Determine the shooting range of the camera while checking the image on the screen, make adjustments to display the subject within the focusing frame, and then make sure that the subject is in focus.
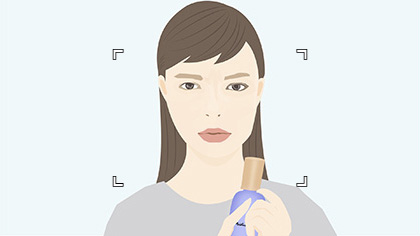
The reviewer is in focus.
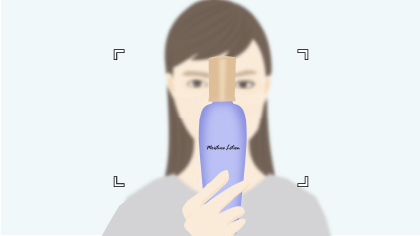
The product is in focus.
-
Shooting movies
Press the MOVIE button to start recording.
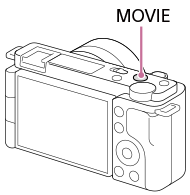
- Press the MOVIE button again to stop recording.
Hint
- You can start/stop movie recording remotely by using the RMT-P1BT remote commander (sold separately).
*The menu screen images on this web page have been simplified for display purposes, and do not exactly reflect the actual screen display of the camera.